Scribed by Susie, is Susie Brown's website
http://www.scribedbysusie.com/Website/Welcome.html
Links for Susie's OutlanderHomepage Articles:
http://blog.outlanderhomepage.com/2016/03/gday-sam-interview-with-sonya-from.html
http://blog.outlanderhomepage.com/2016/03/outlanderhomepage-originals-stone.html
http://blog.outlanderhomepage.com/2016/01/outlanderhomepage-originals-interview.html
This finishes Season two!
Please look for Susie Brown articles in our New Droughtlander part two!
****************************************************************************
“Attend the Tale of Angus Mhor...” An interview with Stephen Walters
By your Aussie blogging lass, Susie Brown.
Outlander Homepage Originals


For the best part of 2 seasons, Angus Mhor endeared himself to Outlander fans everywhere. A fairly minor character in the books, Angus became a vital player on screen. His wicked sense of humour was legendary, as was his banter with Rupert and Claire. When Angus breathed his last after Prestonpans, fans grieved. How would everyone cope without him? But since Angus’ time on Outlander ended, Stephen Walters, the actor who brought him to life, has been very busy. Luckily for his fans, Stephen has shared YouTube clips of his musical and acting talents, as well as interacting frequently on Twitter. We were delighted when Stephen agreed to speak to us here at Outlander Homepage and without any further ado, we present “5 things you didn’t know about Stephen”!


Fact number 1: Stephen has been acting since he was a teenager.
Stephen says:
“I started acting at 15 and later trained at the Bristol Old Vic. However, most of my work has been on either the big or small screen. I have worked alongside actors as varied as Daniel Craig, Samuel L.Jackson, Tom Hardy, Vinnie Jones, Rhys Ifans, Christopher Eccleston and Robert Carlyle, as well as directors as diverse as Danny Boyle, Guy Ritchie, Ronny Yu, Peter Webber and Matthew Vaughan. In 2013, I was nominated for an RTS (Royal Television Society award) for Best Actor in a Drama. This was for "RAGGED", the true story of Ricky Tomlinson, an actor who was controversially incarcerated in the early 1970s for his part in a strike. I have also been involved in 3 Bafta winning dramas: Hillsborough, Buried and The Village.”
Fact number 2: Stephen gave Angus a unique physical character trait.
Stephen says:
“It's my belief that while the writer writes the character, it is the actor who creates it. So when creating Angus, I decided to take my teeth out. I reckoned that Angus had been in a few physical scrapes and I felt that specific aesthetic lent itself to the role. The accent was worked on with the wonderful voice coach, Carol Anne Crawford, but I think that the real ‘voice’ of the character (which is often confused with the accent) is found through different rhythms, personal acting choices and research. Grant O’Rourke (Rupert) and I improvised within the parameters of the script - mostly - but I personally added lots of quirks and mannerisms to Angus that were not specifically written.”
Fact number 3: Accents come easily to Stephen.
Stephen says:
“In my experience, it’s easier to act in another accent than in your own. If you use your own accent, you have to work doubly hard to find the ‘voice’ of the character. My theory is that because I have a musical ear, I can pick up on accents pretty quickly. I am grateful for this, as it certainly comes in handy! I have done Scottish, American, London, Irish, RP (Received Pronunciation, also known as the “typically British” accent) and lots of others. That said, I think that an accent used for accent’s sake is simply mimicry, not acting.”
Fact number 4: Stephen could be a one man band!
Stephen says:
“I play lead and rhythm guitar, drums and a little piano. I write songs all the time. I can write to order if pushed and I enjoy it. I have a huge back catalogue of tunes and I hope to record an album in the not too distant future...maybe even an Outlander album!!”
(NB. Stephen is compiling a charity album as a fundraiser for Bathgate Regal Theatre, run by fellow Outlander colleague, Scott Kyle. To pre-order your own copy, go here: https://bathgateregal.cloudvenue.co.uk/stephenwalterscharityalbum)
Fact number 5: Stephen is working on a secret project!
Stephen says:
“I am currently filming a contemporary western TV series in Canada, but that’s all I am allowed to say at the moment. I am also developing some scripts that I have written and hope to direct.”
We’d like to thank Stephen for generously giving us his time to answer our questions. We’ve loved watching him in Outlander and look forward to whatever comes next!
 |
| Stephen Walters as Zigmas Milko in a scene from Hannibal Rising 2007 |
************************************************************************
“LASTING IMPRESSIONS” When words and visual media combine: a comment on the process of adapting Outlander by your Aussie blogging lass, Susie Brown
Outlander Homepage Originals


Which is better: the book or the film? My answer to this question used to be an automatic “the book”. But these days, I’m not sure that’s true. Sure, there are some diabolical adaptations of books out there - ones that leave you shaking your head and wondering how no-one saw the train wreck that they were creating. But when an adaptation is done right, the two media complement each other. Very rarely, you come across something so spectacularly adapted that the line between book and screen all but disappears. And when that happens, the resulting creation can’t help but make a lasting impression.
I don’t remember a time when I wasn’t able to read. I have lost count of how many worlds I have explored via the printed page. I have been surrounded by books all my life, but one series in particular has imprinted itself on my soul. The introduction to this remarkable world came one afternoon in the late 1990s, in a quirky book and coffee shop at the bottom end of town. Whilst waiting for my cappuccino, I found a story that would change my life. That story was Outlander, by Diana Gabaldon.
Looking back, I think that a few things combined to ensure that I picked that particular book off the shelf. Timing, for one. I had just returned from a whirlwind trip to Scotland with my father. Interest in the history, for another. I had been researching my family tree and knew that there was at least a reasonable chance that some of my ancestors had fought in the battle of Culloden. And so, my interest piqued, I began to read.
To say that I devoured the first book would be an understatement. The story consumed me. I lost all sense of time and place. I loved Claire’s feistiness and Jamie’s protectiveness. My heart swelled as their romance blossomed. And then, something happened that had never happened to me before, despite the many books and millions of words I had read. The characters made me cry. Actual I-can’t-see-the-page-because-I-am-crying-so-hard tears. Tears for characters that on the one hand I knew perfectly well were fictitious, but on the other hand, were so real I felt their joy and pain as if they were members of my own family. When I finished the first book, I moved onto the second without a pause. Then the third. (I had been lucky enough not to discover Outlander until after the first 3 books had been released - I may not have survived the wait between Dragonfly in Amber and Voyager otherwise!) In the almost 20 years since that time, I have eagerly read everything that has been written about the Outlander world. I think I literally squealed when I heard that a series was being produced. Ok, there was a little bit of trepidation in there too - what if they got it wrong? But then I read that Diana Gabaldon was happy, so I relaxed. If “Herself” was pleased, then all would be well!
Finally, season 1 began. I had expected it to be good. I had hoped it would be great. But I wasn’t expecting it to be the all-consuming ride that it was. There literally aren’t enough adjectives to describe the brilliance of what Ron Moore and his team created. My love of the books was rekindled. My admiration for the actors was unparalleled. I found myself thinking about the scenes every day. It was addictive!
I was thrilled to be asked by Outlander Homepage to recap the episodes in season 2. As a newbie blogger, I was determined to do a good job, so I dusted off my copy of Dragonfly in Amber and started to reread, so that I’d be able to make lots of comparisons between book and series. Except that episode one began in 1948, complete with TV Frank, who was far more sympathetic a character than book Frank had ever been. From the get go, things were going to be different. This wasn’t going to be a direct dramatisation of the book.
Of course, neither was season 1. And back then, Diana Gabaldon herself had given her fans plenty of advice about comparing the original to the series. She told us to “Put. The. Book. Down.” (To read her entire post, written just before the finale of the first season, go here: https://www.facebook.com/AuthorDianaGabaldon/posts/909432675766236.) It was sound advice, but of course, I resisted for far longer than I should have, still looking for scenes from the book that I expected to see televised throughout the second season. Some of them appeared. Many more did not. Characters too, changed: appearing or not appearing, dying or not dying - even when the episode was written by Diana Gabaldon herself. By then, I was starting to realise that putting the book down was probably a good thing. (Slow learner, I know!)
In the days since the season 2 finale has aired, and as everyone has started to settle into the latest “Droughtlander”, much has been written about episode 13. While there is almost universal agreement (at least from what I’ve read) that it was a powerful 90 minutes, there are plenty of opinions out there about missing scenes, the introduction of Bree and Roger and the physical appearance of the older Claire. As has always been the way with Outlander fans, these opinions are passionate ones. In my role as recapper for this season, I’ve written over 60 000 words (62 431, to be exact!) recapping each episode’s scenes and offering brief comments on certain plot points and characters. As the season went on, I focused less on the chapters from the book and more on what was unfolding in front of me. Along the way, I’ve learned something about the process of adapting a book into a series and have a whole new respect for the people who undertake this task. So, in my final blog post for this season, I wanted to comment a little more on this.
According to its Wikipedia entry, Outlander is a “multi-genre” novel. It is listed variously as romance, historical and science fiction/fantasy. Right there, any adapter is going to face a problem - how do you successfully adapt something that is all these things? Romance fans are going to be looking for one thing; historical fans another. And are these fans also going to buy a fantasy element? Book fans already know that Outlander can’t be boxed into one genre - like its heroine, it simply can’t be moulded into being something it isn’t. The second book, Dragonfly in Amber, around which season 2 is based, has the added complication of dealing with politics, deception, historical battles/figures and a change of scenery from Scotland to France. The central characters, who spent a large portion of the first book falling in love and getting to know one another amidst a backdrop of danger, are thrown into unknown territory following a horrendous assault. They have just discovered they are going to become parents and must try to change history. How can hundreds of pages of text be conveyed in 13 and a bit hours of television?
The short answer is that they can’t. Not without making changes, at any rate. And one of the first changes was to alter the timeline, not only by bookending the season in the 20th century, but also by reducing the amount of time between Jamie’s rescue at the end of season 1 and the couple’s arrival in France at the start of season 2. In the book, months had passed. In the series, it was much sooner. This had big implications for what became the most commonly discussed topic throughout the season - the love scenes between Jamie and Claire.
Many fans have expressed disappointment over the lack of sex between the couple in season 2 compared to season 1. My personal opinion is that we need to keep the reduced timeline in mind. In the series, Jamie is still a man suffering from the horrors of his abuse. Every time he attempts to be intimate with Claire, he sees Randall’s face. His trauma shows us the extent of his broken spirit. The one thing that had been a strength - his connection to Claire - is shattered. In the book, there were months of recovery and rehabilitation, where he started to come back to himself. Here, it is all still raw. How realistic would it have been, to have lots of sex amidst all the personal turmoil? Would it ring true? Producers, writers and the actors themselves have all said that they never wanted love scenes between the pair to seem gratuitous. How likely is it that someone recovering from a violent sexual assault would be able to have joyous lovemaking sessions? Many relationships fail after rape. It is precisely the strength of the bond between Jamie and Claire that allows them to find each other again. In the books, Claire gives Jamie the chance to fight back against Randall in a scene evoking the supernatural; on screen, she gives him the news that Randall is alive. Both versions are the catalyst for the rehabilitation, but the version we see is the one that makes sense within the storyline that has been developed for the screen and it culminates in the beautiful “Come and find us” scene, which is all the more joyous because of the struggle it has taken to get there.
Then just as they are recovering, the duel with Randall happens and Claire miscarries. Following her physical recovery, the next sexual encounter for Claire is not with Jamie, but with King Louis and is nothing more than a business transaction to ensure Jamie’s freedom. But while her body has healed, her emotions haven’t. When the couple meet again, they have lost a child and are dealing with feelings of anger and betrayal and guilt. How would it be realistic to cram a sex scene in there? Instead, we wait and watch as the two find themselves yet again, when they return, all too briefly to Lallybroch.
In the books, we have many chapters to allow the characters to breathe, to heal. But in a television series with the time constraints of 13 episodes, there isn’t that luxury, as the action must move swiftly towards Culloden. We don’t see sex scenes, it’s true, but we do see many small moments of affection, as Jamie and Claire’s relationship goes from strength to strength, becoming the united team that they always have been, their bond stronger for what they have gone through. It makes their final parting more emotional, more devastating. I would suggest that what we have seen this season is the strengthening of a relationship past its initial romance and attraction, through trauma and grief, forgiveness and trust, leading to understanding and finally separation - and all that is worth the sacrifice of a few bedroom scenes. And really, we have the best of both worlds. If we do as Diana Gabaldon advised, and put the book down, we can watch the relationship from this different perspective - and then return to the books to read the scenes that we missed seeing enacted on the screen.
In interviews before the season began, Ron Moore spoke a little of the process involved in breaking down a book for adaptation. He explained that the story was broken into chunks for each episode. Story arcs were then created, so that each episode had light and shade. Such a process pretty much ensures that events couldn’t unfold exactly as they do in the book. Hundreds of pages needed to be condensed into minutes, so changes needed to be made. Weather, sets, even the availability of actors can also have an impact. The end goal, however, would be to make sure that the things that needed to happen did happen, while preserving as much as possible, the beautiful words from the page.
With one exception, in my opinion, I believe this was achieved. The motivations of characters were maintained and relationships between characters consistent. Where changes happened, they were for a purpose. For example, the appearance of Colum MacKenzie in episode 8 was written solely for television. At the time, I didn’t see the need for his appearance. However, when he reappeared in episode 12, it became clear. We needed to see the deterioration in his health, from the last time he was seen in season 1, to the end of season 2. Episode 8 provided the midpoint, where viewers could see that he looked weaker and older, but his appearance in episode 12 was a shock. It was clear that he was close to death. Of course, Colum’s travelling companion in episode 8 was Laoghaire and this was the change that I disagreed with. In my opinion, the Laoghaire storyline that was invented does change character development in the future - although it remains to be seen whether it works in season 3. I will admit that I was pleased to see that Diana Gabaldon wasn’t supportive of this change either - an example perhaps where everyone should have kept the book firmly in their hands? Time will tell.
If however, we consider an adaptation where everything had indeed been done exactly as written in the book, where all the scenes we had wanted were there - what would have needed to have been sacrificed? I would argue that it would have been a lot. We wouldn’t for example, have had the characters of Rupert and Angus, or Ross and Kincaid, all very minor players in the book. These characters help us understand the life of the highlanders better. We get a glimpse into their loyalty, their friendships, their humour, the bond between the clansmen - all things that make the story richer. We wouldn’t have seen the strong parental bond that Jamie and Claire formed with Fergus. Most of all, we wouldn’t have had TV Murtagh. The character of Murtagh was greatly expanded for television - and quickly became a firm favourite, to the point where many fans hope that another change will see his story continue into future seasons. Can we imagine Outlander now without Duncan Lacroix’s Murtagh? I can’t. By elevating some minor characters and giving them their own story arcs, I would argue that the story is only made richer. Although slightly different to Diana Gabaldon’s original, it is every bit as satisfying.
The other leading characters in the television series are the landscapes and the soundtrack. From the opulence of Paris to the wildness of Scotland, the landscapes allow us to appreciate the visual on a whole new level. We come to love Scotland too and the passion felt by the Jacobites is perhaps more easily understood. Similarly, the beautiful music composed by Bear McCreary heightens our emotions too. From the grandeur of French society, to the beautiful music for baby Faith, to the stirring highland anthems, to the romantic theme music of Jamie and Claire - all this is an addition to the story that is separate to the books, but vital to our love of the story as a whole.
The twentieth century sections of the story bookend the main plot, just as they do in the novel, but whereas the book’s twentieth century is all in 1968, for television the scenes are twenty years apart. It is a big change, but once again, one that serves to heighten both drama and emotion. The 1948 scenes, largely adapted from bits of other books, force us to consider the effect of time travel on the characters left behind. But the main payoff happens when the 1968 scenes appear, as we understand the total devastation that the return causes for Claire. Having seen her heartwrenching goodbye to Jamie at the stones, we understand that the opening moments of episode 1 are literally, for her, only moments later, making her subsequent interactions with Frank totally understandable. The rest of the 1968 scenes then show us a Claire who has been living for twenty years without her soulmate and we marvel at how she has done so, forcing herself into a society that she doesn’t identify with, in order to raise the child who reminds her daily of the man she lost.
Caitriona Balfe pulls this portrayal off beautifully, although some fan discussions have focused not on this, but on the costume choices made by the production team for the older Claire and whether or not they were authentic for the book character. Similarly, discussions about Roger and, more often, Brianna, have focused less on these two actors’ abilities to establish the foundations of two iconic characters and more on their lack of physical resemblance to the book descriptions. Again, I feel the need to follow Diana Gabaldon’s advice, advising putting the book expectations away and focusing on the emotions of the characters. Then we see a woman who has kept going despite losses that would destroy others; a daughter who has never truly connected with her mother, faced with the loss of a man who turns out not to be her biological father and asked to believe that the man who is has been dead for 200 years; and finally a man who must balance the grief he feels at the loss of his father with his attraction towards a young woman and the connection he has to a story that truly transcends time. When we do this, the rewards are huge - particularly when we will have the luxury of at least two more seasons to see the development of all of these characters and storylines. Of course, we also have the luxury of 8 - and soon enough, 9 - books, where we can read to our heart’s content and imagine the characters looking any way we wish. (I, however, can only see the actors when I read now!)
So, ultimately, which is better: the book or the film? For me, in the case of Outlander, the answer is a resounding “neither”. This is because, in my opinion, the two have become interwoven. It is this serendipitous melding of the literary and the visual that has created something new. And the overall impression? Definitely lasting!
These final comments on season 2 have been written by Susie Brown, a teacher-librarian and writer who lives in Australia. She has loved every second of recapping the episodes and thanks Outlander Homepage for the privilege. She’s already looking forward to season 3. Of course, she can’t help herself and is rereading Voyager, which she promises to put down when the time comes!
*************************************************************************
Safe or Slain? What happened to Ross? A Lallybroch Lad’s dilemma!
By your Aussie Blogging lass, Susie Brown
Outlander Homepage Originals
“My Laird. My Laird, is it true? Are we turning back?”
“My Laird. My Laird, is it true? Are we turning back?”
“ Aye. We're going back across the border. Home for winter.”
“ Are they... are the British after us, then? Are they close?”
“ I canna say, Ross, but I'll see you're safe.”
- Episode 11 ‘Vengeance is Mine’ -


This was the conversation between Sam Heughan’s Jamie and Scott Kyle’s Ross during the closing episodes of the second season of Outlander. When at last all seemed lost, Jamie ordered Murtagh to set the Lallybroch men on the road away from the battle, before facing his own fate on Culloden Moor, with Murtagh by his side.
But what happened next???
Outlander fans now await season 3, knowing that Jamie and Claire will be reunited, albeit some 20 years (or 220 years) later. But what they don’t know is the fate of the other highlanders. Throughout season 2, certain changes were made from the book to the screen and it remains to be seen what may yet happen to the loyal men of Lallybroch. Given that Jamie was a man of his word, there is no doubt that Ross and the others would have been led away from the battle - but did they actually get to safety? Or did they end up on Culloden Moor too, despite everyone’s best efforts? And if so, did any of them survive?
It’s certainly something that actor Scott Kyle, who portrayed Lallybroch crofter Ross in the second half of season 2, has wondered. It was Ross who formed a friendship with Rupert after Angus and Kincaid were killed; Ross who met Jamie and the others in the old church following the British ambush and Ross who was sent to bring Jamie to Lord Murray, unaware that he was interrupting Jamie and Claire’s desperate discussions about stopping Charles Stuart once and for all. The character was developed far more for screen than in the books and since his first appearance, Ross fan art and merchandise has been regularly posted on Twitter. Fans are also supporting Scott Kyle’s theatre, Bathgate Regal and the inevitable questioning has begun - will Ross appear in season 3?
It’s a question that Scott Kyle cannot answer as yet, but the actor has stated that he is definitely available to reprise his role if asked. Perhaps a #SaveRoss or a #Iwillseeyousafe campaign would be one way for fans to pass the time during the latest “Droughtlander”!
****************************************************************************From Dragonfly to Droughtlander.. A recap of season 2 episode 13
By your Aussie blogging lass, Susie Brown.
Outlander Homepage Originals
When the credits die away, for the first time in the whole season the Skye Boat melody does not extend into the title sequence. This is a symbol in itself. All anticipation is gone. We have reached the endgame. The Battle of Culloden and the end of season 2 are upon us - and no one is happy. Instead of a musical refrain, there is a television screen.
 An episode of the 1960s television show, “The Avengers” is playing, complete with its strong female character, Emma Peel, who is dressed in leather catsuit and fencing mask and lunging towards an imaginary opponent, sword in hand. Whether the swordplay is deliberately hinting at future events in the episode is unclear, but it is obvious that for now at least, we are back in the 20th century.
When the credits die away, for the first time in the whole season the Skye Boat melody does not extend into the title sequence. This is a symbol in itself. All anticipation is gone. We have reached the endgame. The Battle of Culloden and the end of season 2 are upon us - and no one is happy. Instead of a musical refrain, there is a television screen.

The camera pans out and a date flashes onto the screen: Scotland 1968. A group of children are sitting around the black and white tv, transfixed by the images on the screen. In the middle of them all stands a solemn, bearded man. He is looking at the screen too, but it appears as if his mind is elsewhere. A young woman enters the room and gently reminds him that it is time to get back to the guests who have been asking for him. After an uncomfortable bit of shuffling, he does so. It is clear from his face that he has been hiding in this study, but the time is up. From the earliest moments of the episode, we understand that dealing with loss and the need to find the strength to do the emotionally impossible are going to be recurring themes.
Soon enough, we understand the reason for the reluctance.
 The serious young man is none other than Roger Wakefield, last seen as the cherubic biscuit-loving tyke of 1948. A man grown, he is now hosting a wake and carrying out the wishes of his late father, the Reverend Wakefield, by making a toast to death. Slowly, the mourners are revealed, including Claire, who stands contemplatively in the background, a whisky in hand. Obviously older, she is poised, her hair sleekly styled with grey tinges around her temples. She too, looks unhappy.

The formalities over, Roger is mingling with his guests and accepting condolences, when a tall, red headed young woman catches his eye. It takes some time before he can extract himself from his well wishers to make introductions. Despite his grief, he is clearly interested on finding out who the mystery woman is. Their conversation has barely begun however, when Claire joins the pair, calling Roger by name.
 Quickly some main details are established: Roger wouldn’t remember Claire because the last time he saw her he was only 7 or 8, the Reverend has passed away suddenly from a heart attack, the red haired young woman is Claire’s daughter, Brianna, Claire is now a surgeon, Brianna is a history major, they live in the States and Frank is dead. This is all information known to book readers, but hearing Claire introduce herself as Randall, not Fraser, is still jarring, as is the mention of Frank as her husband, and not Jamie. For tv only viewers, it now becomes clearer why the first half of episode 1 took place in 1948 - at least a bit of groundwork was laid to make the opening moments of this finale less of a shock. Nevertheless, it is still a lot to take in!

Claire asks after Mrs Graham, only to be told that the older woman has also passed away and that Mrs Graham’s granddaughter, Fiona, has since taken over the employ. Wistfully, Claire remarks that while so many things are the same, so many more are different and she excuses herself to take a look around. Left alone, Roger and Brianna continue their awkward conversation, only to be interrupted again, this time by the appearance of the aforementioned Fiona Graham. In her short time on screen, (that only book readers will properly appreciate) actress Iona Claire gives a perfect portrayal of the motivations of this relatively minor character.
Roger excuses himself to farewell his guests, while Brianna and Claire continue to wander the rooms; Brianna with the curiosity of a young woman who knows only that Scotland was a special place to her parents, and Claire with a heart full of memories of a ghost, albeit one that her voiceover says she has determinedly not chased, as Mrs Graham had advised. But as the Jamie and Claire theme begins in the background, sung beautifully by a gentle choir of voices, and Claire’s hands lovingly strokes objects on the mantlepiece, she adds that now that she is back in Scotland, the ghosts have begun to chase her. Still, she and Brianna go to take their leave of Roger and head back to London. But on hearing that they plan to break their journey halfway at a pub for the night, Roger offers them the guest room instead. Claire hesitates, but it is Brianna who deems this a good idea, saying that it is better than “jolting down the wrong side of the road in the dark.”
 She also sees it as an opportunity to see the sights, flirtatiously requoting an earlier remark of Roger’s that Scotland is “beautiful, wild country.” She meets his eyes full on and he is impressed. This is intuitive acting on the part of newcomers Richard Rankin and Sophie Skelton. In these early scenes, they are already laying the foundations, beginning to establish the character traits of two much loved characters.

In the middle of the night, Claire is sitting by the fire sipping a whisky when she is joined by Roger, who immediately pours them both another glass. It is clear that he too has something on his mind. Looking around the room, Roger comments that he had pestered the Reverend for years to throw away the clutter, but now he himself can’t bear to part with any of it. Claire sympathises, adding that there is a lot of history in the room and Roger agrees, adding that the history is not just personal, but Scottish as well. Roger mentions that the College of Inverness wants the Reverend’s library for their archives, but that he plans to keep some rare editions regarding the Bonnie Prince and the Battle of Culloden. This gets an immediate reaction from Claire, which intensifies when Roger reveals that his ancestors had fought in the battle. Roger explains that his true name is MacKenzie, changed to Wakefield when he was adopted by the Reverend after his parents were killed in WWII. With a sad smile, Claire replies that she used to know a lot of MacKenzies, “once upon a time.”
It is as if this admission opens a door for Roger, who begs leave to ask Claire a personal question. With the grief for his father showing fresh on his face, Roger asks Claire how she managed to do it: to say farewell to the person that she loved most in the world. He is of course speaking of Frank, but viewers know who is really on Claire’s mind.
 Raising her eyebrows, Claire admits that she has never been very good at saying goodbye, adding that the hell of it is that the person has gone and that there is no choice but to go on living without them, because that’s what they would have wanted. Roger is becoming tearful, but Claire is dry eyed. This is a strangely composed Claire, and her speech is all the more troubling because of it. The body of Claire has indeed gone on living, but it is all too clear that her spirit has not. Draining her glass and thanking him for the whisky, Claire bids Roger good night and leaves him sitting by the fire. Back in the guest room, Claire gazes at a sleeping Brianna, marvelling aloud at how like Jamie her daughter is. At this point, Brianna’s sleeping silhouette fades, to be replaced by Jamie. We are back in the 18th century. It is 7:23am on the morning of the 16th April, 1746.

***
A gaunt, muddy Jamie is walking with Charles Stuart, making a last ditch effort to convince the Prince that the men are in no condition to fight.
 But Charles is not listening. Gone is his previous high regard for Jamie and with it, any chance that he will listen to the highlander’s reasoning. Instead, a rather impatient Prince brands Jamie his “Thomas”, likening him to the disciple Thomas who would not believe in Christ’s resurrection until he saw the nail marks in Jesus’ palms for himself. Charles stalks away, saying that he will make a believer of Jamie by the end of the day, but the battle will go ahead. Angry, Jamie seeks out Claire, commenting that it is a blessing that Colum didn’t live to see this dark day and that the battle will happen, just as history had foretold. Murtagh joins the couple, reporting on the latest progress of Cumberland’s army, who have already begun their march. Jamie sends Murtagh to inform Lord Murray, as Claire murmurs that there is only one thing left, one possibility. It is not something to be discussed out in the open however, and she leads Jamie inside the house.

***
Time jumps again, and Roger and Brianna are in a car checking out the sights of Scotland. It is reminiscent of the trip that Frank and Claire took in the very first episode of season 1. The two are relaxed, laughing, as Roger acts as historian and explains the significance of the local sites, much in the same way that Frank had done. But while Frank and Claire were at Castle Leoch, Roger and Brianna are at Fort William, trading stories and laughing at Brianna’s bad Scottish accent, intermingled with Roger sharing the grisly history of the place.
 Brianna asks Roger for details about Frank and he responds with his memories of Frank’s fashion sense and his kindness. Brianna agrees, branding Frank the “kindest man in the world.” When Roger adds that he also sees Claire’s kindness, Brianna responds by saying that her mother lives in another world. It is the frustrated utterance of a young woman who has a difficult relationship with her mother, but it is a comment with a poignantly true edge. Claire’s thoughts are indeed in another world, with Brianna’s every word and action unwittingly reminding her of its loss. Pulling her coat around herself, Brianna remarks that the place gives her the chills. For viewers, this is hardly surprising, knowing that she is looking up at the spot where her biological father was flogged and her paternal grandfather died from the shock of seeing it happen, at the hands of yet another distant ancestral relation, Black Jack Randall.

Meanwhile, Claire has driven to another place full of memories, the now dilapidated Lallybroch.
 Surrounded by the ghostly voices of Jamie, Jenny, young Rabbie and her younger self, Claire’s eyes fill with tears to see the ‘Keep Out’ sign and the condition of the place that was once home to her. Sitting on the steps, Claire looks towards the entrance and imagines the figure of Jamie gazing back at her, as in her mind they both recite the love poem: “Come and let us live, my dear; Let us love and never fear; And let amorous kisses dwell; On our lips begin and tell; A thousand and a hundred score; A hundred and a thousand more.“ Brushing her fingers over her lips, Claire closes her eyes as Jamie’s apparition disappears, leaving her alone in the courtyard. Wiping away her tears, she stands and moments later we see her driving away.

***
Time shifts centuries once more - 7:36am on the morning of the battle. Inside Culloden House, Claire hastily explains their final possible move: the death of Charles Stuart. Everything about the battle depends on Charles, she says, so if he were to die, the battle wouldn’t happen.
 Claire shows Jamie the bottle of Yellow Jasmine that she gave to Colum in order to give him a quick and peaceful death. The revelation is a shock to Jamie: in taking his own life, Colum had committed a mortal sin. But Claire carries on: she has been treating Charles for scurvy for weeks and could put the poison into a tea. He would drift off into a deep and permanent sleep and no one would ever know. It is a troubling plan, but their only option and one that Jamie is obviously considering.

***
Back in 1968, Brianna and Roger are enjoying a picnic. Brianna quizzes Roger about his memory of a big event involving Frank and Claire when they were last in Scotland. Roger explains that he was only a wee lad, but does recall finding Mrs Graham crying over a pile of broken things in the tool shed, things that Frank Randall had apparently smashed while in a temper.
 Brianna is confused by this, as she remembers her father keeping his temper tightly under wraps. Roger says that he didn’t think that was the reason for Mrs Graham’s tears, although he can’t remember what was, narrowing down the timeline to either 1947 or 1948. Brianna tells her own story of once breaking open a locked box of Frank’s and finding a letter from Reverend Wakefield, hinting at an incident involving both Claire and Frank. Sure that it was something big, Brianna had found the letter scary and had never mentioned it again. Roger recalls that his father used to keep journals and that if Brianna doesn’t mind “getting a big grubby” they could drag them out of the storage room and look at them. After an awkward joke in which Brianna says that grubby doesn’t bother her and that Roger should see her bedroom, she agrees. They finish their picnic and pack the car.

Claire has driven into town, where we see the number plate of her car clearly. COO 903B. Whether this is a deliberately humorous touch from the designers as a nod to the method of Jamie’s rescue at the end of season 1 has not been mentioned in any official interview, but it certainly provides a moment of amusement for observant viewers! Claire’s mission though, is a serious one: she is seeking the chain of title to Lallybroch. The woman in the genealogical office finds the document easily enough, remarking that it is the earliest one they have in their records. It is a deed of sasine, transferring ownership of the property from James Alexander Malcolm MacKenzie Fraser to James Jacob Fraser Murray.
 Claire smiles briefly at the sight of Jamie’s handwriting, as the woman continues reading the details of the document, including the names of the two witnesses: Murtagh Fitzgibbons Fraser and Claire Beauchamp Fraser, although the final surname has been smudged somewhat. Claire asks what happened after the property was transferred and is told that the property had stayed in the Murray family for many generations. A copy of the deed has been made for Claire and she accepts it gratefully, before asking if a genealogical search can also be done. The woman confirms that it can and asks for the name, which Claire provides: Roger MacKenzie.

In their guest room that night, Claire is teasing Brianna goodnaturedly about her “date” with Roger, mentioning his physique and blue eyes. Brianna teases back, suggesting that maybe Claire should date Roger instead. Claire asks where they had gone and her demeanor changes immediately with Brianna’s reply: Fort William. Brianna asks if Claire has ever been there, to which Claire responds: “Once. Didn’t much care for the place.” t

Her good mood broken, Claire responds distantly to Brianna’s next questions about her own movements for the day, saying that she had just been puttering around the village. Brianna notices the mood change too, asking her mother whether she misses Frank. Claire answers with the obligatory “Of course”, but Brianna is not convinced, adding that sometimes it doesn’t seem as if Claire does, or if she ever loved him at all. Claire is thrown. Instead of answering directly, she deflects, responding to her daughter’s question with “What a thing to say.” But Brianna will not be put off, repeating her question - had Claire loved Frank? “I did,” says Claire, but the answer is far from convincing.

***
The next scene is back in Culloden House, where Jamie and Claire are in earnest discussion. Jamie says that what they are considering is cold blooded murder. “To stop a slaughter,” adds Claire. At this point, the viewers are made aware of something that Jamie and Claire are not: a horrified Dougal is listening to this plan from outside the room.
 “If we kill the Prince,” continues Claire, “we take one life to save thousands.” The conversation is interrupted abruptly, not by Dougal, but by Ross, who has brought the news that Jamie’s presence has been requested by Lord George, as the men are being called to form lines. Jamie tells Ross that he is on his way and after his kinsman has gone, Jamie looks once again at the bottle of poison in Claire’s hand, saying that they would need to move quickly. Claire agrees, saying that she could put it into his tea and give it to him immediately. Neither have noticed that Dougal has entered the room, until he speaks, branding Jamie an ungrateful son of a bastard and Claire a filthy whoring witch. Shocked, Jamie and Claire look at him, speechless, as time shifts once more...

***
Roger and Brianna have arrived on campus, where Roger has a meeting before their great journal excavation can begin. Brianna wanders the building and stumbles across a meeting of the White Roses of Scotland.
 The voice of the presenter, as it passionately decries the loss of the Scottish spirit at the hands of the English, is immediately known to the viewer. Soon, the camera reveals a modern day Geillis Duncan, known in the 20th century as Gillian Edgars. As Brianna watches and listens, Gillian asks the assembled crowd, “Where are the rulers of old, who knew how to look after their people?” She goes on to list 3 great rulers: King Arthur, Richard the Lionheart and Prince Charles Edward Stuart. To both reader and viewer, this third addition is laughable, but Gillian has the crowd in the palm of her hand, asking the crowd to imagine a Scotland that had thrived after a victorious Battle of Culloden. Throwing her arms out wide and with every bit of Dougal MacKenzie’s passionate Jacobite fervour, she proclaims, “I am Bonnie Prince Charlie, You are Bonnie Prince Charlie, We are Bonnie Prince Charlie. Aye! Scotland, Scotland, Scotland!” The crowd joins in the enthusiastic chant, as Brianna watches, impressed. After the lecture, Brianna engages Gillian in conversation and argues points of history. Gillian is intrigued, and given that Brianna is not a student on campus, asks Brianna, “Why are you here?” It is a direct copy of the question that Geillis asks Claire in the 18th century and a clever addition by the writers. Brianna replies that as a history student she enjoys watching history being made. It is another clever line, as Brianna doesn’t know that this is indeed what she has been doing, given that 1968 is the year of Geillis’ own travel through the stones. Roger arrives and the conversation is stopped, but not before Gillian gives Brianna a pamphlet for an upcoming rally.

Claire is also revisiting history. Wandering through Culloden’s visitor centre and museum, she is met with a wax statue of Charles Stuart.
 A passerby comments on the Prince’s height, to which Claire replies that he wasn’t that tall in real life. Stuart could have been great, she continues, with the name, the cause and the support of good men willing to lay down their lives for him. Instead, says Claire, history has taken a fool and turned him into a hero. She walks away, but overhears a couple who are looking at another artefact in a glass case and musing whether or not it is a dragonfly. Claire moves immediately to the case, labelled as containing objects found on the battlefield. In the centre is the piece of amber that Hugh Monroe had originally presented to her as a wedding gift.

***
At 8:18am in Culloden House, Dougal advances on Claire and Jamie, as the latter tries to explain to his uncle that it is not what he thinks. But Dougal is past the point of reason. His emotions escalating rapidly, he says that Jamie has betrayed them all, not only his people but Scotland as well. There is no doubt who he blames, turning to Claire and letting fly a string of insults. Jamie instantly defends Claire, saying that Dougal mustn’t speak that way even in his anger. But Dougal says they are past anger, draws his sword and lunges at Jamie. The fight is brief and vicious, Jamie trying to shield Claire, defend himself and fight off Dougal, while all the while trying to make his uncle see reason.

As Dougal aims a knife at Jamie and prepares to strike, Claire breaks a box over his head, which puts Dougal onto his back. Still his knife is aimed at Jamie’s heart and it takes all the younger man’s strength to turn it around. Claire rushes to Jamie’s side and leans her weight onto his shoulder. The result is immediate, gruesome and heartbreaking. The knife sinks into Dougal’s chest and the desperation from the fight is replaced with shock and remorse, as Jamie begs forgiveness in Gaelic from his uncle’s lifeless body. This is a stunning scene, with tour de force performances from both Sam Heughan and Graham McTavish, whose look of shock at the point of death is exquisite.

As Dougal aims a knife at Jamie and prepares to strike, Claire breaks a box over his head, which puts Dougal onto his back. Still his knife is aimed at Jamie’s heart and it takes all the younger man’s strength to turn it around. Claire rushes to Jamie’s side and leans her weight onto his shoulder. The result is immediate, gruesome and heartbreaking. The knife sinks into Dougal’s chest and the desperation from the fight is replaced with shock and remorse, as Jamie begs forgiveness in Gaelic from his uncle’s lifeless body. This is a stunning scene, with tour de force performances from both Sam Heughan and Graham McTavish, whose look of shock at the point of death is exquisite.
The method of Dougal’s death is a departure from the books, as in Diana Gabaldon’s original, it is Jamie alone who kills his uncle. By having Claire assist Jamie, it underscores the fact that the Frasers are united in everything now and that there is truly nothing they won’t do - both to save each other and in their desperation to stop the battle.
 There is now, however, an alteration from Claire’s claim in an earlier episode that bad things tend to happen when they are apart. Now bad things are also happening when they are together. There is no doubt that this act will have catastrophic consequences, but viewers must wait to see what these are, as we are once again returned to 1968.

***
In the dusty storeroom, Roger and Brianna find the Reverend’s journals, along with an unwanted furry visitor. Roger performs an improvised rat satire to chase it away, explaining to Brianna that it is an old Scottish custom, designed to convince the rat that there is better eating to be had elsewhere. Amused, Brianna remarks that there shouldn’t be a rat to be seen for miles, but Roger has been distracted by the discovery of the toy plane that he had played with as a boy.
 Brianna too, is soon distracted - by a box marked Randall. Opening it, the pair discover photographs of Frank and Claire, a letter of commission for Black Jack Randall signed by George II and a letter from Frank to the Reverend Wakefield, asking the Reverend to abandon research into Black Jack, as he was “not the man I thought.” Confused, Roger and Brianna decide to take the box into the library, as the centuries flip again.

***
It is 8:26am when Rupert discovers Jamie and Claire by Dougal’s body. Horrified, he says that he wishes he could have torn out his one good eye to stop him from seeing the carnage before him.
 Jamie begs Rupert for two hours in which to take care of some things, promising that he will then return to answer for his crime. Reluctantly, Rupert agrees, saying that he will grant the two hours only because of their friendship that now lies murdered along with Dougal and that when Jamie returns, he will damn Jamie’s soul to the fiery pit. The scene ends with Claire and Jamie staring tearfully at one another.

***
The Culloden battlefield in 1968 is a desolate place. Claire wanders around the clan headstones, Frank’s voiceover recounting the battle and what had happened to the highlanders on the fateful day. Stopping in front of the one bearing the name Clan Fraser, Claire meets a woman placing some flowers by its base. “Are you a Fraser?” she asks. “Yes,” Claire replies. “I am.” With a small smile, the woman moves away, leaving Claire alone.
At this point, it has to be said (again) what an amazing actress Caitriona Balfe is. Another review referred to her ability to emote so beautifully when her scene partner was, in fact, a rock. But this is precisely what she does.
 Conjuring up the image of Jamie in viewers’ minds as clearly as if he were there in the shot with her, Caitriona Balfe’s Claire speaks directly to the spirit of her husband. Resting her hand on the headstone, she says that she is not going to cry and that she has come with good news. Lovingly, she tells Jamie about Brianna, named for his father, as she had promised. Claire confesses that she had been angry at Jamie for some time, for forcing her to go and live a life that she did not want, but concedes that he was right: Brianna was safe, loved and raised well. She tells Jamie of the traits that Brianna shares with him and how sometimes it takes her breath away. Sitting by the gravestone, Claire begins with the details of Brianna’s birth and soft music begins. The camera pans back and we understand that Claire has been talking for quite some time, but when she is done, she congratulates herself on not crying, joking with Jamie that she bets he didn’t think she could do that. Despite this though, her eyes do begin to tear up as she speaks of their final day at Craigh Na Dun. She tells Jamie that there was one thing she hadn’t said at the time and that now, finally, 20 years later, it is time to do so. With a small sigh, she whispers “Goodbye, Jamie Fraser. My love.” The Jamie and Claire theme swells behind her as she lays a hand tenderly on the top of the stone and adds, “Rest easy, soldier.” It is so simple, yet so honest and beautiful, that it is difficult to imagine that viewers aren’t at least a little misty eyed as Claire walks away.

But while Claire may have finally got herself to a place where she can farewell Jamie, Brianna’s discoveries are about to turn this on its head. Finding one of the newspaper articles about Claire that we saw when they appeared in episode 1, Brianna is confused by what it says. Reaching for the Reverend’s journal, Roger cautions her, reminding her that if she investigates further she may not like what she finds. But Brianna tells him, “I want the truth.”
A confrontation with Claire soon follows. Brianna has pieced together enough bits of information together to know that Frank was not her father. She demands to know where Claire has been for the past 2 days, asking whether she has, in fact, been with the man who is.
 Claire is thrown by the directness of her daughter’s questions, all the more so because she has just made her own peace with Jamie’s spirit and has decided to move on. She tells Brianna that it is complicated, a choice of words that inflames the younger woman’s temper further. Brianna tells her mother that no, it is quite simple. She has done the maths and Claire was three months pregnant when she returned from “the fairies”. The two woman are looking at each other when Roger inadvertently walks into the middle of the argument, armed with a new piece of correspondence. Sensing what he has landed in the middle of, Roger tries to leave. But Brianna is insistent. Roger hasn’t lied to anyone, she says. It is his house and he is her friend. Reluctantly, Claire agrees and just as reluctantly, Roger sits next to Bree on the couch.

Taking a deep breath, Claire begins her story.
 There was another man, she says, one whom she loved very much. It was this man that was Brianna’s real father. Brianna accuses her mother of lying to her for her whole life, becoming angrier when Claire tries to explain that Frank hadn’t wanted her to know, but wanted to raise her as his own, in America, where they could put the past behind them. Brianna is then suspicious of their presence in Scotland, demanding to know whether Claire had planned some surprise introduction whereby she would be introduced to her real father. When Claire says no, that isn’t possible, Brianna concludes it is because the man has no interest in meeting his daughter, but Claire corrects her, explaining that he is dead. Frank hadn’t wanted Brianna to know about him, Claire repeats, so for 20 years she hasn’t uttered his name out loud. The tears well in both women’s eyes - anger from Bree and relief from Claire, who is now anxious to tell her daughter all about Jamie Fraser.

But Brianna will not let Claire do this, telling her mother that she doesn’t want to know a single thing. She stands to leave, but Roger stops her. Using first “Bree” and then correcting himself to say Brianna, Roger touches her hand gently. “You told me you wanted to know the truth no matter what,” he reminds her. “This is it.” He strokes her hand briefly with his thumb before releasing it and the gesture is all the more intimate for its simplicity. Reluctantly, she rejoins him on the couch and Claire continues.


But Brianna will not let Claire do this, telling her mother that she doesn’t want to know a single thing. She stands to leave, but Roger stops her. Using first “Bree” and then correcting himself to say Brianna, Roger touches her hand gently. “You told me you wanted to know the truth no matter what,” he reminds her. “This is it.” He strokes her hand briefly with his thumb before releasing it and the gesture is all the more intimate for its simplicity. Reluctantly, she rejoins him on the couch and Claire continues.
Claire tells Brianna that Jamie had loved her very much, even though he had not met her. Tears falling freely, she says that Jamie would have raised her, were it not for the Battle of Culloden. She hesitates to say the words, knowing how they must sound. Viewers must wait for the reaction though, as we are taken to the aftermath of Dougal’s death, at 8:34am.
***
With Claire beside him and Fergus looking on, Jamie confesses to Murtagh that he has killed his uncle. With typical Murtagh brilliance (and who doesn’t wish for a Murtagh in their life?) Jamie’s godfather says only, “I can’t say I’m surprised, only that it took you so long” before switching to the practical and asking what needs to be done. In response, Jamie unrolls a document. It is a deed of sasine, transferring the ownership of Lallybroch to Jenny’s eldest son, thereby keeping the estate in the family. To further ensure this, the document is dated from the previous year, before the rebellion and before Jamie’s branding as a traitor. The document needs two witnesses and Murtagh sends Fergus in search of ink and a quill. Murtagh asks if Jamie wants him to deliver the document to Jenny, but Jamie plans to send Fergus, informing the boy that he must ride to Lallybroch at once.
 Jamie tells Fergus that the document must reach Jenny without fail and that it is worth more than both of their lives put together. Fergus says that he doesn’t want to leave Jamie, but Jamie is insistent. It is important, he tells Fergus, that no matter what happens in the battle, that someone remembers. Fergus tells Jamie that he will not fail him and with a smile, Jamie answers, “I know you won’t.”

***
From the look on her face, it is obvious that Brianna is finding this story hard to swallow. Roger too, looks bemused. Sarcastically, Brianna asks her mother how long she has been cooking up the story. Claire admits that it sounds crazy, but Brianna is incredulous. Did Claire really think she would believe such a fairy tale? She is not 5, she reminds Claire. How is she meant to believe that the man who has loved her for 20 years is not her father and that her real father is in fact a tall, red headed, kilt wearing man from the 18th century? Undeterred, Claire tries again. She agrees with Bree that Frank was her father in every way that matters, except for one. He didn’t make her. Claire reaches out to touch her, but Brianna pulls away. Her voice breaking, Claire tells Brianna that she is just like Jamie, repeating again that Jamie would have loved and raised her, if not for the battle. Angrily, Brianna finishes the sentence with her, telling her mother to stop. Desperate to make her daughter believe, Claire takes out the copy of the deed to Lallybroch that the woman from the genealogical office had copied for her earlier and shows Brianna her signature.
But Brianna is furious. She tells her mother to admit that she is not a perfect person and to own up to the fact that she f*cked someone else whilst being married to Frank, just like many other bored housewives.
 This makes Claire equally furious. She uses the same language to defend herself, which shocks Brianna. Claire was not bored, she yells, and what she had with Jamie was far more than f*cking, with Jamie having been the love of her life. Brianna asks Claire why she is doing this and Claire replies that it is the truth. But Brianna won’t believe. Only two people know the truth, she says, and one of them is dead. As she stalks from the room, she utters the sentence designed to hurt: “Too bad it wasn’t you.” With these words, she achieves her aim. Claire’s eyes widen in despair. Roger, an unwilling witness to the whole exchange, gives her a look of pity before following Brianna.

***
At 8:37am, Murtagh and Claire are adding their signatures to the deed of sasine, as Jamie gives urgent instructions to Fergus. He is to stop for nothing except sleep and to hide himself well when he does. Giving Fergus a knife, Jamie tells Fergus that he is a soldier now, one that he loves like his own son.
 A single tear smudges Claire’s signature as she goes to Jamie and Fergus to make her own farewell. “Like our own son,” she echoes, tearfully pulling Fergus into her arms and kissing him. Murtagh too farewells the boy, bowing solemnly to Fergus as he opens the door and heads in search of a horse. We see the despair on everyone’s faces as Fergus looks back one last time.

***
In the pub, Brianna and Roger are discussing Claire’s story. Roger has found some extra documents from the Reverend’s collection that had obviously been important to his late Father’s research. Hesitantly, he mentions the deed of sasine, commenting that it did seem authentic. He adds that Brianna had always said that her mother lived in another world and that perhaps Claire is now trying to show her that world. What’s important, says Roger, is not whether he or Brianna believe Claire’s story, but that Claire herself believes it. What they need to do is to keep an open mind. Jokingly, Brianna responds that she would rather keep an open tab, sending Roger back to the bar for another drink.
Meanwhile Claire has been looking back through the press clippings of her reappearance, when her eyes fall on the pamphlet that Brianna had been given on campus. The pamphlet is complete with presenter’s photograph and Claire looks down at the face of Geillis Duncan.
 Claire remembers the date that Geillis had told her at their witch trial, the date of Geillis’ own travel through the stones : 1968. While the ghosts have been all around Claire, this one is no ghost. Geillis is nearby and Claire sets out to find her.

The next scene sees Claire ringing the door bell of a house, which is answered by a dishevelled looking man. The house belongs to Gillian Edgars and the man is Greg, Gillian’s husband. He invites Claire inside and pours them both a drink. Claire tells Greg that she will not be in the area long and would like to say hello to her old friend, if he will tell her where she is.
 Greg replies that Gillian is probably with the Roses, or as he calls them, the bloody nationalists, adding that she spends all her time at the institute, using his money to pay for courses and filling notebook after notebook with her findings. Finally, he admits to Claire that following an argument where he told Gillian that she should get a job and learn to type, she had left him and he hasn’t seen her for weeks. He drains his glass, hugging the bottle close and closes his eyes. He is a pathetic figure, asking Claire if she will tell “Gilly” to come home should she run into her and to tell her that he loves her. Claire agrees and with Greg now passed out in the chair, she takes Gillian’s notebooks and lets herself out.

But it is not Claire who next runs into Gillian, but Brianna, when Gillian comes into the pub following the rally. Brianna apologises for missing it, adding that she and Roger had been having a whisky. (As an aside, in the books, Brianna abhors whisky.) Roger says that it has been a tricky day, to which Brianna says that her mother is insane.
 Gillian smiles, saying that this is a sentiment echoed by daughters everywhere. Brianna talks of attending the next rally, but Gillian replies that she is leaving that evening, in order to further the cause and book readers and tv viewers alike now know what form that leaving will take. As a final piece of advice, Gillian encourages Brianna to keep asking the hard questions, as that is the way the world changes.

By the fire, Claire is reading the notebooks, filled with Geillis/Gillian’s theories on time travel. It is obvious that thought and preparation has gone into them, and Claire is shocked to read that her one time friend believed that a human sacrifice was necessary for travelling through the stones, as well as gemstones for protection and guidance.

Realising that Geillis will soon be making her way to Craigh na Dun for her 1968 journey, Claire wants to warn her, to hopefully prevent her friend from the destiny that awaits her in the 18th century, where she will burned as a witch.

Realising that Geillis will soon be making her way to Craigh na Dun for her 1968 journey, Claire wants to warn her, to hopefully prevent her friend from the destiny that awaits her in the 18th century, where she will burned as a witch.
***
At 8:43am, Jamie gives Murtagh his last orders. He tells his godfather to gather the Frasers of Lallybroch together and to get them away from the battle. Everything will be chaotic, he reasons, and no one will try and stop them. Jamie wants the men to be sent home. No matter how righteous, he says, the battle has been doomed from the start. They have done all they could, but it is over and, like Colum had predicted, Jamie will not have his kin die for nothing. Murtagh asks what Jamie will do. Jamie replies that he will take Claire to safety and then turn back to Culloden to fight until it is done. Nodding, Murtagh promises to guide the Lallybroch men to safety and set them on the road home, but will then return to fight by Jamie’s side. Jamie tries to prevent him, repeating that he doesn’t want Murtagh dying for nothing. But Murtagh only smiles at his godson.
 “I won’t be,” he says. “I’ll be dying with you.” Jamie can do nothing but nod in agreement. This is a beautiful moment between the two men, underscoring the loving bond they have always shared. Murtagh is every bit as heroic as Jamie, all the way along thinking of nothing but his godson’s wellbeing. Even when all is lost, Murtagh will not have Jamie die alone and viewers are as moved as Jamie by this ultimate sacrifice.

***
Claire is preparing for bed when Brianna comes into the room. Laying down an olive branch of sorts, Brianna says she doesn’t want to argue. She suggests that they agree that she has a father who isn’t Frank and that while she doesn’t want to discuss Claire’s “time travel delusion”, she does want to know more about Jamie. Smiling, Claire agrees. Jamie was tall, she begins, with red hair just like Brianna’s. His father’s name was Brian, which is where Brianna’s name came from. Jamie spoke French, played chess and had a sister, called Jenny. Taking Brianna’s hand, Claire says that it would take too long to tell her everything, but that she will. She begins to tell Brianna of the afternoon she has spent by Jamie’s grave at Culloden, but Brianna stands immediately, saying that this is where Claire loses her. But Claire grabs her hand. “I didn’t intend to fall in love,” she says. “In fact, I fought against it. But I couldn’t deny what I felt for him. I tried, but I couldn’t. It was the most powerful thing I had ever felt in my life.” Brianna says nothing, but we see her disbelief waver a little.
Roger is in the study when Claire appears a while later. He asks after Brianna and upon hearing that the two women are talking, comments that this is an improvement on shouting. Holding the White Roses of Scotland pamphlet, Claire asks if Roger knows Gillian Edgars. Roger replies that he doesn’t really know her, other than when Brianna had taken the pamphlet from her. This shocks Claire, asking if Brianna had in fact met her. At this point, Brianna enters the room, proclaiming her admiration for Gillian, even if she is a bit crazy on the whole “Scottish nationalist thing”. Claire asks if Brianna knows where Gillian is, as she needs to find her. Roger mentions the pub conversation, saying that Gillian had mentioned going away to further the cause and he doesn’t believe that she would be back. Claire mutters that Gillian must be going through the stones and Brianna starts to lose patience.
But Claire will not be dissuaded. Pointing to Gillian’s picture on the pamphlet, she tells Brianna that Gillian is Geillis from the witch trial, the woman who saved Claire’s life. If she can stop Gillian from going through the stones, Claire hopes to be able to do the same for her friend. But then she stops. She looks at Roger and announces that she can’t do any such thing, because of him. Roger is rightfully confused, so Claire explains. She has investigated his family history, she tells him and his 7 times great grandparents had been unable to have children, so they had been given one to raise: the child of Dougal MacKenzie and Geillis Duncan. “So,” says Roger, “you’re saying that my ancestors are actually the war chief that you spoke of and the witch?”
 Brianna admonishes Claire for trying to drag Roger into the story, but Claire retorts that Roger has the same right as Brianna to know who he is. Roger responds that if this is all true then Gillian has to be stopped, particularly if she is going back to be burned alive. But Claire is worried about the implications of stopping Gillian. What if it means that Roger will never be born? Roger reasons with her: how can he not be born if he’s already there? He can’t simply evaporate. But Claire is still hesitant, saying that she doesn’t know how it all works. Brianna asks Roger if he is actually buying the story. Not taking his eyes off Claire, Roger answers that he doesn’t know, but at the very least they should find Gillian and warn her. Claire agrees, saying that at least that way she can warn Gillian not to draw attention to herself in the past. Exasperated, Brianna says that Roger is feeding Claire’s delusions and stalks from the room, as Claire calls after her.

In the hallway, Roger agrees that perhaps he is feeding Claire’s delusion, but that this is their opportunity to make Claire face facts. Brianna asks him what will happen if Gillian is just as crazy. Roger replies that perhaps it means that they will watch as a woman slams her head into a 5 tonne block of granite, but either way, it will give them a chance to put a stop to it all. Brianna can’t fault this logic and agrees.
***
At 8:54am, Jamie is leading Claire in the opposite direction to the marching men. Finally she asks where they are going. He responds that while Red Jamie will not get far, he can save her and he will. They can leave together, she says, sail away somewhere. But Jamie tells her that the ports are closed and he will take a bullet or a blade over hanging or the wrath of the MacKenzies. If he is a dead man already, then he will choose the battlefield. Claire starts to panic, saying that she will stay with him. She asks if, at the witch trial, he would have left her if she had gone to the stake with Geillis?
 He responds that he would have gone to the stake with her and to hell and beyond if necessary, but the difference is that he was not carrying her child. This brings Claire up short. It’s too soon to know for sure, she says, but Jamie is insistent. She has never been late in her courses, he tells her, and she hasn’t bled in two months. Claire can’t believe that he had kept count in the middle of a war, but confirms that he is right, although she hasn’t known herself for long. They stand for a moment, hands over her belly, his shaking as he says that the child will be all that is left of him and that they must go. Her distress builds and she repeats that she can’t leave him. He reminds her of his word to Rupert and of her own to him: that if it came to it, she would go back through the stones, back home. “But you are my home,” says Claire, her eyes full of tears. “And you are mine,” he responds, “but this home is lost and you and the bairn must go to a safe place, to a man who can care for you both.” She knows he is right, but it is tearing her apart. “There is no time,” he says, holding out his hand for her to mount the horse behind him.

***
Petrol is being poured over a body as night falls on Craig Na Dun. Roger, Claire and Brianna arrive, Claire recognising Greg Edgar’s car. The body is set alight as Claire leads the way towards the stones and the others follow.
 Brianna asks what the smell is and Roger, in a brilliant echo of his witch ancestor’s line from the season 1 witch trial, comments that it smells like “a f*cking bbq.” But they are too late. Claire screams out Geillis’ name, but all they can do is watch as, far from smashing her head into the rock, Gillian Edgars passes straight through the stone and disappears. Roger and Brianna cannot believe what they have witnessed, nor what they can hear. Both of them comment on a loud buzzing noise, that is getting louder. This is a vital point for future events in future seasons.
 It is not lost on book viewers, and hopefully not on tv only ones either. Claire sends Roger to go and get help, while Brianna and Claire stare first at the stones and then at each other.


***
Jamie leads a reluctant Claire into the circle of stones. She asks how she will explain everything. With a gentle smile, Jamie tells her that he will leave that to her, to tell Frank what she wants about him; about them both. If Frank wants to hear, Jamie says, as he takes Claire’s hand, he asks her to tell Frank that he is grateful, that he trusts him and that he hates him to the very marrow of his bones.
 He pulls Claire towards the centre stone, but she baulks. The buzzing is so loud, she tells him and she is not ready. Pleading, she begs him to go with her, to try and go through the stones, imploring him to hear the buzzing that she does. But he can hear nothing and besides, he says, touching the stones to no effect, it isn’t his place. His destiny is on Culloden Moor.

But Jamie promises to find her. “If I have to endure 200 years of purgatory, 200 years without you,then that is my punishment that I have earned for my crimes.” He reaches out a hand to stroke her face as he continues.
 “For I have lied, killed, stolen, betrayed and broken trust.” His hand hovers over her belly, in an unspoken acknowledgement of Faith. Her face is a picture of misery, as he draws her closer. “But when I stand before God, I’ll have one thing to weigh against all the rest.” He kisses her. “Lord, you gave me a rare woman.” He kisses her again and she clings to him desperately. “And God I loved her well.” Overcome with sorrow, with love and with need, the two sink to the ground in their final passionate goodbye.
 This is the speech and scene that book readers have been waiting for, and Sam Heughan and Caitriona Balfe smash it out of the park. It is hard to imagine it being done any better; the despair of the two characters being felt by every viewer watching.
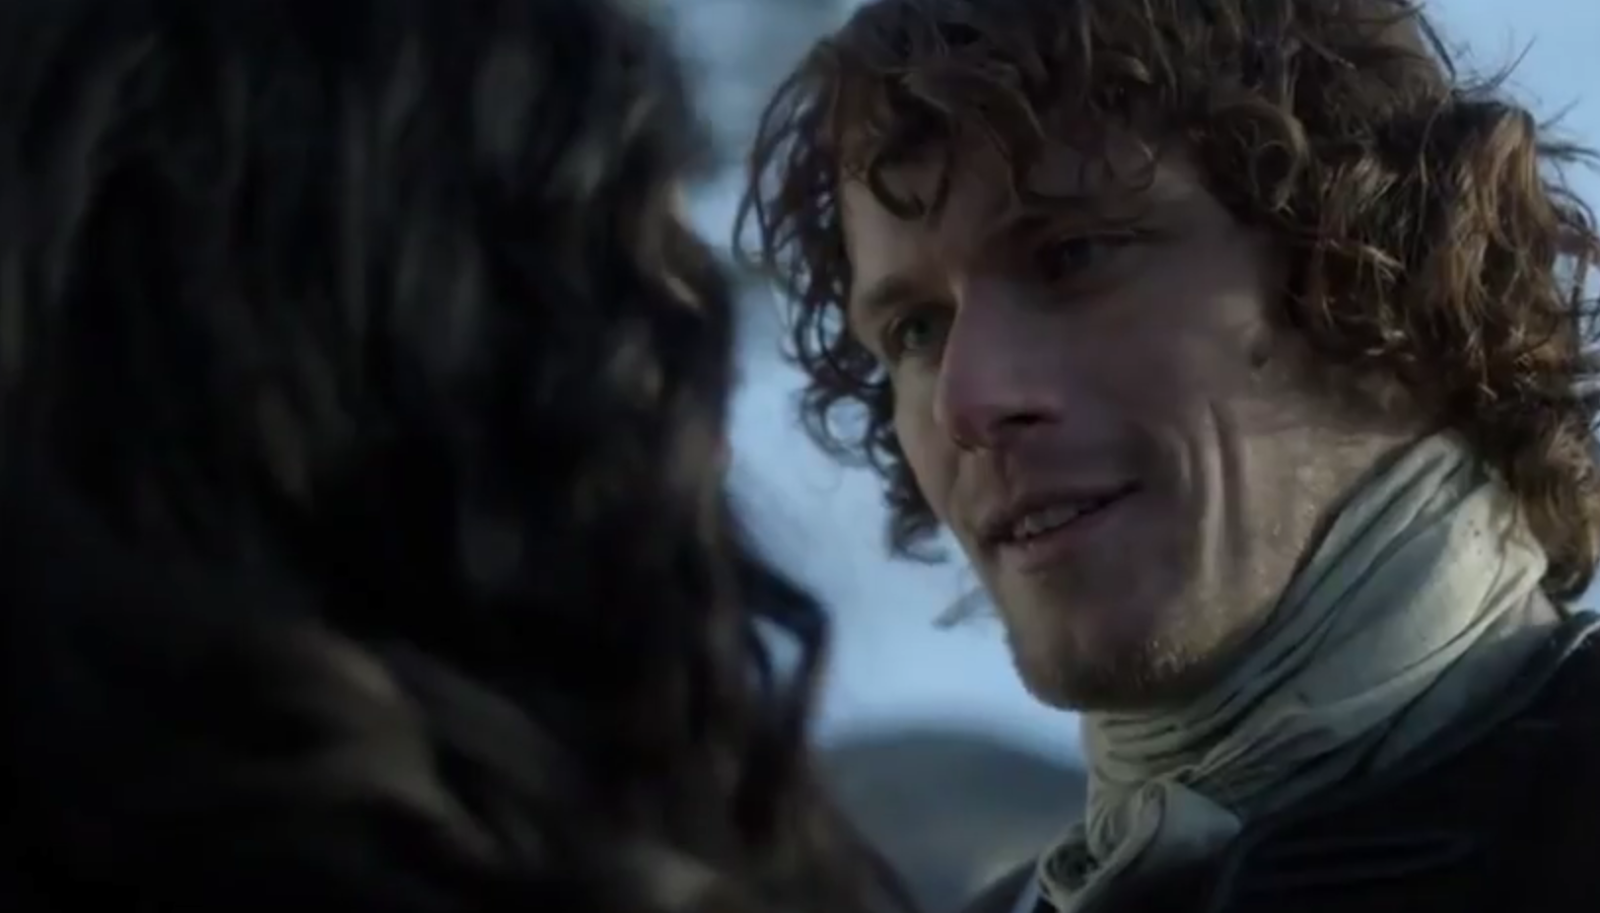

Gunfire is heard as they sit up. The battle of Culloden, the battle that they have given everything to try and prevent, has begun. From her pocket, Claire takes the piece of amber that Hugh had presented to her as a wedding gift, wraps it into her scarf and gives it to him.
 “Keep it with you,” she says. “Blood of my blood.” “And bone of my bone,” he adds. “As long as we both shall live,” she whispers and they kiss. Pulling Claire to her feet, he places a ring onto her finger. “This belonged to my father,” he says. “Give it to the bairn when he’s old enough.” Claire agrees, adding that she will name the child Brian, in honour of Jamie’s father.


The time has come. Eyes locked, arms around each other, Jamie almost waltzes Claire backwards until she is in front of the centre stone. “I love you,” she whispers, tears falling freely. “I love you.” “And I you,” he replies. With one final kiss, he turns her around and links his fingers through hers. Only then, when she cannot see his expression, do we see the full anguish on his face, as a tear slides down his cheek.
 He whispers brokenly, “Goodbye, Claire” and bows his head, their hands reaching forward together to touch the stone. In the books, there is a line where Claire says that she can actually hear her heart break. This is the moment where the hearts of viewers everywhere break and it is virtually impossible to remember that these are two actors recreating a piece of fiction. It is painful, beautiful and utterly, desperately sad and we fully understand Claire’s anguished cry at the stones at the beginning of episode 1, which would have come only moments after these events.

***
“It’s true, then!” says Brianna, as she and Claire run away from the stones. “Everything you said is true.” Brianna asks if the body was that of Gillian’s husband, asking if someone has to die when people travel through the stones. Claire reassures her that while Geillis had believed a sacrifice was needed, no one had died in her own journey. Suddenly, Brianna realises something else. “Is this the last place you saw my father?” she asks. Claire says simply, “Yes.”
Once again, generations echo each other. As Jamie had done when first learning of Claire’s travel after the witch trial, Brianna says,
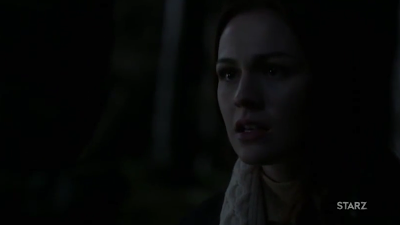 “I believe you. I don’t understand it, but I believe you.” She then asks Claire for nothing but truth between them from now on, unaware that she is speaking almost the exact words that her father had spoken. But this similarity is not lost on Claire, who strokes Brianna’s face and tells her that she is so like her father, before readily agreeing to Brianna’s request. At last, the two women embrace.

The first hint of dawn is breaking as Roger returns. He has anonymously called the police, but is unsure how long it will be before they arrive. Brianna asks Roger to tell Claire what he had discovered. Pulling the papers from his pocket, Roger tells Claire that it was some research the Reverend had done at Frank’s request and that he is uncertain if the Reverend had ever sent it.
 Claire asks what the research says and Roger explains that after the battle of Culloden, a few seriously wounded Jacobite officers had taken refuge in an old house for two days before being taken out to be shot. All,that is, apart from one Fraser of the Lovat regiment, who had escaped execution. Claire is guarded, saying that there were a lot of Frasers on the field that day. Roger agrees, but adds that there were only five Fraser officers, four of whom are mentioned on the memorial plaque at the Beauly church. Hardly daring to hope, Claire asks who the 5th officer was.

“James Fraser,” says Brianna. “My father.”
Claire smiles. “Jamie,” she says. The Jamie and Claire theme music begins softly, as the realisation hits. Jamie had not died at Culloden. Roger confirms this. “He meant to die,” he says, “but he didn’t.”


“He survived,” Claire says, as the music builds. “He survived!” She turns back towards the stones as the sun begins to rise above them. “If that’s true,” she says, with a look at Bree, “then I have to go back.” The sunlight reflects in her eyes as the rays surround the centre stone. The music builds to its climax and the episode - and season - ends on a note of hope.

This final episode answers the questions posed by the first and we are left full of emotion for all that has come in between. The themes of love against all odds; heroic actions; blind faith to the point of destruction; death, loss, forgiveness, friendship and finally hope that exists and endures - all these have been covered, each episode leaving us with something to think about, grieve over or rejoice in. Kudos to all.
This recap was written by Susie Brown, a teacher-librarian and writer who lives in Australia. She has learned so much whilst writing about this series, which she wants to address in one last indulgent post - but for now, her heart is full of love and admiration for all who have brought Diana Gabaldon’s words to life.
****************************************************************************
"Lallybroch Lad" Part 2 - Kincaid speaks! An Interview with Gregor Firth by Susie Brown
OutlanderHomepage Originals


During season 2, viewers were treated to an all too brief glimpse of the character of Kincaid, one of the Lallybroch men who came with Jamie to join the Fraser clan. Kincaid had the dubious distinction of being the “first to fall” on screen, so his time on the show came to an end after episode 10. By contrast, the actor who portrayed him, Gregor Firth, has been amazingly busy, both pre and post Outlander and he very kindly took a few moments out from his hectic schedule to chat to us.
OHP: Tell us something about yourself - how did you get into acting? What other shows/roles have you been involved with pre Outlander?

From there, I studied drama at school, along with music and got good grades in both. Opportunity was never far away, as I did shows in high school with a local Edinburgh theatre company and performed as a child actor in the Edinburgh Festival Fringe many times. This in turn, opened a lot of doors for me and led to many great experiences, including going to Kansas for a summer to join a theatre troupe and do a show, which will always be a very fond memory.
I went on to study at Queen Margaret University and gained a Bachelor of Arts degree with Distinction. This really launched my adult career. Since graduating, the world’s been my oyster. I’ve toured a show in China for 3 months; toured the USA for 6 months; appeared in various tv shows like River City, Shetland, (and Outlander, obviously!), been in various TV commercials and have performed in several shows at the Royal Lyceum Theatre and Traverse Theatre here in Edinburgh, as well as with the Citizens Theatre in Glasgow.
OHP: Ross and Kincaid were Lallybroch’s answer to Rupert and Angus. How much time did you have to work with Scott Kyle before filming your scenes? Tell us a bit about your character - did you give him a back story?
Gregor: Scott and I didn’t know each other before filming, though I knew of him from "Kajaki" as I'd been up for a role in the same movie. We instantly became good mates. We both knew that we didn’t have the biggest parts in the show, certainly my character, so we worked closely together on our scenes to try and make them as good as we possibly could. It was great to work alongside Scott. As for character development, I found, with Kincaid, that he really was there in the moment, called up to fight for his country alongside his friend, so I wanted to bring that to the screen, rather than just saying "Oh, you know. . . wife, six kids, horse and cart . . . . what more does a man need!”

OHP: Can you tell us a little bit about preparing for the battle scenes? The overall impression for viewers was that we were watching a group of men gradually becoming well trained soldiers - did it feel like that? Did it take a long time to get all the movements etc right? Was there a feeling of camaraderie amongst the men, or was there just a lot of sitting around?!
Gregor: The fight training was the most intensive, naturally, as it must be correct. When you’re dealing with weapons, especially near people’s faces, every move must be precise otherwise someone could get hurt. As depicted, we progressed in training, but it was mainly shot over a few weeks, so it didn’t really feel like we were being formally trained as such. I was just desperate to get an axe in my hand and kill me some redcoats. . . . I guess I got my wish. . . just!
OHP: The scenes leading up to the Battle of Prestonpans looked COLD! How long did these sequences take to film? Can you talk about what it was like to film the battle sequences in the tent?
Gregor: Prestonpans was cold. . . . We were on long shoot days starting early and finishing late into the night, but there were always warm places to hide away when you weren’t on screen - and plenty of hot coffee and tea. Plus, with all the layers of costume, I really didn’t feel the cold. We shot in a massive marquee as the smoke, or mist effect builds a lot easier when you’re not competing with outside elements. It was fun to shoot - very very muddy and damp, but a great thing to film. . . Who doesn’t like running through mist with a shield and axe in hand shouting Gaelic expletives?

OHP: Before the battle, Ross and Kincaid share a beautiful conversation where they each make a will of sorts, leaving possessions and responsibilities to the other. Did filming scenes like that make you think about your own mortality?
Gregor: Not really. . . I was just glad we had the scene to solidify our bond, or brotherhood if you like, and cement our friendship. They were very close, Ross and Kincaid. . . but I do wonder if Ross will go see my wife and kids, or just pinch the coin I’d stashed!!!
OHP: How did it feel to be the first “casualty of war” at Prestonpans? Was Kincaid’s death scene challenging to film?
Gregor: I filmed an actual death scene where I wore a squib and my chest exploded as I ran forward in the battle, but it wasn’t used in the final cut. It was certainly a definitive death. One of those "Oh, you know he's not coming back from that" type of deaths!
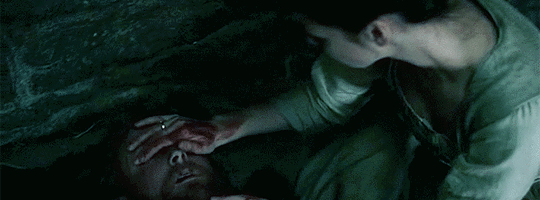

OHP: What happens next in your career?
Gregor: Next on the cards for me, I'm filming a new psychological drama for the BBC in August called "The Replacement". I’m also hoping to work over Christmas in the theatre world. Plus, during the Edinburgh Festival Fringe, I'll be writing for a tabloid but as always, my ear is to the ground for more work! Did I mention I love my job?!!!
We’d like to thank Gregor for generously giving us his time to answer our questions. We loved watching him in Outlander and look forward to seeing him either on stage or screen soon. If you’re going to be at the Festival Fringe, keep an eye out for his written work too!
****************************************************************************
“Lallybroch Lad” Life as a member of Clan Fraser
An Interview with Scott Kyle by Susie Brown
OutlanderHomepage Originals

Ever since the early days of season 1, Outlander viewers have been treated to the comedy stylings of the MacKenzie clansmen, Rupert MacKenzie and Angus Mhor. But in season 2, Lallybroch provided its own duo, in the form of Ross and Kincaid. Crofters by trade, the two men came with Jamie and Murtagh to fight as part of the Fraser clan in the Jacobite rebellion. From a viewer’s perspective, portraying these fiercely proud Highlanders looked like a comprehensive job, so just what was it like to bring these men to life? Outlander Homepage was fortunate enough to be granted an interview with Ross himself, Scott Kyle, who very kindly gave us his perspective on being one of the Fraser clansmen, as well as sharing some details of his life away from the Outlander set.

OHP: Tell us something about yourself - how did you get into acting? What other shows/roles have you been involved with pre Outlander?

OHP: Ross and Kincaid were Lallybroch’s answer to Rupert and Angus. How much time did you have to work together before filming your scenes? Tell us a bit about your character - did you give him a back story?
Scott: I met Gregor at the studios for our fight training bootcamp and we instantly hit it off. We had a few mutual friends in common, which helped break the ice. As soon as I knew I had been cast in the show, I started listening to the audio books and to try and get a picture of the world that Diana Gabaldon had created. I knew that Ross was one of the smaller parts in the series and I hoped that I would be given the opportunity to work with as many of the core cast as possible. I didn’t make up a back story for Ross, but I did try to source as much info as possible from the internet to try and create the character. The rest of the character was created on set, as I took in all of the surroundings and outer characters.
OHP: Can you tell us a little bit about preparing for the battle scenes? The overall impression for viewers was that we were watching a group of men gradually becoming well trained soldiers - did it feel like that? Did it take a long time to get all the movements etc right? Was there a feeling of camaraderie amongst the men, or was there just a lot of sitting around?!
Scott: The battle preparations started with a training session with the fight director and the stunt team. The work was then taken onto the battlefield and we had a few rehearsals before shooting. The more takes we did, the better the men got - so this probably came across on the screen. There were 100 supporting artists who played the highlander army and we still meet up regularly for a few pints! The guys were very keen and extremely committed to the show and their roles - top blokes.
OHP: The scenes leading up to the Battle of Prestonpans looked COLD! How long did these sequences take to film? Can you talk about what it was like to film the battle sequences in the tent?
Scott: The great thing about being cold and wet is that you don’t need to act cold and wet because you are freezing. Ha ha! The smoke filled tent was a lot of fun, but it was hard to breath at some points and we had to pop out for regular breaks. That said, we all had great fun and it was a nice way to end the episode, with a bloodbath!
OHP: Before the battle, Ross and Kincaid share a beautiful conversation where they each make a will of sorts, leaving their possessions and responsibilities to the other. Did filming scenes like that make you think about your own mortality?
Scott: Yes, absolutely. The scene was very emotional and you couldn’t help but think about how the real men amongst the Jacobite army must have felt. I also knew that I would be losing (for real) two good friends in Gregor Firth and Stephen Walters, who would not be returning from the battlefield with the rest of us. I tried to use all of this in the scenes and tap into it when they shouted action.
OHP: How difficult was it to film Ross’ grief following Kincaid’s death? Do scenes like that stay with you for a while afterwards?

Scott: The death scene was very emotional and because we filmed the scenes chronologically, I had already played out the battlefield sequences, which helped when mourning Kincaid in the croft house. The scenes do stay with you but you are snapped out of it by characters like Stephen and Duncan, who starts laughing and joking after the tougher scenes.
OHP: Can you give us a little bit of insight as to a typical day filming on the Outlander set? What was involved? Who were your main scenes with? Are you able to share a funny memory?
Scott: The day always started out with an early pick up and drive to set, breakfast in my trailer and then costume & makeup. Every day was different and we had a few night shoots to contend with, but it was all great fun and an experience that I will never forget. Some of the best laughs were had between takes during the tougher scenes and I think the more experienced cast members would crack a joke just to break the tension.
OHP: We know that you’re an artistic director of the Bathgate Regal Theatre. Can you tell us a bit about the theatre and what your job involves?
Scott: I love performing on stage and in fact most of my career has been on the stage. However as I have gotten older, I seem to be drifting more and more towards film and tv. That said, the theatre is very much my passion and it gives me a chance to create opportunities for other performers, which is very important to me.
OHP: What happens next in your career? Is there anything you would like to promote in terms of future roles or projects? Any charities you would like your fans to get behind?
Scott: As with all actors I have no idea what the future holds for me, but obviously I would love to get another opportunity to work on Outlander. In the meantime I will continue to work at the theatre and try to inspire the next generation of storytellers.
(NB. Scott was too modest to mention this, but we’d like to encourage everyone to visit Bathgate Regal’s website at http://www.bathgateregal.org/ or their just giving page: https://www.justgiving.com/regalcommunity. They are currently fundraising, so if you’ve got a bit of spare cash, why not consider supporting this registered charity? You could even attend a special Outlander themed highland fling at the theatre - details here: https://bathgateregal.cloudvenue.co.uk/highlandersfling)

We’d like to thank Scott for generously giving us his time to answer our questions. We’ve loved watching him in Outlander and wish him all the very best for the future - we know that we’ll be seeing more of him on both stage and screen!
*************************************************************************
“Desperate Times and Measures” A recap of season 2 episode 12 by your Aussie blogging lass!
Outlander Homepage Originals
By Susie Brown
There is only a brief musical interlude to begin this episode. The music is slow, but still in a hopeful major key.
 The accompanying images are less hopeful however, with a map bearing the dreaded words “Culloden Moor” and two hands seen moving the models of the British and Jacobite armies slowly and deliberately towards each other.
By Susie Brown
There is only a brief musical interlude to begin this episode. The music is slow, but still in a hopeful major key.

As the episode begins, the bedraggled highlander army is wending its way through, as Claire tells an exhausted Fergus, “the outskirts of Inverness.” This army, however, is an echo of the one that enjoyed victories at both Prestonpans and Falkirk and marched triumphantly into England. It has been 5 months since the order to retreat and as time passed, so has the food.
 The weather too has been brutal and, as the camera pans around the weary company, we are left in no doubt as to the dire situation. Whether it is just the power of suggestion, clever make up and costuming, some sort of extreme boot camp diet or just excellent acting, everyone looks thinner. This army is, ironically, already “dead on its feet.” Claire’s voiceover tells us that their worst nightmare is coming true and that she feels completely helpless. As far as mood setters go, the opening scene is a bleak one.

As they try and find a place to rest, Ross and Rupert express their frustrations.
 Ross tries to help Rupert, much to the other man’s annoyance. Now sporting an eye patch any pirate would be proud of, Rupert asks what use an army is if it runs from a fight, openly wondering what “poor Angus” would say. Ross replies that it would probably be much the same as “poor Kincaid” and that it was time the army turned and showed its face. Ross’ comment earns a grunt of agreement from Rupert, as he swigs on a flask before passing it to Ross to drink. It is perhaps the uneasy beginnings of a new friendship. Having each lost their closest friend, Rupert and Ross begin to accept the other as a new companion.


Murtagh too, is sent off on horseback, in search of the Prince, who is resting, no doubt far more comfortably, in Inverness. A war council will soon be called and Murtagh remarks that they know where that will lead, as Culloden Moor is but a few miles east.
 A despondent Claire confirms Murtagh’s recollection of the date of the battle, adding that it is a mere “three days from now.” With a customary raise of his eyebrows, Murtagh leaves. Claire is angry: “All that work,” she says. “All that plotting. How the bloody hell did we end up here?”

Jamie agrees that it wasn’t from lack of trying, but tells Claire not to wave the white flag just yet. He seems to be the only one who hasn’t yet given up, adding that there is still time to avoid the fight that they cannot win, if he can make the Prince see reason. Jamie states the need to see to the men, while a slightly teary Claire says that she must go into Inverness to replenish her medical supplies. Despite the odds stacked firmly against them, they are still trying. It is, after all, all that they can do.
Her basket over her arm, Claire walks into an Inverness apothecary, in time to hear the order of the current customer - ginger, rosemary and arsenic.
 The woman also orders a bottle of laudanum, apparently her second for the week. Claire starts in recognition of the voice: it is Mary Hawkins. She greets the young woman in astonishment, asking what she is doing there. But this time, there is no affectionate greeting in response. This Mary is cold and distant, telling Claire she assumes that she has come with the Jacobite army and that rumour has it that there will be fighting soon.

Claire confirms this, but asks again why Mary is also in Inverness, having been sent home after the “incident with the Duke”. Mary replies that she had been contacted by Alex Randall, who had gained a position helping out the overseer of a large English estate.
 The two are to be married, Mary says, and is immediately incredulous at Claire’s stammered congratulations. Alex has told her of Claire’s influence in the ending of their relationship in Paris, and Mary’s voice rises in anger, saying that Claire had merely pretended to be her friend. Claire tries to defend herself, saying that Alex is in very poor health, but is interrupted by the pharmacist, who has returned with the bottle of laudanum. As Mary goes to leave, Claire apologises for the pain she caused the both of them, saying that the situation was complicated and asking how Alex is.
 A still frosty Mary tells Claire that Alex will be fine. Their landlady is advising her on the proper medicines and she herself is taking care of Alex now. Claire is concerned by this, and asks if she can stop by to see Alex, in order to apologise to him as well. Mary agrees to this and tells Claire where they are living. Still, she has not smiled. It is sad to see this friendship on such frosty terms, but it is beautiful acting on the part of both Rosie Day and Caitriona Balfe.


Back at the camp, the war council has begun. The Prince, immaculately dressed in frilly white shirt and red kilt (with a lot of knee on show) is sipping a liqueur by the fire as an equally well dressed Quartermaster O’Sullivan commands the meeting. He has studied the situation, he says and the choice is clear.
 The best spot for the battle is Culloden Moor. Jamie, with mud-streaked face, voices his objection. The spot is perfect, but for the British, not the Jacobites. Lord Murray agrees, as Jamie goes on to explain the moor’s terrain, adding that without sufficient calvary, the lines will be smashed to bits. Then the in-fighting begins. The commanders of Clan MacDonald and Clan Cameron say that while the Frasers may fail, their clans will get the job done. Why fight at all, asks Jamie, to snorts from the other men. Jamie appeals directly to Charles, asking the prince to walk the camp himself and inspect the army.
 The men are too exhausted to fight a major battle. O’Sullivan brands this opinion coward’s talk and an angry Jamie turns to confront him, to be stopped by the Prince’s call of “Enough.” Jamie changes tack, speaking of the French gold, supposedly on its way from the continent. With it, they can buy much needed food and weapons, splitting the army into smaller units in the meantime, to make it difficult for the British army to follow. Kneeling in front of the Prince, Jamie says that when the men are rested and have what they need, then they can choose the better ground to fight upon and defeat the enemy once and for all. It is a plea, but an impassioned one and proof that Jamie is still thinking strategically, doing everything he can to change history.


Charles reaches out a hand to briefly touch Jamie’s face, acknowledging that Jamie has been his most loyal companion and friend. But it soon becomes clear that while this may indeed have been so, it is no longer the case. Charles’ gaze flits back to O’Sullivan.
 He stands and states that he is not some frightened hare to be run down by a pack of British hounds. He is a man and a soldier, weary of retreat. Charles states that the men will rest and then they will march to Culloden. Jamie bows his head in despair as Charles continues, saying that God will provide for them. Murray is less convinced adding, “May He have mercy on us all.” Jamie’s head snaps back up and we see him thinking. Perhaps, at the eleventh hour, he has a new ally.

Claire arrives at McGilvrey’s Boarding House, the sound of racking coughing immediately apparent. She follows the sound and enters the room as Mary is trying to give Alex some arsenic tea.
 Claire intervenes, telling the young woman that although it may bring colour to Alex’s cheeks, arsenic will not help the cough. She helps Alex to a sitting position and we get our first glimpse of him. Claire’s shocked look is well founded. Alex holds a bloodstained cloth to his lips and his ashen face is covered in a sheen of sweat. Even in this state though, he is impeccably polite, telling Claire how good it is to see her. Both Mary and Claire implore him not to speak and Claire stands to prepare a poultice that will help ease the muscles in his chest and back.

The door opens and Alex greets the new visitor with a single word: “Johnny.”
 Claire spins around. It can only be one person and sure enough, Jonathan Wolverton Randall, clad in civilian attire, steps into the room. Black Jack and Claire’s eyes lock as Alex continues to speak, expressing his surprise at both his brother’s presence and appearance. With a brief touch of Mary’s hand, Jack explains that he has been granted leave to see Alex and that he didn’t want to attract attention by coming in uniform.
 He sits on the bed and strokes his brother’s face. It is a strangely unnerving intimate gesture and Claire is struggling. She starts for the door, but Mary stops her. Mary sings Randall’s praises, saying that she isn’t sure what would have become of them without “John”. Alex has been unable to work, she explains and they would have been destitute if his brother hadn’t paid all of their bills. Not taking her eyes off her fiance struggling to breathe in the bed, Mary asks Claire when Alex will be able to work again. As gently as she can, Claire tells her it is time for Mary to make reparations with her family so that she will have somewhere to go. Alex cannot be cured and will not be going back to work. The rest of the prognosis is clear, but not spoken aloud. Mary’s stutter returns, her distress obvious.
 Alex must be cured, she says, her hands briefly touching her stomach. Claire realises what this must mean. She asks Mary if she is pregnant and if Alex knows. Yes, Mary answers, adding that Alex’s brother also knows.


The aforementioned “John” strides over at this point and Claire involuntarily pulls the younger woman towards her. But Alex is asking for Mary and the young woman goes to him at once, leaving Randall and Claire eye to eye once more.
 Claire gives him a venomous look and leaves, but he is close behind, calling out first “Madam Fraser” and then “Claire” when she refuses to answer him. Grabbing her arm, she swings around, as Randall tells her not to take her animus towards him out on his brother. Alex has not taken an easy breath in weeks. He then issues a command: “Cure him.”

Claire answer unnerves him, but he recovers quickly, saying that she can at least ease his pain.
 This statement makes the physician in Claire stop walking. Reluctantly, she turns back to face him, as Randall adds that he is not asking for himself, but for Alex, Mary and their unborn child. It is not clear what is the most unnerving for Claire: being in close proximity to Black Jack once again, or the fact that he seems to actually be showing some compassion. Not one to trust the latter possibility, Claire hisses that if she helps Alex, she wants something in exchange - knowledge as to the whereabouts of Cumberland’s army. With his familiar sneer, Randall comments on Claire’s bargaining over an innocent man’s suffering, adding that “Madam Fraser” impresses him.
 In return, Claire addresses him with a biting “Captain Randall” adding that the woman she is now is different to the woman she once was. It is another unspoken implication, but we can certainly assume that Randall himself is part of the cause of this change.


Claire relays the encounter to Jamie, who strikes out in fury at the furniture covered in dust cloths. Will they ever be able to rid themselves of “that man”, he asks? But Claire is placating. Maybe this time, Randall’s presence will be good for them. Randall has told her that Cumberland’s army is 12 miles away at Nairn, with a birthday celebration planned for 2 nights’ time.
 The planning begins again, but not without confirmation that Randall has indeed spoken the truth. Claire tells Jamie that she wants to return to the boarding house and tend Alex, saying that she owes Mary that much. But Jamie is reluctant. What if Alex dies in her care and Randall attempts to harm her? But Claire has thought of that: saying that Murtagh can accompany her.

Night has fallen and a carriage draws up outside. A man is helped out and the misshapen legs leave us in no doubt as to who has appeared. Rupert has been watching from the window and wakes Murtagh at once - what, he asks, is the MacKenzie doing there?
 Murtagh answers “If I knew, I would.” Rupert strides over to open the door, and Ross, Murtagh and Rupert watch uncomfortably as a visibly weakened Colum struggles inside.

The seeds of Colum’s decline were sown back in episode 8. Then, Colum was noticeably older and slower, but in just a few months, things have taken a drastic turn for the worse. Colum cannot walk without assistance, leaning heavily on the coachman with one hand and his cane with the other. His breathing is laboured, his face grimacing with pain. More unspoken looks pass between the 3 men.
Colum greets them, saying that it is good to see some familiar faces. He expresses sorrow over Angus’ death, remarking to Rupert that he had always thought that when Angus fell, Rupert would fall with him. The depth of Rupert’s grief is then expressed in just three words: “So did I.” Colum demands three things: a bed to rest in, his brother and his nephew.
A short time later, Claire is examining Colum, with Jamie standing nearby. Colum tells Claire she is wasting her time.
 The healer who replaced her at Leoch has been looking more “dour”, but Colum comments that he has been dying for years and that it is a wearisome process whose conclusion he welcomes. Jamie asks if that is why he has come: to hasten the process along. Colum asks where Dougal is, complimenting Jamie when he learns the reason for his brother’s absence from camp - giving Dougal enough authority to keep him content, but not enough to allow him to grab for more. Jamie smiles, adding that it is as if Colum has read his mind. Colum dismisses him, saying that while they wait for Dougal’s return he wishes to speak to Claire in private. Jamie leaves, saying that he will be close by if needed.

Alone, Colum commends Claire on her marriage to Jamie, admitting that he had been wrong as to his earlier assessment of their union. It is one of the pleasures of dying, he says, to be able to admit his mistakes.
 The other is that it is easier to ask for favours, asking for relief from the pain. Claire offers to get him laudanum, but he refuses, as it merely dulls the senses. He wants something more final.

Once again, the implication is clear. Claire asks if suicide is not a sin. “What’s one more sin to a sinner?” Colum replies. The conversation then turns to Geillis Duncan and how he would welcome the same quick death that she had given to Arthur Duncan. Claire comments that that death, while quick, would have been agonising. Colum says that he will leave the details to Claire and trust that she will give him a kinder death. He speaks harshly of Geillis, prompting Claire to admonish him. Colum remarks that memories remain rawer than wounds, but provides Claire with some news: Geillis’ child had lived, as she was not burned until after it was delivered. The boy is with a childless MacKenzie couple. Claire asks if Dougal knows, as he has not mentioned the child at all. Colum replies that the boy will just be one more mistake that Dougal has to live with.
 Claire goes to her medicines, returning with a vial that she places in Colum’s hands. It is yellow jasmine, she tells him, and its effect will be just like drifting off into a deep sleep. He smiles at her tearfully, saying that for what it’s worth, Claire has his deepest gratitude. Gently, she pulls the blanket over his hand, hiding the bottle from view. Her look is of affectionate pity and understanding. This relationship, at least, is one that has achieved some resolution, albeit in its final moments.

As Colum is promised a final ease from his suffering, Alex is still in agony. Randall is holding Alex’s head, arguing with Claire as to her choice of treatment, a pipe of two separate herbs to ease his cough.
 Randall snaps that Alex can’t possibly smoke the concoction, but Claire has another method, blowing the smoke through a paper cone for Alex to inhale. As Randall and Mary soothe him, the smoke begins to work and Alex’s breathing eases. Murtagh watches from his position as security guard, as both Randall and Mary approach Claire. Alex is in pain, says Randall. Mary suggests more arsenic. Claire tells them both that arsenic will do no good. It is news that causes Randall to grab Claire by the arm. They had an agreement, he says.
 Claire says that she is treating Alex, but that she can’t cure him. Murtagh in turn grabs Randall, offering to fight Randall himself if he needs to ease his frustration. Claire tells them both to stop it. The noise attracts the attention of Alex, who calls for his brother.


It is then that Alex asks Randall to do something for both himself and Mary. Randall assures Alex that he will not let Mary or the child want for anything, but he is not expecting what follows.
 Alex says that he has sent for the minister, not for the last rites, but so that Randall and Mary can be married. Jack argues that the child will have the Randall name if Alex marries Mary and that he will see that the child is taken care of. But Alex is adamant. With Jack as her husband, Mary will have some position in the world, more than he ever could. It is ironic that this is a similar argument to the one that Claire made in Paris. She had thought that encouraging the end of the relationship was the only way of ensuring Frank’s future family tree, when in reality, it has happened by Alex’s own hand. He is entrusting those most precious to him, he says, to the one that he has loved the longest. The looks on everyone’s faces show the full gamut of emotions: Claire at last understands the family tree; Alex is filled with hope, Mary with despair and Jack with anger. It is at this point that Alex plays his trump card. He asks Jack if his elder brother thinks he is unaware of the density of the dark wall he has built to protect his better self from the world. He alone has borne witness to Randall’s tenderness and the generosity of his soul. It is to this inner man that Alex is entrusting the care of his love and his child.

But true to form, Jack refuses this entreaty. He stalks from the room, Claire in pursuit until she is stopped by Murtagh.
 The refusal has brought on a fresh round of coughing and Claire sends Murtagh after Randall, turning back to Alex to treat him again with the herbal smoke.

Dougal arrives back at camp, to tell Jamie what Randall has already announced: the British army are encamped at Nairn.

Murtagh is arguing with Claire, as the two walk out of the boarding house. Murtagh is incredulous: how can she be supporting this, in order to save the “mythical prick Frank Randall.”
 Claire immediately leaps to Frank’s defence, saying that he is neither of those things. But Murtagh is still angry. How can she hand over an innocent lamb to a black wolf? Claire agrees that it seems that she has made a deal with the devil, but that Mary needs a husband, or she will be starving on the streets. In response, Murtagh offers himself as a husband, adding that while he had never thought of Mary in that way, and he is sure Mary would not look twice at him, they could nevertheless learn to get along. While not a father, he adds, he has been godfather to Jamie, who has turned out all right. It is a beautiful offer, and Duncan Lacroix’s delivery ensures that fans everywhere love Murtagh just that little bit more. Claire is similarly touched, but adds that the realities of war are that no-one’s survival is guaranteed. If Murtagh dies they would be in the same position, whereas if Mary is Randall’s widow, she would be entitled to both his property and his pension, meaning that her elevated station would probably see her welcomed back into the family home. Grudgingly, Murtagh agrees. The two have arrived outside the inn where Randall is. Leaving Murtagh outside, Claire goes in alone.

Black Jack is very drunk. What kind of God, he asks Claire, creates a world where monsters thrive, while beauty and purity is rewarded with poverty and death? The same God, answers Claire, who offers an opportunity for redemption.
 But Randall asks for her help in convincing Alex to marry Mary himself and reiterates that he will see that the child is taken care of. But Claire is direct. What happens, she says, when Jack is not alive to make good on that promise? Talk then turns to the curse that Claire had given to Randall at Wentworth - the date of his death. Although known to book viewers, this is the first time that tv viewers learn it- 16th April, 1746. Claire tells Randall that as his sister-in-law Mary is entitled to nothing, but Randall interrupts her. What if her curse doesn’t come to pass, he asks. What if the world continues as it always has, with the pure of heart choking to death on their own blood, helped there perhaps by the monsters who walk among them? Claire asks if Randall has ever harmed his brother and the answer is swift: No. Claire muses that perhaps that immunity might extend to those that his brother holds dear. Randall asks if that is good enough for her and Claire replies that sometimes it is all people get.

But, as he always has done, Randall is finally able to break Claire’s composure just as it seems she has the upper hand.
 Randall asks Claire if she knew what he had done to Jamie at Wentworth, adding that far from regretting the pain and fear, he revels in it. The lighting of this scene is brilliant, with Black Jack appearing as a menacing snake, who hisses, “Do you really want Mary in my bed?” And as she has always done, Claire is able to claw back her upper hand. If he refuses, she says, he is sending his brother to his grave with a broken heart. If he truly loves his brother, she can only trust that this will be enough for him to stay his impulses with Mary.

At the camp, Dougal and Colum greet each other, Dougal saying that it grieves him to see his brother so unwell, but that he is also joyous at Colum’s obvious change of heart, joining the Leoch men with the rebellion.
 But Colum wastes no time in correcting him that this is not the reason for his arrival. He tells Jamie and Dougal that there are clan matters which must be settled while he can still draw breath. Colum continues, saying that he has declared his wish for his son, Hamish, to be the next chief of Clan Mackenzie. Dougal comments on Hamish’s youth, asking who will teach the young boy what it means to be a chief. Colum replies that Ned Gowan will instruct Hamish in clan law, while he has chosen a guardian whom he thinks the clan will follow, until Hamish comes of age. It is someone who will guide Hamish to manhood, so that he learns how to choose what is best for the future and demonstrate what it means to be a chief. Colum then looks at Jamie, offering him the responsibility. It is an announcement that shocks both Jamie and Dougal alike.
 Dougal’s temper is quick to rise. Why has Colum chosen a Fraser to lead the clan over his own brother and Hamish’s true father? Jamie is their sister’s son, Colum reminds Dougal, adding that he doubts the clan would choose Dougal as chief anyway and that if Dougal was half as popular as he believed himself to be, there would be more men in the Jacobite army. Dougal bites back, saying that Colum’s decision is his final punishment for Dougal fathering the son that he never could. But Colum will not be drawn into picking over old wounds. It is the future of the clan which concerns him, he says. Dougal says that Jamie will not do anything different to him, stating that Jamie will also rally the Mackenzie men to fight.


Jamie speaks at this point, saying that while he is honoured to be entrusted with the care of Colum’s son (and the gentle dig at Dougal’s paternity is clearly noted) Dougal is right: Jamie will use every option in his power to defeat the British, including raising the Mackenzie banner. But Colum says that while he doesn’t doubt Jamie’s fighting spirit, he also knows that Jamie would not sacrifice his men needlessly if the cause is lost.
 Jamie agrees with this assessment, with the slightest of nods and Colum turns once again to Dougal. If Dougal can say that he would do the same, saying the words and meaning them with his head and heart, then he can have the guardianship. The silence is deafening. Dougal can make no such promise and leaves the room. “My poor brother,” remarks Colum. “I have lived my life crippled in body and he has lived his crippled in mind.” The similarities between the Mackenzie brothers and the Randall brothers have never been more clear.


At McGilvrey’s boarding house, a joyless wedding is taking place. As Alex looks on, Randall hisses and Mary sobs the vows. Claire and Murtagh act as witnesses to the bizarre union.
At the camp, Jamie and Murray are proposing interrupting a different celebration, by attacking the British at Cumberland’s birthday party. Each leading a column of men on a 12 mile march, Jamie tells the Prince that they will trap the British between them.
 This is Jamie’s hail mary - the very last chance to stop the battle of Culloden and alter history. Everything hangs on the Prince’s decision. But just as he needs Charles to treat Jamie as the noble and trusted friend he has always been, Charles looks instead to the quartermaster, who reluctantly agrees that the plan has merit. Revelling in his restoration as the one with the prince’s ear, O’Sullivan agrees to the attack, but with one change - Jamie and Murray will lead one column, the Prince and O’Sullivan the other. Although he doesn’t think it wise, Jamie has no choice but to accept. With a grin that can only be described as unhinged, Charles stands and adds that he will bring his finest bottle of wine as a gift to Cumberland, to be presented once Cumberland is his prisoner. The other men chuckle, as Jamie takes his leave.
At the camp, Jamie and Murray are proposing interrupting a different celebration, by attacking the British at Cumberland’s birthday party. Each leading a column of men on a 12 mile march, Jamie tells the Prince that they will trap the British between them.

A drunken Dougal comes once more to a further weakened Colum, saying that he has brought his brother a wee drink. Colum asks to be left in peace, but Dougal is not leaving.
 He has drunk enough to muddle a stallion, but he remains sober. In gestures belying this statement, he tips the dregs of the bottle on the floor and says it is just as well, as he wouldn’t want Colum to think he would do anything to hasten his exit from the world. Colum’s response is telling to the viewer, given the earlier scene we have witnessed with Claire, when he says that he is beyond any injury that Dougal could do to him.

This hurts Dougal. Bitterly, he begins a monologue that goes back to their childhood, remembering the day when Colum had been thrown from the horse.
 Dougal had been sure that his brother would recover, but as the time passed, he had watched Colum’s limbs twist further and his body shrink. He hated his brother, Dougal admits, but had also wept for him, more than he had ever wept before or since. The world was never the same, Dougal says, because Colum had destroyed it. Still, Colum hasn’t spoken and Dougal turns to force some sort of response from his older brother, repeating “Answer me”, until he realises that he will never get a response again.

What follows is a beautifully poignant griefstricken piece of acting from Graham McTavish. Putting his head on Colum’s chest, Dougal weeps, saying that Colum has turned his back one final time, leaving Dougal alone in the darkness of the world. He puts his fist to his forehead, lamenting the fact that all he had wished to say would now remain trapped inside him forever, unsaid.

Holding his brother’s hand, he says his final goodbye, “all because you couldn’t keep your arse on a bloody horse.” It is heartbreaking stuff and we are left to wonder what might have been, if only the Mackenzie brothers had been as open with their affection as they were with their anger.

Holding his brother’s hand, he says his final goodbye, “all because you couldn’t keep your arse on a bloody horse.” It is heartbreaking stuff and we are left to wonder what might have been, if only the Mackenzie brothers had been as open with their affection as they were with their anger.
It is a totally different farewell at the McGilvrey boarding house. The unhappy newlyweds are standing around the bed as Alex’s death rattle grows louder and louder. Finally, his breathing stops.
 Mary tearfully looks to Randall, who indeed begins to break down himself. But just as we begin to think we might see a glimpse of the humanity that Alex had always insisted lived inside his brother, Randall begins punching Alex’s lifeless body. It is a shocking display, all the more so because of this scene’s ferocity when compared to the tenderness of the one which preceded it. With a sobbing Mary in her arms, Claire eyes Jack with horror.
 Without a word, he smooths his hair back into place, gives her a long look and leaves. He is indeed, by his own admission, one of the world’s monsters.


Again, Claire updates Jamie as to what has occurred. Jamie says that he can’t believe that Claire encouraged Mary to be Randall’s wife. But Claire corrects him. She encouraged Mary to become his widow, knowing that Randall will die at the battle of Culloden the following day.

But while Jamie and Murray lead their men to the designated spot, there is no sign of O’Sullivan and the Prince. The men are exhausted, says Murray, fearing that they put too much faith in starving men. But Jamie says he will take a starving Highlander over a drunken British soldier any day and suggests that they attack on their own.

But Murtagh rides up with bad news. The Prince and O’Sullivan’s men have turned back, he says, after losing their way in the dark. Still Jamie is insistent upon attack, but Murray has lost his nerve. With only a portion of the men, he says, it would be madness and they would lose the element of surprise. He has no choice but to call off the attack. As Murray and the men head back to Inverness, Murtagh and Jamie look at each other in resigned desperation. “Tomorrow,” says Murtagh, “the Prince will have his battle on Culloden Moor.” The music rises ominously as the episode ends with a close up of Jamie’s face. The Hail Mary has failed. History is upon them.

But Murtagh rides up with bad news. The Prince and O’Sullivan’s men have turned back, he says, after losing their way in the dark. Still Jamie is insistent upon attack, but Murray has lost his nerve. With only a portion of the men, he says, it would be madness and they would lose the element of surprise. He has no choice but to call off the attack. As Murray and the men head back to Inverness, Murtagh and Jamie look at each other in resigned desperation. “Tomorrow,” says Murtagh, “the Prince will have his battle on Culloden Moor.” The music rises ominously as the episode ends with a close up of Jamie’s face. The Hail Mary has failed. History is upon them.
Living up to its title, this was an episode of last chances for many of the characters. It was a last chance for brothers to make their peace; a last chance for lovers to steal a bit of happiness in the midst of illness and death; a last chance for men to redeem their souls and a last chance to stop the fates. All have failed, despite the best efforts of many good people. With the battle that Jamie and Claire tried so hard to prevent merely hours away, viewers would be forgiven for uttering a quick prayer themselves, to protect them from the emotional tidal wave that is bound to hit with the final episode of the series.
This recap was written by Susie Brown, a teacher-librarian and writer who lives in Australia. Unlike Alex Randall, she never believed that Jack Randall had an ounce of good in him, but wasn’t expecting him to prove it in such a hideous fashion!
****************************************************************************
“A Friend Indeed” ~ Simon Meacock talks to Outlander Homepage about the return of Hugh Monroe An interview compiled by your Aussie blogging lass, Susie Brown
OutlanderHomepage Originals
While episode 10 saw the departure of a much loved character with the death of Angus Mhor, episode 11 saw the return of a season 1 favourite.
 Hugh Munro, last seen atop a rainsoaked hillside with news for Jamie and a gift for Claire, returned this week to provide some much needed help to the couple. Hugh’s portrayer, Simon Meacock, kindly agreed to share his thoughts on filming Hugh’s return and what it was like working with Diana Gabaldon. He also revealed his hitherto unknown powers of weather control!
While episode 10 saw the departure of a much loved character with the death of Angus Mhor, episode 11 saw the return of a season 1 favourite.

****
The lovable character of Hugh Monroe was first introduced to Outlander’s viewers in episode 8 of season 1. Hugh spent his days as a beggar, wearing official gaberlunzie tokens to identify himself. Through Jamie’s explanations to Claire, viewers learned that Hugh had been captured by the Turks. Boiling oil had been poured on his legs and his tongue had been cut out, making speaking virtually impossible.
 But Jamie and Hugh had developed their own method of communication, allowing the older man to give Jamie a vital piece of information. After being introduced to Claire, Hugh immediately presented her with a wedding gift - a dragonfly encased in amber. It was a short scene, but one that established a friendship between the three characters and hinted that their paths may cross again in the future.

No one was more pleased to see Hugh’s return this season than Simon Meacock, the actor who brought the character to life on the screen. “It was great to be back for the second season of Outlander,” he said, “and for Hugh to be much more involved in the plot this time round. It was great to see Hugh in action too. I had a lot of fun beating up a messenger and taking out an English soldier during the course of this episode!”

An added bonus was the fact that the action was written by none other than Diana Gabaldon herself.
“It was an honour and a privilege to work with Diana on this episode. It made it extra special knowing that she had written it,” Simon explained. “It was also great to be able to chat with her on set about Hugh’s backstory and to be able to delve deeper into who Hugh is as a character. I was obviously glad to find out that they had made the decision to keep him alive for this episode too, as I was aware that in the books he’s not so lucky!”
Indeed, in the books, Hugh is captured in the grounds of the Duke of Sandringham’s estate and is hanged for his trouble. In the tv version however, Hugh is able to deliver a message to Jamie, lead both Jamie and Murtagh to the house where Claire has been taken and overpower an English redcoat, all without losing his own life! The only downside, Simon explained, was the weather.


“We filmed most of this episode in awful conditions – something that I seemed to be blamed for! The weather would be fine and then I’d show up on set and the heavens would open!”
But the weather didn’t dampen anyone’s spirits for long.
“Outlander has such a great cast and crew who are all so welcoming,” said Simon. “It was wonderful filming it.”
Simon was also witness to some excitement whilst filming his scenes. “I was actually on set when the Golden Globe nominations were announced,” he said. “Everyone was delighted to get the nod after just one season.”
Since finishing his scenes for season 2, Simon has been busy with other projects, some of which are screening right now. For UK fans, Simon portrays the character of Jason Briggs in the third episode of Agatha Raisin, which screens on Sky 1 on 21st June. Australian fans may have recognised Simon on the first episode of The Coroner, which screened on the ABC on 18th June, and is available on iView until 3rd July. Simon will also appear as the prison guard in the feature film, The Limehouse Golem. It is currently in post production and will screen, according to Simon, “most likely next year.”
We’d like to thank Simon for taking the time to share his thoughts with us. We’re sure we’re not the only ones to hope that since tv Hugh is still alive, he might reappear in season 3 or 4!
****************************************************************************
“No Winners in War” - The Battle of Prestonpans A recap of Season 2 episode 10 by your Aussie blogging lass, Susie Brown.
Outlander Homepage Originals
The anticipation of battle is high, right from the opening moments of the episode. The Skye Boat Song melody is given the war treatment, complete with stirring pipes and drums.
 The camera focuses on the precision of the drummers’ movements and we are given another reminder of the ritual and ceremony involved. Everyone has a part to play - musicians included.

As the episode’s real action begins, Claire is standing over the body of a dead Highlander who has fallen foul of the redcoats. Her voiceover muses about how many men she has seen killed in war and wonders at the chances of them actually being able to change the outcome of history.
 Jamie calls to her, asking how long it takes her to answer a call of nature and Claire, with one final look at the ruined body, picks up the soldier’s discarded weapon. How many men has she seen killed in war? Far far too many. It is a grim opening to the episode and a stark reminder that nothing about a battle is certain. No matter the outcome and despite their best efforts, any one of them could meet the same fate as that of the Highlander corpse. There are certainly no winners in war.

If the opening scene sets a sombre mood, the following scene sets a frustrating one.
 Jamie is attending a strategy meeting with Charles Stuart and the other commanders, chiefly the Irish Quartermaster, John O’Sullivan and the Scottish General, Murray. But plans are not going well, with the quartermaster favouring immediate attack and the general reluctant to abandon the high ground that he has rushed his army towards. Jamie too, is reticent to charge towards the English, as it will require the attackers to cross the boggy Tranent Meadow. As the quartermaster and the general begin to hurl insults at one other, Jamie and the commander of Clan MacDonald strategise over a new plan: sending cavalry into the area to test the bogginess of the ground. Meanwhile, resplendent in a gaudy, gold trimmed tartan outfit and making frequent visits to the food table, Charles Stuart suggests that they have already taken two cities without the need for firing a single shot.
 Moreover, says the Prince, the people in those cities welcomed him with open arms. Jamie reminds Charles that on both occasions they had possessed the element of surprise,which is not the case here. Charles suggests setting up a meeting and offering generous terms of surrender, musing that surely no-one is really keen on bloodshed. Diplomatically, the quartermaster praises the Prince’s kind heart, but says that the time for talk is done. They have sailed for France to fight a war, after all. But General Murray is equally adamant. He will not risk the destruction of his own army, he says, by ordering it to cross potentially lethal ground. Tempers flare and the General leaves. Jamie instructs Clan MacDonald to await orders, but adds in an undertone that these may be some time.


The meeting breaks up without resolution and Charles walks out with Jamie, asking why the Scots are such retractible people. Jamie responds that the Irish are just as stubborn, but Charles is despondent.
 The cause must succeed, he says, because he has promised his father and God that it will. Talk turns to Claire’s role throughout the battle, ministering to those who are wounded. Jamie remarks that Claire is setting up a field hospital and so Charles makes an unbelievable request. He wants British casualties tended to before Jacobite ones, he says, because the English are his father’s subjects too. He wants the English to realise that war is being waged on them with the greatest reluctance and that it is his wish that one day they will all be friends again. Jamie advises Charles not to share this sentiment with the men and also tells him that Claire is unlikely to follow such a request. Charles muses that she is more likely to do so if the request comes from Jamie himself.

Turning away and raising his hand in expectation of it being kissed, the prince closes the conversation. The look on Jamie’s face is priceless: Charles Stuart truly has no idea - on any level.


Turning away and raising his hand in expectation of it being kissed, the prince closes the conversation. The look on Jamie’s face is priceless: Charles Stuart truly has no idea - on any level.
Meanwhile, the lack of action is beginning to take its toll on the men. Sitting around the campfire with nothing to do, Angus starts spitting ale at Kincaid, one of the men from Lallybroch, until Kincaid snaps. Kincaid’s friend, Ross, tells Angus that he shouldn’t waste the ale, but should rather save it to quench the thirst from battle later on.
 Rupert and Angus then begin needling the Lallybroch men, mocking their choice of phrasing and calling their courage into question. Tempers flare quickly. Angus holds a blade to Kincaid’s throat, threatening to open him “from belly to bone”. Murtagh intervenes, telling Angus to put the blade down before he puts it somewhere unpleasant, leading Angus to switch his anger to Murtagh. Their arguing wakes Dougal, who smashes a bottle against the rocks in his own show of anger. It is a prime time for the laird to appear and calm things down, which is precisely what Jamie does. Observing that his men are getting on about as well as the commanders, the talk is turned deftly from the squabbling men to the lack of a battle plan. It is a small deflection, but yet another indication of Jamie’s instinctive leadership. He begins to speak of what is required: a reconnaissance of the marshland between them and the British camp, in order to discover if the ground is solid enough for the army to cross. Leaving the men to their own devices once more, Jamie asks Dougal for a word in private.
Jamie and Dougal begin discussing the reconnaissance plan in more detail.
 Someone must ride out into the marshland, says Jamie. If a man on horseback can be supported, then so could an infantry. But it is a risky proposition. Dougal observes that Jamie cannot undertake the mission himself, vital as he is to Charles Stuart. Jamie agrees, but states that someone must risk the doing. It is an excellent strategy on his part, knowing that Dougal will be unable to resist an opportunity to impress the bonnie prince. Indeed, Dougal starts to plan what would be needed - staying within a safe distance of the range of the British guns. 125 yards is suggested by Jamie, reduced to 105 by Dougal, deeming the plan to be a gamble, but one which is worth the risk.

Moments later, a mounted Dougal rides through the camp, headed for the marshland. The men, realising what he is doing, gather to watch. Amidst calls of “mad man”, an obviously nervous but determined Dougal begins his journey towards the British. He is soon noticed and the British soldiers begin to load their rifles.
 Back on the hill, the prince has joined the watching men, branding Dougal a remarkable fellow. Angus engages him in conversation, and is awed to discover that he is speaking to the prince himself. By contrast, the prince doesn’t seem remotely interested in speaking to the Highlanders, waving away Rupert’s compliments without even turning his head in their direction.

In the centre of the meadow, Dougal’s horse becomes stuck in the boggy ground and the British begin to fire. Dismounting, Dougal tries to turn his distressed horse around. As Jamie and the others watch with increasing concern, bullets start to land uncomfortably close to Dougal. Finally, one passes through his bonnet and grazes his forehead. But rather than display any fear, Dougal merely replaces his bonnet with the barest of sarcastic smiles.
 He leads his horse back towards the assembled Scots and receives a hero’s welcome. To his surprise and ultimate discomfort, Dougal finds himself locked in an impulsive embrace from his Prince. Charles states that if he had a hundred men like Dougal, the war would soon be over. Humbled, Dougal mutters that while he’s not sure about that, he can confirm that the meadow is unsafe to cross. This is a signal for the squabbling between the Irish quartermaster and the Scottish general to begin again, the latter saying that they should decamp and remove themselves to Edinburgh. Yet the enemy are not in Edinburgh, states a frustrated prince, adding that he is relying on the general to break the stalemate, or he will have to be replaced.

Handing Dougal a bottle, Jamie remarks on his uncle’s luck and states that he should have the cut on his forehead seen to. Dougal declines, but admits that a change of clothing is in order... While ultimately unsuccessful in forcing a charge towards the enemy, the mission has at least done much to improve the morale of the men while they wait for a plan B to take shape.
While Jamie is displaying his leadership tactics in the open air, Claire is similarly taking charge in the makeshift field hospital.
 With a handful of women around her, Claire is attempting to instill some morale of her own, as she explains to the women - and a rather disgruntled Fergus - what their individual tasks will be, as they prepare to tend to the wounded men. The preparations take some time and it is dark when Fergus bursts back into the hospital area, followed by a young man, who Fergus explains, has information of the utmost importance for the leader of his Highness’ army. Introducing himself as Richard Anderson, the young man explains that he has lived on the land all his life and knows of an alternative way down the ridge, a hidden trail past the bog which will allow them to catch the British unawares. Claire sends Fergus in search of Jamie and soon another strategy meeting is taking place, with Jamie, General Murray, Claire and the prince listening to Anderson’s explanation of the path’s location.
 Not marked on any map, it is there, but difficult to find unless you know where to look. Murray remarks on how this good fortune seems almost too good to be true, but Anderson proves his trustworthiness by promising to lead the highlanders down the path himself. While he’s not much for fighting, he says, he can at least lead them across the meadows without a misstep. The prince is reticent at first, but is swayed by Jamie’s pronouncement that delay could prove fatal. Finally the decision is made: they will go, says the prince, and not return unless they bring victory back with them.


With the fighting now assured, the men start to think about their own mortality. In a matter of fact way, Ross and Kincaid share secret hiding places of savings and promise to care for each other’s wives, crofts and children. Ross says, “What’s mine is yours and yours mine” and, with a spit and a handshake, the two make their living wills. It is a conversation overheard by Angus, who for the first time, abandons his practical joking and tries to make a similar deal with Rupert.
 Not able to be totally serious though, he offers his friend his sword, dirk, sporran (and all that it contains) and his whore. Rupert however, is unimpressed. What use does he have for a sword that hasn’t been used, he asks and comments that Scarlet the whore isn’t Angus’ to give away. Most importantly though, Rupert refuses to make the same deal that the Lallybroch men have. He is more superstitious, refusing to put final plans in place that may bring “the devil’s own eye” down on them.

Murtagh and Jamie too, are in a contemplative mood. Murtagh is concerned that his death needs to mean something and that if he is just one casualty in a large battle, then how will his memory live on within the clan? Jamie says that he can’t offer any words of comfort, mentioning Paris and how he almost lost his marriage trying to stop the rebellion from happening. “I failed,” says Jamie, but Murtagh immediately corrects him. “We failed,” he says. Jamie lays a grateful hand on his godfather’s shoulder, saying that it’s any solace, he feels the same way that Murtagh does. This is indeed solace to Murtagh. Jamie and Murtagh know, without saying it specifically, that the memory of one would live on in the other, should either fall. It is this simple understanding between two men of a similar mind that gives their lives the meaning that they both crave.
Jamie goes to Claire and the two share a moment together before the battle.
 Commenting that sleep isn’t going to be an option for anyone that night, they seem about to fill their time with other activities when they are interrupted by Fergus, who requests permission to join the fighting. Fergus will steal into the tent of General Cope, he says and steal the general’s sword. Jamie tells him kindly that while he doesn’t doubt his capabilities, he needs Fergus to look after Claire and the other women, because there is no-one else he would entrust their safety to. Claire wraps a motherly arm around the young boy, telling him that it looks like he must stay behind and like it.

At last the moment has come and Angus, Rupert and Murtagh come to collect Jamie, so that they can, in Angus’ words, send the British army to hell. It is a beautiful scene, each man trying to keep up a brave front as they say their farewells to Claire. Angus asks for a kiss, which she grants, while Rupert refuses to say goodbye, telling her that they will share a dram together after the battle. Tearfully, Claire asks Murtagh to watch over Jamie. “Of course,” Murtagh replies, before checking that they will win, as the “promise of history” has stated. Claire confirms this fact, but each of them is all too aware that while the overall result may be certain, the survivors and casualties still remain a mystery.
The farewell between Jamie and Claire is beautifully done. Sam Heughan and Caitriona Balfe have two of the most expressive faces around and the look that passes between the two is full of so much unspoken emotion. They kiss fervently, and Claire says,

“On your way, soldier.” Jamie smiles and makes a formal bow before turning and walking away. (The last time he did this at Lallybroch, he ended up at Wentworth, but the difference this time is that there is no slow motion camera effect, so viewers can at least remain hopeful that he will be back by Claire’s side soon enough!)

“On your way, soldier.” Jamie smiles and makes a formal bow before turning and walking away. (The last time he did this at Lallybroch, he ended up at Wentworth, but the difference this time is that there is no slow motion camera effect, so viewers can at least remain hopeful that he will be back by Claire’s side soon enough!)
True to his word, Richard Anderson leads the men down the hidden path, as Claire orders the women to get some rest. Looking around, she suddenly realises that Fergus is missing. All too soon we see why.
 Moving quietly amongst the group of soldiers, wide-eyed and clutching a knife, is Fergus. When they reach the outskirts of the British camp, Anderson tells Jamie that he will leave them there. Jamie thanks him, remarking that all of Scotland is in his debt. Moving over to General Murray, Jamie instructs the older man to ensure that Prince Charles remains behind the lines during the battle.

The prince is indignant at this. He has a sword, he says and is trained in its use. Moreover, the army is his and he wants to be the one to lead it into battle. But Jamie tells Charles that the rebellion would never survive the death of its prince. And surely, he adds, regaining the throne would not mean as much to Charles’ father without being able to share the moment with his son. At this, Charles utters a line that is equal parts amusing and sad - “Mark me, I don’t believe my father is all that fond of me.” But Jamie remains insistent: Charles is to remain behind the lines with the quartermaster and the general.
Meanwhile, Claire is giving a pep talk of her own. The women are tense as they make their preparations and all is silent in the makeshift hospital. Claire tells them that she knows how they are all feeling, but that their men are depending on them and they will not let them down. Moving between them, Claire checks the bandages, honey water supplies and the sterilisation of the instruments. Certainly the men stand a better chance of survival with her 20th century knowledge - another little nod to the possibility of Claire being able to change history simply by her presence.
Another atmospheric Bear McCreary soundtrack begins to build as the highland army waits in the morning fog. Tensions are high. Finally Jamie gives the signal, removing the plaid he has been using to camouflage himself. The others follow his lead, Jamie raises his sword and they move forward. It is a brilliantly filmed scene. The men run in slow motion, and we hear nothing except the building music. It’s heart pounding stuff.
 Suddenly the music stops and in the brief silence we see a sleeping British sentry leaning on his rifle in the fog. Then the actual volume kicks in. With the Tularch Ard battle cry, the soldier is cut down, the first of many. Back at the hospital, the women turn towards the noise. The battle has begun and one of the women begins to pray, as Claire sends another for more hot water. They can do nothing they can do now but wait.


The actual battle of Prestonpans lasted about a quarter of hour. It is hard to imagine that it was any more bloodthirsty than what we see on the screen. Blood flies, swords slam into skulls and the highlander shirts are soaked in blood. Full of adrenaline, the men yell and scream. It appears as if the British soldiers will be little match for the Jacobite rebels.
Back at the hospital, things have changed. Wounded men are everywhere and Claire and the other women move between them. Suddenly, Claire notices Ross, who enters carrying Kincaid over his shoulders.
 As soon as Ross lays his friend down for Claire to examine, we realise that we are looking at the first Highland fatality. Kincaid’s eyes are lifeless and Claire closes them, turning to Ross and saying, “I’m sorry. He’s gone.” She stands to tend to the other living men, but Ross reaches out his hand and stops her, his eyes still on his friend. Claire tells him that there is nothing more that she can do. She moves away and Ross begins to grieve.

On the battlefield, the Jacobites are winning.
 Fergus however, has discovered that the battle is not the grand adventure that he had thought it would be. He looks terrified, slashing his knife and turning away from the bloodshed as men run all around him.

One of the British commanders is screaming orders to his men, when he notices a Highlander and gallops towards him, slashing through the man’s side.
 The Highlander is Rupert and we see him fall just as the scene shifts back to the hospital and the announcement comes that the British wounded are arriving. Claire begins to sort the Englishmen by the severity of their wounds, having been reassured by their commander that the men mean them no harm.

This sorting is interrupted by the arrival of Angus, supporting a badly injured Rupert and screaming to Claire that Rupert needs her assistance immediately.
 Angus’ eyes are full of tears, telling Claire that he will not allow Rupert to die on him, and that she must help him. Claire examines the wound - a deep and ugly gash. As she tries to sedate Rupert a little, the injured man asks about Angus, saying “Is he blown up?” Angus explains that Rupert is referring to a canon blast, but that it’s nothing. Claire gets to work, calling for thread to sew up the wound before an infection sets in.
 As she works, we see the rest of the event in flashback. Angus had shot Rupert’s attacker off his horse, before a canon blast knocked him off his feet too. The operation over, Angus asks Claire if Rupert will live. She replies that she doesn’t know, but that as long as the wound doesn’t fester, Rupert’s strength will stand in his favour. Claire turns to examine Angus, checking his eyes and asking if he is nauseous. Suspicious of a mild concussion, Claire tells Angus to stay by Rupert and to stay awake. Angus replies that while he is bone weary, he plans on focusing on watching Rupert’s big belly going up and down. Claire lays a reassuring hand on Angus’ back, adding that as long as it does, there is hope. This is a side of Angus that we have never seen until now and we understand again the fierce friendship between the two men. Despite his practical jokes and short temper, the simple fact remains that Angus loves his friend.


A triumphant Jamie and Murtagh arrive, with Jamie announcing that the day is theirs. Amidst the excited talk about what they could have done with cavalry and how they might have captured General Cope and assured victory that very day, is the tender and relieved reunion of two soulmates.
 As with the leave taking, the emotional moment of reunion is conveyed purely through the looks that Jamie and Claire give to each other and the desperation with which they cling to each other. Breaking away, Claire checks Jamie over for injuries. Then she remembers Fergus and asks where he is. Jamie replies that the boy is outside and Claire hurries to find him.

There is no triumphant young man waiting for Claire however, but a lost little boy, still in shock from what he has seen.
 In full maternal flight, Claire gathers Fergus up into her arms, calling him a wretch for sneaking off and saying that she should box his ears. Fergus stammers that he thinks he killed an English soldier. Claire hugs him fiercely, saying how sorry she is and asking if he is injured. Fergus replies that he is just very, very tired. Claire leads him away in search of food and a bed, as the casualties start to spill out into the courtyard.

Dougal, meanwhile, is still at the battlefield, dispatching living British soldiers with a knife to the chest. Hearing his name, Dougal turns around, to see an injured Lieutenant Foster, the English soldier who had escorted Dougal and Claire to the village of Brockton during season 1.
 Dougal quickly remembers the man, branding Foster the only honourable redcoat. He sits next to Foster on the ground, as the English soldier asks to be taken to the infirmary. Dougal laughs, asking if Foster expects to be carried there and remarking that he still has work to do. It is at this point that Foster makes a fatal error. He tells Dougal that while the Jacobites have won the day, Dougal as a war chief should know better -the Jacobites will not beat the British army. They have won the battle, but will never win the war. It is not what Dougal wants to hear. He looms over Foster and sinks his blade into the Englishman’s belly, saying “Only God knows the answer to that”. Once Foster is dead, Dougal wipes his blade on the soldier’s shirt, adding that if the lieutenant is right, he will look for him in hell.

This is an uncomfortable scene and many fans have expressed dismay at the callous way Dougal is portrayed here. But the fact remains that Dougal is a war chief and a fervent Jacobite to the point of fanaticism. It is certainly not beyond the realms of possibility that when faced with an enemy soldier telling him that his cause is ultimately doomed, Dougal’s bloodlust would still be sufficiently roused to take the action that he does - however distressing this is for the viewer to watch!
At the hospital once more, Angus and Ross stand over their friends. Angus is watching Rupert like a hawk, while Ross gently pulls the blanket up over Kincaid’s face. Catching Angus’ eye, he says simply, “We did not run.” Angus nods and with that simple action, the two share a moment of reconciliation. Murtagh and Jamie join Angus, attempting to lighten the mood by saying that Rupert’s size and his love of “third portions” will no doubt save him. Jamie commits the faux pax of referring to Rupert’s appetite in the past tense, but quickly apologises. Angus looks exhausted and Jamie passes him a bottle which the man gratefully accepts, saying that it has been a long night. He raises the bottle to Ross in salute and goes to sit down.
Walking past, Claire notices the mark of a horse shoe on Jamie’s shirt. Jamie admits that he was actually stepped on by a horse as the British soldiers retreated. Grabbing a bottle, Claire orders Jamie to fill it, so that she can inspect Jamie’s urine and check for kidney damage. Walking over to a British commander, Jamie hands the man the bottle, telling him to hold it while he takes aim.
 With a grin the man does so and quickly it turns into a game, with the soldier wagering sixpence on Jamie’s ability to reach the jar from a certain distance. Understanding the need for some levity after all the bloodshed, Jamie plays to the crowd, but it is an act that comes to an abrupt halt when Charles Stuart walks in.
The prince thanks Claire for her labours. She curtseys in reply and tells Charles to be careful of the blood, as the floor is slippery. He launches into a speech about his distress at claiming victory over the English, as his interests lie in both countries, which should in truth be one. It is obvious that his speech is not being appreciated, but it is quickly interrupted by Dougal’s boisterous entry. Not seeing the prince that he had earlier impressed, Dougal is screaming “victory” and grabbing onto the women, when he notices the English wounded. He asks Jamie why the English “scum” are being treated as if they were kin.
 Jamie tells Dougal that the British have been taught a lesson that they will not soon forget, but the older man draws his sword again, threatening to kill them all. Jamie restrains him, saying that killing the men will not add to their victory.

The prince then speaks, saying that the men are all his father’s subjects. Dougal whirls around, horrified. For the second time in the episode, he finds himself being touched by Charles, but instead of a grateful hug, this time the prince grabs Dougal around the face.
 Each man is Dougal’s brother, Charles says and despairs at his lack of Christian charity. The prince orders that Dougal’s name be struck off the Jacobite roll, as there is no place in his army for someone with such wanton disregard. Shamed, Dougal goes to leave, watched silently by everyone assembled.

But Jamie the laird steps forward once again. Branding Dougal a warrior with an unfortunate tongue, Jamie suggests an alternative plan. Dougal should be given command of an elite group of warriors, to form the Highlander Dragoons, whose job it will be to follow the enemy, report on troop movements and harass the supply lines. In this way, says Jamie, Dougal’s abilities will be used, but the prince will not need to look upon him again. It is a proposal that Charles agrees to, praising Jamie’s ingenious mind and informing Dougal that he is in Jamie’s debt.
Dougal thanks Jamie and assures him that he will not give his nephew cause to regret his generosity. But this is where his humility ends.
 Grabbing Jamie’s arm, Dougal informs him that he knows what Jamie is up to: championing him and exiling him at the same time. It is, says Dougal, a plan worthy of his brother Colum. While it is probably not meant as praise, this is yet another indication of how much of a natural leader Jamie has become. Dougal goes to leave, but before he does, he asks Angus how Rupert is doing. There is no answer and Dougal repeats the question, remarking that Rupert is his friend too. He grabs onto Angus and suddenly we realise that something is desperately wrong.


Angus is choking, his mouth full of blood and Dougal calls out at once to Claire. Horrified, Claire lifts up Angus’ shirt and sees the purple flesh below. Too late, she realises the significance of the canon blast. Far from being fine, Angus has been bleeding internally the whole time. Jamie asks if there is nothing she can do, a plea echoed on the shocked faces of everyone assembled. Angus too, is looking desperately at Claire, trying to speak through the blood. “Save me, Mistress.” But she cannot. It is an all too brief, tragic death scene.

Angus the joker, the fierce warrior with the quick temper, Angus their friend, is gone. The grief is immediate. Heads bow, Jamie crosses himself silently and Claire strokes the dead man’s face.

Angus the joker, the fierce warrior with the quick temper, Angus their friend, is gone. The grief is immediate. Heads bow, Jamie crosses himself silently and Claire strokes the dead man’s face.
The silence is broken by an anguished cry. Determined and pale, Rupert rises from his sick bed.
 Without a word, he walks over to Angus, picks up the sword that had been promised to him earlier and unsheaths it. He carries the sword back to his bed and hugs it to his chest, looking over at the body of his friend. It is a farewell all the more heartbreaking for its simplicity. The scene ends with the group huddled around Angus and the shock is palpable.

That night, the rest of the camp celebrates, but the main group are sombre. Dougal stares into the flames of the fire, while Murtagh comments that he had expected the flavour of victory to taste sweeter. Jamie turns to Claire, saying that she had been right about Prestonpans after all. “I was, wasn’t I?”
 she answers, but then adds, chillingly, “That means I’m also right about the disaster awaiting us at Culloden.” As Claire, Murtagh and Jamie exchange looks, the reality of this statement sinking in, their conversation is interrupted by the drunken singing of Rupert and Ross. “Come let us drink while we have breath,” they sing, “for there’s no drinking after death.” Their respective best friends gone, the two men are grieving in the only way they know how. Bitterly, they sing the final line, “Down among the dead men let them lie.”
 Ross punches the air and the crowd gives a cheer, but the final moment of the episode belongs to Rupert, who stares, bereft, at the ground. The battle has been won, but Rupert is a man lost.


When interviewed and asked about his favourite episode of the season, Sam Heughan chose this one, for the brilliant performances by the whole ensemble. He added that while other episodes gave individual characters the chance to shine, it was this episode where everyone took their turn at centre stage. This statement is certainly true, not only for the actors, but also from the point of view of the cinematography and music. All aspects of the production combine and create a powerful, emotional hour of television. As viewers, we are left in no doubt as to the horrors of war. In the book, Claire remarks that history had deemed Prestonpans a rather insignificant battle, but it is clear that it was anything but. Statistically, the casualties may have been low, but emotionally, no-one will ever be the same. There are certainly no winners in this war. With Culloden still a few months away and the promise of history no longer on their side, the stage is well and truly set for a highly charged and emotional end to the season.
This recap was written by Susie Brown, a teacher-librarian and children’s writer who lives in Australia. She watched the whole episode with her hand over her mouth and her heart pounding in her chest and isn’t surely she’s emotionally ready for what is to come...
****************************************************************************
“Who’s Ready?”The art of preparing for battle. A recap of episode 9 by your Aussie blogging lass
OutlanderHomepage Originals By Susie Brown
As with all episodes in the season so far, Bear McCreary’s musical arrangements set the tone for what is to come. For the first time, the Skye Boat Song is continued past the opening credits not with instruments, but with vocals.

A growing chorus of male voices take over the melody, as the title image shows carts and boots splashing through muddy puddles. The scene broadens out and we see a group of men trudging through the Scottish hillside, accompanied by Claire and Jamie on horseback. The humming vocals continue as Claire’s voiceover explains the situation: on the way to Crieff to join Murtagh and the Lallybroch men, a number of the Lovat contingent have deserted the company, resenting being ordered into action by the old fox. Young Simon has been sent to try and change their minds, offering the inducement of land at the end of the war.
 If the deserters are indeed persuaded to fight and die for this promise of land, the reformed company will all meet at Perth and join the Stuart army. The set look on the faces of the remaining volunteers, together with the slow and slightly sombre pace of the music indicates that this is unlikely to happen. Nothing about this group shows that they are ready for any type of action.
As with all episodes in the season so far, Bear McCreary’s musical arrangements set the tone for what is to come. For the first time, the Skye Boat Song is continued past the opening credits not with instruments, but with vocals.

A growing chorus of male voices take over the melody, as the title image shows carts and boots splashing through muddy puddles. The scene broadens out and we see a group of men trudging through the Scottish hillside, accompanied by Claire and Jamie on horseback. The humming vocals continue as Claire’s voiceover explains the situation: on the way to Crieff to join Murtagh and the Lallybroch men, a number of the Lovat contingent have deserted the company, resenting being ordered into action by the old fox. Young Simon has been sent to try and change their minds, offering the inducement of land at the end of the war.

Murtagh is waiting for them and admonishes them for their lateness, saying that he has been waiting for 5 days and is no longer keen to perform the welcome jig he had prepared for their arrival. It is an immediately lightening of the mood, as Jamie and Claire, arms around each other, move to greet him. The easy trust and friendship between the three is obvious as they discuss the situation. The volunteers that remain are not much to look at. Claire remarks that Jamie and Murtagh will have their work cut out for them in training the Lovat rejects, the old fox having kept the best fighting men for himself. The discussion turns to the personalities of the two Frasers of Lovat, both young and old, Jamie explaining how Young Simon is without his father’s blessing, as Lord Lovat wishes to remain neutral. Murtagh comments that this sounds like the old weasel that he knows well.
 The conversation is interrupted by excited shouts of “Milady! Milord!” and Fergus appears, launching himself at Claire in a joyful embrace. It is lovely to see that the relationship between Claire and Fergus, begun by mutual grief and guilt in Paris, has developed into a closeness reminiscent of a mother and son. Fergus is immediately full of complaints at the treatment metered out by Murtagh, the young boy complaining that he was forced to mend Murtagh’s socks and fetch his meals, and Murtagh countering that he was merely educating the lad as to the finer points of travelling in the highlands. Claire ends the argument with an affectionate “All right, children” and strolls off, her arm around Fergus. Night falls and a beautiful lilting Gaelic melody begins to play, both peaceful and atmospheric as it accompanies a montage of images of the camp at rest.

The following morning, Jamie and Claire emerge from their quarters, Claire commenting that she will instruct the ladies amongst the group to prepare as many banncocks as possible. As they get ready to begin their day, they are subject to another reunion, with the appearance of Rupert and Angus,
 the latter commenting that he has washed his mouth out with whisky in anticipation of a greeting from Claire. She responds in kind, by kissing him soundly on the cheek. She is then engulfed in a bear hug from Rupert, and there are genuine laughs and smiles all round. Given that this episode marks the return of the season 1 highland “personalities”, it is entirely possible that this is a reunion of the actors too. Caitriona Balfe looks genuinely surprised to be swept off her feet and the resulting laughter shared with Grant O’Rourke could indeed be a case of two friends casting off their characters for a second.

Claire asks after Willie and the other men look uncomfortable. The silence goes on long enough for Claire and Jamie to look worried, the latter moving to put his arm around his wife in support. Finally Rupert breaks the news. He tells them, with equal measures of sorrow and disgust, that Willie has gone and gotten himself married to an Irish lass and has sailed for America with her family. Claire smiles, and suggests that marriage might do them all some good.
The easy camaraderie halts somewhat with the appearance of Dougal, who announces his arrival by striding towards the group asking if Jamie has a welcome for his uncle.
 In a move designed to reassert his power while attempting to unsettle Jamie at the same time, Dougal tells his nephew that he looks well, “despite the misfortune he has suffered”. Jamie refuses to rise to the bait, declaring that he has never felt more fit. Claire greets Dougal cooly and the strain between the two of them is obvious. Jamie asks if Colum has changed his mind about the rebellion, with Dougal replying that Colum’s mind is his own. The true situation becomes clear - the only ones of the Mackenzie clan ready to “declare their hearts and swords to the glorious cause” are Dougal, Angus and Rupert. Claire’s blunt retort, “What, just the three of you?” leads Dougal to once again allude to Wentworth, stating that she hadn’t questioned their strength when Rupert and Angus had helped to rescue Jamie from under the noses of 200 hundred redcoats. This barb is offset by the comedic stylings of Rupert and Angus, who, in true “I once caught a fish - this big” style and much to Murtagh’s quiet amusement, begin to riff about the actual number of redcoats they had defeated on their own.

Dougal expresses his pride in Jamie’s joining of the Jacobites, saying that it is as if he was watching his own son take his first steps as a man.
 Jamie replies saying that he welcomes their hearts and swords and he will be happy to enlist their help in the training of the men. Dougal states that it shouldn’t be too difficult. It is obvious that he expects to immediately take charge and march the men straight to Charles Stuart. But Jamie is not going to allow Dougal to dictate the pace, saying that the men are not ready for any kind of battle yet, and as they are on suitable land for training, they are going to stay for a time. This catches Dougal off guard, asking Jamie if his mind is set on this course of action, before finally backing down and stating that they will make a fine group of Highland soldiers.

The next scene opens with Murtagh doing his best sergeant major impersonation as he begins to drill the highland men, underneath a tattered and fluttering “Je Suis Prest” flag.
 It soon becomes clear however, that the men are far from ready, unable to form lines and asking when they are going to get real weapons. Jamie, Claire and Dougal are all watching this exchange, but the reaction of each of the three is markedly different. Dougal smirks at Murtagh’s attempts at disciplining the unmotivated group of men and walks away, while Jamie looks on, a little disconcerted at the men’s lack of enthusiasm. But it is Claire who has the strongest reaction.
 As she watches Murtagh barking orders in the men’s faces, a brief image of a WWII company flashes into her mind. Disconcerted, she walks away, towards another part of the camp. Fergus is playing a game of shinty with some of the other men and another image of American soldiers playing baseball appears. It unsettles her enough to stalk into the group of laughing highlanders and drag Fergus away, admonishing her young charge for not collecting water as she had asked.


The training continues, with a montage of activity. The singing returns, with male voices raised in a stirring Gaelic anthem, as Jamie, Murtagh and Dougal all take their turn in instructing the men. Weapons are being forged, the women are preparing musket balls and the general atmosphere is one of anticipation. Around the fire that night, Dougal is determined.
 He states that the men are coming along nicely and that they should march to Charles Stuart without delay. Murtagh immediately disagrees, asking which group Dougal has been surveying, as if this particular group were to meet the British they would either be slaughtered or hanged. Dougal is insistent, telling Jamie that more clans are joining the cause every day, with their leaders jockeying for positions of authority. But Jamie is not about to be swayed by his uncle, saying that he has more important concerns than jockeying for a position at the Prince’s table and refusing to take the men anywhere near the main army until they are ready. The tension between the two is building.

Also building are the WWII flashbacks (or flashforwards) Claire is experiencing. Many things are triggering her memories, this time the sight of the men eating and being unimpressed at the food on offer.
 In an extended scene, we see the origin of Claire’s “Jesus H Roosevelt Christ” expression, uttered by American corporal Caleb Grant. Claire makes friends with Corporal Grant and his friend Private Max Lucas and the trio companionably discuss their hometowns and the peculiarities of the English language. Back in the present, Jamie encounters Claire in their quarters. It is obvious that she is not herself, but Claire refuses to admit that anything is wrong, saying simply that there is so much to do. Shedding his jacket, Jamie’s clan badge drops to the ground and Claire retrieves it, the badge immediately merges with the cloth badge on the American soldiers’ uniforms. “Je Suis Prest,” murmurs Claire, “I am ready”, but the tone of her voice casts doubt on this statement.
 Jamie crosses to her, apologising for bringing her to the camp and promising her that whatever happens, he will make sure she’s safe and they will get through it. Claire insists that she is fine, but his look of concern shows that he is not convinced.


The following morning, Murtagh is back at the training, but the men are still only making a half-hearted attempt at their role of soldier. Enter James Alexander Malcolm Mackenzie Fraser, complete with his father’s magnificent coat.

In a stirring speech reminiscent of “Braveheart”, Jamie wins the men over. He acknowledges what they are thinking and feeling, admitting that he was much the same when he first became a young soldier in France. But then he tells them of his experiences with battle and how a well disciplined and trained army can triumph. His voice builds, spurring them on to have the discipline to stand together, to march together and to fight together, so that they will win. But just as he has them in the palm of his hand, the mood is broken by the scream of a battle cry, “Tulach Ard” and barechested and mud encrusted Dougal, Rupert, Angus

The following conversation shows just how far Jamie has come. Dougal expects to be able to dismiss his nephew’s concerns and take charge, telling the younger man that he has been training men for longer than Jamie has been alive, so he knows more about the process than Jamie does. But Jamie is adamant. “No,” he counters, “you don’t.” Showing that he now deserves to wear the laird’s coat, Jamie declares that the men are his clan, answerable only to him. Furthermore, he gives Dougal an ultimatum. If Dougal wishes to fight with Clan Fraser, then he must obey Jamie’s orders without objection.
 If he can’t, then he should be on his way. This is a side of Jamie that Dougal has not seen before and it both annoys and unnerves him. With a quiet “As you say,” he walks off, leaving Jamie alone.

This is a brilliant scene, superbly acted by both Sam Heughan and Graham McTavish. Keeping the title of the episode in mind, it is clear that Jamie is now ready to be the true leader of his clan, whereas Dougal is far from ready to relinquish control to his nephew.
Indeed, Dougal heads straight to Claire and attempts to assert his control via manipulating her instead.
 He tells Claire that Jamie is struggling, but too proud to ask for help. Claire could, he suggests, remind Jamie that Dougal can help him. When Claire asks why she should do that, Dougal plays his trump card. She should do it, he says, because of their agreement in the cave while Jamie was prisoner, adding that he would wager that Claire had never told Jamie of his generous offer to look after her as her husband, nor her own promise to be Dougal’s bride if Jamie died.

But Claire will not be manipulated. Speaking with an icily quiet voice, Claire informs Dougal that she and Jamie share everything. Dougal expresses surprise, saying that if Jamie took no issue with it, then he is the better man. Claire agrees wholeheartedly, telling Dougal that truer words have never been spoken.
What follows is another beautifully acted scene by Caitriona Balfe and Graham McTavish. In an unnerving speech, Claire brands Dougal a narcissist, unable to rise above his own ego and self gratification. His wish to restore King James to the throne, is not for Scotland, she says, but his own self interest. Claire tells him to stop trying convincing people of his patriotism and suggests in no uncertain terms what he should do instead. In response, Dougal is equally quiet and fervent.
 He does love his own reflection, he admits, but he loves Scotland more. He would give everything he has, or anything he ever will have, including his life, to see a Stuart back on the throne.

Finally, the training is bearing fruit. Jamie, Murtagh and Dougal are encouraged by the progress of the men, who at last are beginning to march as a disciplined unit.

And indeed, it is more than a question that initiates Claire’s next reaction.
 Rupert and Angus are examining the condition of Angus’ feet, which are covered with, as Angus says, “everyday filth.” On sighting them, Claire is disgusted,telling Angus that he could develop trench foot, which could in turn lead to gangrene and amputation. Angus fails to understand the seriousness of the situation and Claire becomes increasingly agitated. The face of Angus morphs into one of an American soldier and she is once again back in the second world war, educating largely disinterested soldiers about the importance of looking after their feet.
 Brought back to the present by Angus’ maniacal laughter, Claire loses her temper completely, curses at Angus and stalks out of the tent.


That night, as Rupert regales everyone with an off colour story, Dougal stalks in, proudly leading some new recruits. Jamie is immediately suspicious, wanting to know why a group of strangers have succeeded in getting past the guards and when Dougal tells him that he merely waved and was allowed to pass, Jamie tells Murtagh to send the sentries to him. Next Jamie questions whether the volunteers are indeed there of their own free will, explaining to the men precisely what will be expected of them. He tells them that if they do not wish to stay and fight, they should leave immediately and no one will think any less of them. To a man, the group departs.
Left alone, Dougal questions Jamie’s actions. They must conscript, he says. But Jamie will not take men from other clans, not have men fight for something that they don’t believe in. Dougal says that they can make the men believe, but Jamie disagrees. A man who fights for his own beliefs, he says, is worth ten of any man forced to fight for someone else’s. But Dougal is impatient, saying that all he hears is words and no action.
 When Jamie says the men need more training, Dougal suggests that Jamie is doing a poor job, given that he just brought 10 armed men into the camp. Jamie agrees, adding that it will not happen again, as he is ordering Dougal and his men to be in charge of sentry duty. Biting back a further retort, Dougal claps Jamie on the shoulder, saying “Done.”

The following morning, Jamie, with laird’s coat back on, announces to the assembled crowd that the previous sentries, Ross and Kincaid, will be punished for letting strangers into the camp. Murtagh proceeds to deliver 6 lashes of the strap to each man.
 As everyone begins to flinch at the sound, Claire leaves, looking distressed. Jamie notices and follows at a distance. More men are practising the firing of the muskets and Claire jerks at the sound of each shot. Jamie notices this too and continues to follow, whilst still calling out instructions to the men behind him.

By now Claire is very distressed, her breathing shallow. She holds onto a cart for support and we are shown the final war scene.
 Giving a lift to Corporal Grant and Private Lucas, Claire’s tank is fired upon and an explosion throws them all from the vehicle. Claire wakes in the darkness, to the sound of men calling out for help. Corporal Grant is with her, who tells her that Private Lucas is on the other side of the road somewhere. Claire says that they can’t leave him behind and Corporal Grant agrees, but that the enemy will see them as soon as they try to cross the road. Claire says that she will go - as a woman, she won’t be harmed. But Corporal Grant refuses.
 Waiting until the enemy tank begins to move, he tells her to “stay put” (an interesting nod to Jamie’s similar request in season 1) saying that he will return for her. She nods her agreement and he moves out. Immediately, there is gunfire. Peering over the embankment, Claire sees him fall, followed by another explosion that sends her back to her hiding spot, curled up in the foetal position, entreating the wounded soldiers screaming for help to shut up. She is found at daybreak by some other Americans, who can’t believe she is out there on her own. Severely traumatised, Claire can do nothing but lie there and shake, to the increasingly concerned questioning of the soldier.
 The “Maam?” changes to “Mo Nighean Donn?” as Claire is discovered in a similarly foetal position by a very concerned Jamie.


Cradling her gently, as if she is a wounded bird, Jamie waits for her shaking and distressed breathing to slow. When she is calmer, Claire shares her feelings of guilt with Jamie. She knows that she would have been killed had she tried to save the soldiers, and it was that knowledge, she says, that allowed her to close the door on the incident until now. It is the training of the men, she says, watching them be turned into soldiers, that has brought back the memory of Max Lucas crying for his mother as he lay dying.
 For two years she has been trying to stop the war from happening, but now that it is here, she’s not sure if she is ready to go to war again. Immediately, Jamie seeks to reassure her. She won’t have to go to war, he says. She has fought her war and they will fight this one without her. He plans to have her sent back to Lallybroch, but Claire refuses. She likens going back to lying helpless in the ditch all over again, powerless to move like a dragonfly in amber except that this time the men who might be dying are people that she knows and loves. She won’t lie in that ditch again, she says. She can’t be helpless and alone ever again.
 As always, Jamie understands her and accepts this without question, promising that whatever happens, she will never be alone again. Tearfully, Claire says that she will hold him to that and Jamie, kissing her on the forehead, tells her that she has his word.


The post traumatic scenes experienced by Claire are taken from bits and pieces of exposition in Diana Gabaldon’s books and sewn together into one coherent storyline for this episode. It is a masterstroke by writer Matt Roberts, as it provides an extra depth to Claire’s character. We see both her vulnerability as she is forced to relive past events that she has never dealt with, as well as understand her motivation to stay where she is, by Jamie’s side, even if she still doesn’t feel ready for war. It also adds a deeper layer to the relationship of Jamie and Claire. As Claire had remarked to Dougal earlier in the episode, the two really do share everything and they are a formidable couple because of it. (It is scarcely worth mentioning how well this revelation scene is acted by Caitriona Balfe and Sam Heughan - as actors, they are so in sync with each other, that it is impossible to imagine them being anything but brilliant!)
Whilst attending to some private ablutions, Jamie is suddenly set upon by a lone attacker. Jamie has no difficulty in overpowering his assailant and it soon becomes obvious that he is a child.
 The indignant sixteen year old, whilst denying that he is a spy, says that he saw the light of the campfire, came to investigate and recognised Jamie, who he describes as “Red Jamie, an unprincipled and traitorous rebel”. Jamie asks who the boy marches with, but despite a broken arm, the young man refuses to divulge any information and states instead that he’s prepared to die. Jamie of course, has no intention of killing him, but begins to try and scare the information out of him, by heating his knife over the fire and holding it near the boy’s face.

At this point Claire appears and begins a performance where she names Jamie a “Scottish barbarian” and offers to surrender herself, should Jamie let the boy go free. Jamie catches on to Claire’s plan quickly and the two of them put on an amusing display, whereby Jamie pretends to ravish his wife and Claire pretends to resist.
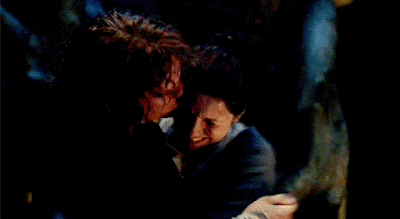 This is too much for the young boy, who agrees to give information if Jamie will let the English woman go. He introduces himself as William Grey, the second son of Viscount Melton. He is travelling with 200 infantry, travelling to join General Cope’s British army and attempts to scare the Highlanders off by warning them of the heavy armourment the British are carrying. Grey also divulges the British soldiers’ position, saying that they are camped 3 miles to the west. The information received, Jamie orders that Gray be taken in the direction of the camp, to be tied to a tree about a mile away if he is telling the truth and to have his throat slit if he isn’t.
 As he is dragged away, Grey says that he owes Jamie the debt of his life, but once the debt is discharged in the future, he will kill Jamie. With a bow, Jamie remarks that in that case, he hopes they never meet.
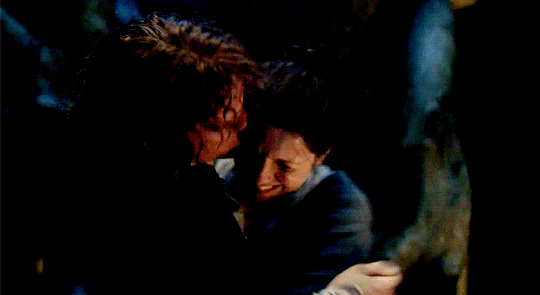

After Grey has been dragged off, it is revealed that it is Dougal’s men who had let the young boy through the lines.

Murtagh to inflict 18 lashes of the belt upon his back - 6 for the uncovered fires and a dozen for his own carelessness. It is a calculated move that earns him even more respect from the men.
The punishment carried out, Jamie and the others begin to prepare to slip into the English camp.
 Dougal brands this a fine idea, expecting to join the raid. But at this point he learns his own punishment - he and his men are to remain behind on sentry duty. Dougal is incredulous, but Jamie is every inch the commander now and issues this as a direct order. It is yet another example of how ready Jamie now is to lead his clan into battle.

The raid goes without a hitch, the Highlanders slipping in and out without detection and helping themselves to the wheels and cotter pins from the canon carriages. Returning to the camp, Jamie, his face still blackened, shows the trophies of war to Claire.
 He tells her that this success is due to her selflessness - by allowing herself to be “mock molested” in front of William Gray, she forced his confession of where the British soldiers were. It is an action, he says, that will save lives. But just when it looks as if he is going to express his gratitude in another way,
 Jamie tells Claire to get dressed. They need to get moving, he says, before the British awake.


The final scene of the episode is a majestic sight. With the stirring melody of a Jacobite anthem playing behind them, Jamie leads his men towards the Stuart camp. Banners waving, Jamie raises his sword and the men follow. Jamie, Claire, Dougal and his men, Murtagh and Fergus ride, with the rest of the party marching.
 But this time they walk tall, striding with purpose and carrying weapons. No long a band of undisciplined cotters and farmers, they are now Jamie Fraser’s men. The Stuart camp appears below them and Jamie calls Dougal forward. He asks his uncle to do the honour, ride ahead and announce their presence to the Bonnie Prince. This is a conciliatory gesture, not lost upon Dougal, who gives his nephew a brief nod and smile of gratitude, before cantering down the hillside.
 Jamie turns to Claire, remarking that there is no turning back now. Claire agrees, quoting Jamie’s clan motto: Je Suis Prest. And this time, they are.


This episode contained a number of written for television scenes, but each of them served to complement Diana Gabaldon’s original words. The episode provides the chance to examine the concept of readiness for battle and the impact that this process has on all the characters.
 Jamie has come into his own now, every inch the leader of men that book readers have long known him to be. Claire has faced her fears from her previous war experiences and has emerged with the determination to never lie helpless again. She needs to be with those she loves and will both draw strength from and give strength to them. Dougal has been made to take on the role of follower, rather than leader. Of all the characters, it is Dougal who is probably still not ready to be subservient, but seeds have been sown in this episode that will come to fruition later in the season. The stage is set. Let the battles commence. Je Suis Prest.

This recap was written by Susie Brown, a teacher librarian and children’s writer who lives in Australia. Her favourite part of this episode was watching Jamie’s inspiring speech to his men and noticing just how well that Laird’s coat suits him now.
****************************************************************************
“Never Trust A Fox” - Our recap of season 2 episode 8 by your Aussie blogging lass!
OutlanderHomepage Originals By Susie Brown
** Before we get started **
** Before we get started **
It was always going to be a difficult task to follow the “Faith” episode. That episode was so full of emotion and touched so many people on a personal level that it stands to reason that episode 8 would suffer by comparison. But then add to that the fact that episode 8 diverted the most strongly from Diana Gabaldon’s books, in a way that the author herself had stated she wasn’t fond of and you were bound to get some concern from the fandom. It’s safe to say that this latest episode is the most controversial so far. Many have liked it, but many more have not. Your humble reviewer falls into this second category - but will attempt to be neutral whilst recapping the events!
~
Almost as if it were a bad dream, all traces of France have been removed from the opening credits. In place of the opulence of Paris, we now have the sweeping landscapes of Scotland once again, complete with some allusions to the 20th century, with its future characters and events.
 Battle scenes are prevalent too and the whole atmosphere is one of determination - a warrior feel, before the episode even begins. As the theme music, wholly sung in English once more, fades away, a single high whistle continues the melody with bagpipes gently underscoring the tune. A fox fixes its gaze on the viewer. Foxes are often symbolic of trickery and deceit, so we already have a hint of what may lie in store as the episode plays out.

Claire’s voiceover announces that they had come to Scotland to heal and the opening minutes of the episode certainly indicate this. Enough time has passed for Jenny and Ian to have had another baby and for some happiness to show in the faces of Jamie, Claire and Fergus, who has accompanied them to Scotland. Back in her tartan clothing instead of fine French fashion,
 Claire greets an excited Rabbie McNab, who has just harvested the first potato of the new crop. Inside the house, Jenny, Claire, Jamie, Mrs Crook and the children crowd around the potatoes tipped onto the table, admiring the new fruits of the harvest. Jenny thanks Claire for the suggestion to plant them, remarking what a fine crop it is. It is soon obvious that noone knows how to prepare a potato however, until Fergus and Claire share their knowledge:
 boiled and eaten with salt and butter, roasted or mashed with milk. Jamie good naturedly teases Claire about her cooking ability and when she responds that she is confident in her ability to boil a potato, he pulls her towards him, saying that they will have a feast. Their easy affection and closeness is heartwarming and serves as another reminder that time has indeed passed and the healing powers of Scotland have been weaving their magic.


Ian and Murtagh appear with the mail and the potato reverie is over. Everyone settles down with their letters: Claire’s is from Louise, while Jenny’s contains a bill, a letter from their Aunt Jocasta and some books. Ian, Jamie and Murtagh are discussing the repair of some equipment, with Murtagh commenting that he never thought he’d be a farmer.
 Their easy conversation is brought to a halt though, when Jamie opens his own letter. Jared has written, expressing his pride in his cousin and enclosing a paper bearing the Stuart crest. It is a declaration of the Stuart right to the English throne, signed by all the Highland lairds who support the cause and Charles has brazenly forged Jamie’s signature. Murtagh reads the rest of the news: Charles has landed in Scotland and begun to form his army. The scene ends with the realisation of what this all means: the distribution of the list immediately makes Jamie a traitor to the crown. As a result, their campaign to stop the Jacobite rebellion before it begins is over - Jamie now has no choice but to join the battle.

It seems almost cruel to the viewer: 6 minutes into the episode and the longed for viewing of happiness and healing is done!

Alone on the hillside, Jamie and Claire discuss the implications of Charles’ actions. Claire wants to leave, saying that they can go to Ireland or the colonies, and take their friends and family with them. Jamie will be hanged as a traitor to the British if caught, so they must leave.
But the restorative power of Scotland is most emphasised in the conversation to follow. Jamie is no longer the “half man” that he was in France. His determination has returned and with it, his warrior confidence. He will not leave his tenants to the mercy of the British butchers. They know what happens if the Jacobites lose, Jamie says, but what if they win?
 This time it is Jamie convincing Claire that they can still change the future, arguing that she has already done so in the saving of young Thomas Baxter, for preventing small pox from entering Paris and for ensuring that Louise de Rohan did not attempt to abort Charles Stuart’s baby. Claire can’t believe that Jamie wants to fight for Prince Charles, but Jamie corrects her: he wants to fight for their family and for Scotland. There is no other way, he says. Claire reluctantly agrees, saying that she can’t think of an alternative that they could live with and adding that the definition of insanity is described as doing the same thing over and over, expecting a different result. With an affectionate stroke of her face, Jamie responds that he’ll wager that whoever said that has never travelled through time. The scene ends in another embrace, with Jamie gazing across the hills in determination: the Laird has indeed returned.

The decision made, the planning begins. Ian, Murtagh and Jamie start talking of men, meeting places and timelines, with Jamie instructing Murtagh to bring the men to join himself and Claire in two weeks’ time.
 When Claire asks where they will be in the ensuing fortnight, he replies that he has been dispatched by Prince Charles to get support from one of his kinsman, Lord Simon Fraser of Lovat. Jenny overhears the name and is immediately incredulous. In describing the “old fox” to Claire, the viewer learns why Jenny is so against Jamie asking for his help. The supposed head of Clan Fraser of Lovat is known for changing allegiances, depending on which side will line his pockets the best. In fact, Jamie and Jenny have only seen their grandfather once, after their mother had died and their father had thrown the old fox out of Lallybroch. Jamie explains that there is bad blood between the Mackenzies and the Lovats, with Lord Lovat once attempting to have Jamie’s mother kidnapped to prevent the marriage between Ellen Mackenzie and Brian Fraser. While Claire comments that this is a situation of which Prince Charles is undoubtedly unaware, the siblings continue their argument. Jenny says that it is degrading and a fool’s errand to expect Jamie to crawl to a man who does nothing that isn’t in his best interest and never without a price. But drawing himself up to his full height and using his sister’s given name, Jamie hisses that what would be foolish would be letting pride stop him from saving Lallybroch, Scotland and everything that they hold dear. This silences Jenny and Jamie announces that they will leave for Beaufort Castle the following morning.

Alone in their room later, Jamie confesses to Claire that he hasn’t been totally honest about his family history. His father, Brian Fraser was the bastard son of Lord Lovat and a kitchen maid. Although acknowledged by Lord Lovat and raised at Beaufort Castle, Brian was still illegitimate, a fact that Jamie feels that he should have told Claire, accusing himself of being cowardly.

Claire reassures him that his father’s parentage makes no different to her and suggests that they go to bed. For the first time ever in a love scene between the two, the screen “fades to black”, a decision that no doubt resulted in howls of protest from the fandom at large!

A little later, Claire wakes alone in the bed, hearing Jamie’s voice downstairs. She walks out onto the landing and comes upon Jamie whispering in Gaelic to his young niece.
 Claire’s eyes fill with tears to see the tender way that Jamie is talking to the baby. Jenny comes out and joins her, explaining that neither Jamie nor her daughter could sleep, so he had taken her off Jenny’s hands for a while. The conversation between Jenny and Claire is beautifully touching. Jenny explains how it is possible to speak to a baby like you can speak to no other; without worrying about choosing your words, adding how such a conversation can comfort the soul. Jenny says that it is the same way that a mother speaks to a child before it is born, turning to Claire and saying “You know.”
 It is a brief but moving acknowledgement to what Claire has lost and Claire’s eyes fill with tears again as she answers, “Yes. I know.” Jenny continues, saying that unlike a mother, a man waits until the child is born, but then feels all the things that could be as well all the things that will never be. Claire continues to watch Jamie and we see the longing on her face. It is a particularly poignant moment for viewers, given their knowledge from episode 1. Is this the only time that Claire will watch Jamie with an infant in his arms?


Morning comes and so do the farewells. Ian and Claire embrace, telling each other to take care of their respective Frasers. Jenny presents Jamie with a set of rosary beads, saying that they brought Ian safely home to her from France. Jamie good naturedly teases his sister, remarking on the fact that Jenny had given Ian a token for France and not him, despite Ian not being betrothed to Jenny at the time.
 But this time Jenny doesn’t bite, wrapping Jamie in a tearful embrace and saying that if he doesn’t come back, she will never forgive him. Jamie kisses her forehead, telling her that never is a very long time.

Some humour is provided at this point by Fergus, who appears awkwardly riding a mule and announcing his intention to go “with milord”. On being told he must stay behind with Jenny and Ian and work in the stables until Jamie returns, Fergus appeals to Claire.
 Hadn’t she said that he would always have a home with them? Claire tries to answer, but Jamie interrupts, agreeing that Fergus’ place is with them and promising to keep him away from the fighting. Jamie tells Murtagh to bring Fergus along a fortnight later, which Murtagh agrees to do, as long as he hasn’t killed the boy first! Jamie tells Fergus to obey his commander, indicating Murtagh, who responds with some marvellously gruff eyebrow acting. Finally Claire and Jenny embrace, Jenny giving Claire some last minute advice to watch out for her grandsire. As the music that accompanied the couple’s journey to France plays in the background, Jamie and Claire ride away, this time heading towards Beaufort Castle.


Claire’s voiceover provides detail about Lord Lovat. For the past 50 years, Jamie’s grandfather has been switching loyalties between the exiled King James and the British monarchs. He has had three wives and indulged in many extra-marital affairs. As they enter the courtyard, Jamie and Claire are met with some suspicious stares, before being shown into a room of the castle.
 As Jamie starts to pick some teasel heads from his wife’s hair, they are interrupted by a familiar voice, telling Jamie to leave them, as they suit Claire. The voice belongs to Colum McKenzie, who has, he says, arrived that morning to discuss a response to the rebellion with Lord Lovat and assumes that Jamie is there to do the same. Colum takes Claire’s hand, saying that he is pleased to see her looking well.

But this is not a welcome reunion. Claire snatches her hand back, reminding Colum of the witch trial. Colum says that he doesn’t understand the implication that he had something to do with Claire’s involvement in that, saying that he understood Claire to be in the wrong place at the wrong time. Claire agrees, but that this was only due to the letter provided by Laoghaire. Colum assures her that he had Laoghaire beaten for the gross overstepping of her place and had intended to throw her out of Leoch, but had been persuaded by Mrs Fitz, who had promised to keep the girl in check. Jamie asks if Dougal has accompanied Colum, the older man saying that it had been decided that it would be best for the clan if Dougal remained at his estate.
 Claire and Jamie are confused at this, as they had assumed that Dougal would lead the clan into battle. The conversation is stopped abruptly by the entry of Lord Lovat, who wastes no time in insulting everyone else in the room. Jamie stands up for himself, saying that at least he didn’t need to resort to rape or trickery to find himself a wife, earning a brief bark of laughter as a result. Lord Lovat tells Claire to leave, so that he can talk politics with his grandson and his rival. After a brief nod from Jamie, Claire shoots the old fox a barely disguised look of contempt and stalks from the room.

Outside, Claire waits for Jamie’s meeting to finish, when she is caught off guard by the appearance of an apparently contrite Laoghaire, who has accompanied Colum to Beaufort Castle, at Mrs Fitz’s insistence.
 Modestly dressed and capped, Laoghaire kneels, claiming to have found God and wanting to express her regret for her past evil actions towards Claire. But rather than accept the apology, Claire tells Laoghaire how she has often thought of what she would do if she met her accuser again, and how every option had ended with lighting a pyre and dancing on Laoghaire’s ashes. Claire says that she doesn’t hate Laoghaire, but rather pities her and the dark places she must have inhabited in her quest to gain something that she would never have.
 The younger woman begins to cry as Claire tells her that she had better find another way of getting right with God, as she can’t help her.


When recounting what happened to Jamie afterwards, Claire muses that perhaps God had brought them together after all, as she feels lighter. Jamie, meanwhile, comments that he wouldn’t have given the time of day to the “brazen wee besom”. Talk turns to dinner, where Claire learns that she is welcome to accompany Jamie to dinner, as Lord Lovat is partial to a bit of “decoration” at the table - with the provison that she doesn’t speak. Claire shoots Jamie a look, but takes his hand as they head downstairs.
 From her mute position at the dinner table, Claire spends her time watching proceedings carefully. Jamie is at his determined best, speaking passionately to the assembled guests of the need to show the British that they will not be put down, that they must unite behind the exiled King, in order to fight and win. Colum tries to discredit Jamie, remarking sarcastically of Jamie’s insight into the French perspective and mocking the news that France has not officially yet provided its support. Getting to his feet, Jamie continues his speech, saying that while French support will be welcomed, they do not in fact need it, listing the strength of the army already assembled.

Meanwhile Laoghaire is pouring wine for the men, watched by one young man in particular. Lord Lovat’s son, moved by either Laoghaire’s closeness or Jamie’s words, gets to his feet to say that the British have offered a reward for the capture of Charles, which is an indication that the British must consider the Prince a serious threat. Jamie jumps on this, asking his cousin outright whether he will join the cause.
 But Lord Lovat immediately discredits his son’s news, saying that the British could therefore end the rebellion for thirty thousand pounds, which would cost considerably less than waging war. His son admits that he hadn’t thought of that, leading Lord Lovat to publicly humiliate him, telling him to sit down and not speak again. With a sleazy grab at Laoghaire, Lord Lovat orders her to bring them more wine, along with a glass of milk for his son. With that the war talk is over.

On the way back to their quarters, Jamie and Claire discuss the state of play. Claire says that Colum appeared to be using Jamie to convince Lord Lovat not to join the rebellion. Jamie explains that Colum will not support another uprising after the rebellions of previous years have failed. Colum wishes Lovat’s clan to remain neutral along with the Mackenzies, knowing that the smaller clans will follow and that the rebellion will collapse before it even starts. It is a somewhat ironic position for them to be in - not long before, Jamie and Claire would have welcomed this opinion, as it would have fit in with their plan to stop the Jacobite rebellion altogether. But now that Jamie has been tied to Charles Stuart, they must change tack completely.
Claire asks why Colum just doesn’t speak to Lovat directly, but Jamie explains that his grandfather doesn’t trust his uncle and that using him instead is a much more effective strategy.
 He decides that he must speak to his grandfather alone, expressing regret that young Simon is a spineless creature, as the old fox’s son could probably influence his father’s decision if he showed more strength of character. Suddenly Jamie realises that Lord Lovat declined to say no to the rebellion when given the perfect opportunity at dinner, leading him to the conclusion that the old fox wants something.

The next day, Claire is walking the hallways and sees Lord Lovat throw an older woman out of his quarters, shouting that she knows something that she is not telling him.
 After checking that the woman is unharmed and introducing herself, Claire discovers that the woman is Maisri, Lord Lovat’s seer. Claire tries to talk to her but Maisri runs off before she can engage her in conversation.

Meanwhile, Jamie’s meeting with Lord Lovat begins on rocky ground, with the older man speaking disrespectfully of Jamie’s mother and branding his father a fool, for choosing Ellen and Lallybroch over Lovat’s offer of making him his heir, despite his illegitimate status. The old fox follows this up with a question, asking Jamie if it’s true that he hasn’t sworn fealty to Colum. Jamie asks him if that’s what he’s after: Jamie’s fealty for sending aid to Prince Charles.

Jamie offers his grandfather a similar fealty to the one he gave to Colum: his help and goodwill while he stands on Lovat soil. But Lovat refuses: he wants Lallybroch and offers an alternative deal. If Jamie won’t give him Lallybroch in exchange for men for Prince Charles, perhaps he would give him Lallybroch in exchange for Claire’s honour? He continues by making a thinly veiled threat, that many men would like to put “the Sassenach wench” to the only use she’s good for and that Jamie cannot guard his wife night and day.
 Refusing to rise to the bait, Jamie instead invokes the La Dame Blanche story to great effect upon his superstitious grandfather, saying that anyone who attempts to take Claire in an unholy embrace will find their private parts blasted like a frostbitten apple and their soul will burn forever in hell. To illustrate his point, he dramatically throws a bottle of whisky into the fire which explodes into flames.

Back in their room, Jamie tells Claire of Lovat’s healthy belief in the supernatural, warning her that she should take care for the next few days. Claire disputes the older man’s fear, saying that he hadn’t seemed scared of Maisri, adding that Lovat really is a brute. Jamie agrees, adding that the old fox is a brute who may soon own his ancestral home. Claire can’t believe that Jamie would seriously consider giving Lovat what he wants, but Jamie argues that if he can’t even persuade his own grandfather, then how will others believe in his ability to lead men and wage war?
 Claire offers an alternative: getting young Simon to stand up to his father and pledge his own support for the rebellion. Jamie agrees that such an action may force Lovat to send men, even if only to protect his son and heir, but expresses doubt that Simon would ever do such a thing. But Claire has a plan of her own, saying that it may depend on what they use to boost his confidence.

The next scene sees Claire seek out Laoghaire, finding the young woman sniffing Jamie’s shirt as she hangs out the washing.
 Laoghaire says that she has done nothing to the shirt, repeating that she really has changed. Laoghaire says that she had thought that God had brought Claire and Jamie to her so that she could make amends, but that Jamie had barely acknowledged her in the hall. She tells Claire that if Claire will not avenge herself then she should leave her alone. Claire responds, over Laoghaire’s fervent hail Marys, that perhaps she could find a way to forgive the younger woman, adding that although Jamie will never love her, perhaps Laoghaire could earn his forgiveness by helping them convince Young Simon to stand up to his father.
 Claire explains that Young Simon is infatuated with Laoghaire and that she could use this attraction to persuade him. Laoghaire is indignant, refusing to “give up her maidenhead” for Claire. Claire counters that she need not do anything of the sort, adding that a woman has more to offer a man than her body. In return for Laoghaire’s help, Claire confirms that she will speak to Jamie on the younger woman’s behalf.


Meanwhile Colum and Jamie are trying to convince each other that their’s is the right course of action. Jamie tells Colum that remaining neutral will be seen as treason by whichever side is victorious, while Colum says that the other rebellions failed due to lack of outside support, which is still the case with the latest cause. If they don’t send men to fight, Colum reasons, then this rebellion too will melt away and they will be left alone. He adds that Lovat would agree with him too, were it not for the temptation of Lallybroch. Making a final plea, Colum tells Jamie that while Jamie has always been headstrong, he has never been reckless with the lives of others.
 He begs Jamie not to make a deal with Lovat and not to trade his home for a war he cannot win. Instead, Jamie promises to do everything in his power to save the things that the two men hold most dear. In this scene, we see a Colum who is beginning to suffer more visibly from his condition. He looks older, his face is paler and he moves more awkwardly, grimacing in pain and grasping onto the table occasionally for support, as well as sinking awkwardly into a chair when Jamie leaves the room. Yet he remains a proud man, with neutrality a far more palatable option than a war in which he could never participate.

The next scene opens with Claire walking arm in arm with Young Simon, chatting companionably about the chapel, the peaceful surroundings and what changes Simon will make when he himself becomes Lord Lovat.
 It is a walk reminiscent of the one Claire took with Alex Randall in Paris and indeed, this is a similarly calculated affair. Laoghaire, now minus her modest cap, appears at a convenient moment, allowing Claire to claim the need for a few private moments in the chapel and leaving the two alone. Laoghaire begins her best flirtatious moves, but Young Simon proves a difficult target,
 awkwardly reciting poetry instead of engaging in conversation.


Inside the chapel, Claire finds the seer Maisri, who is initially fearful of her, asking what a white lady would be doing inside a church. Claire remarks that it is cold outside and says that she is pleased to see that Maisri is all right, after what she had witnessed with Lord Lovat.
 Maisri replies that Lovat is not an easy master, asking Maisri to tell what she sees and beating her if her visions are not to his liking. When Claire asks if everything Maisri sees does in fact come true, Maisri replies that this is mostly the case, although sometimes an action can change things. Buoyed by this, Claire asks what Maisri saw and the older woman tells her, retelling a vision that is symbolic of an execution. Claire remarks that if Maisri tells Lovat, perhaps the old fox can change his behaviour and be spared, but Maisri points out that he could also kill the messenger. Their conversation is interrupted by Laoghaire, who is calling for Claire. On going outside, Claire discovers that Young Simon has run off, after Laoghaire, in desperation when her practised flatteries weren’t working, had let him look down the front of her gown.
 Exasperated, Claire stalks towards the castle, saying that she had told Laoghaire that it wasn’t meant to be about sex.


Finding Jamie in the stables, the two exchange reports of their unsuccessful attempts in persuading both Colum and Young Simon. Claire tells Jamie of Maisri’s vision, with Jamie adding that it would have been helpful if they knew whether the traitor’s death had come at the hands of King George or King James. Jamie remarks that he had told Colum that he would do what he must to save the highlanders and that he can’t get Lord Lovat’s men without giving up his land. Claire says that it is too much and that they should just go to Charles with the men from Lallybroch, but Jamie will not go to the Prince as a failure and failing Claire declaring herself to be a visitor from the future with specific knowledge of the battle to come, he has no choice but to sacrifice Lallybroch.
In the following scene, the old fox proves himself to be what Jenny had said he was: someone who is motivated by his own interests.
 Lovat displays two separate legal documents: an agreement of neutrality between his men and the Mackenzies of Leoch, as well as a deed of sasine for Lallybroch estate. The decision is Jamie’s: if he signs, then he gets the Lovat men for the rebellion, if he doesn’t, then Colum gets his neutrality. After a moment’s thought, and with Claire, Laoghaire and Young Simon looking on anxiously whilst Colum makes a last ditch attempt to dissuade him, Jamie announces that he is doing this to ensure the future for his family and people and moves forward to sign the deed. At precisely this moment,
 Claire draws the attention to herself, dramatically collapsing upon “seeing” a vision involving Lord Lovat. Picking up on Claire’s cue, Jamie rushes to her side, telling everyone that Claire had been tried as a witch by those who didn’t understand the difference between black magic and the power of the old ones. Claire proceeds to describe the events that Maisri had foretold, but helpfully adds that the executioner is standing on a bed of white roses, the symbol of the Jacobites. Lovat reacts with violence, drawing a knife and racing towards Claire, threatening to cut out her tongue. He is quickly stopped, but not by Jamie.
 Instead it is Young Simon who steps into his father’s path and grabs onto his arm. With a look towards Laoghaire for support, Simon says that Lovat and Colum are fearful old men. He says that Jamie is right and it is their duty to stand up for their country and their kinsmen, promising to fight for King James and to change the white lady’s vision even if Lovat himself will not. Lovat responds by turning his back on his son and promptly signs the neutrality pact with Colum.


The following morning, Jamie and Claire are preparing to leave. Young Simon joins them, saying that he will be proud to fight alongside them and will wait for them outside the gates. Jamie remarks that they are going to Charles empty handed after all, but Claire says that at least they have been able to save Lallybroch.
 Seeing Colum waiting by his coach, Jamie goes to bid his uncle farewell. Colum tries one last time to convince Jamie to return home to Lallybroch, even asking Claire if she can do nothing to change Jamie’s mind and saying that he can only be happy that Jamie’s mother had not lived to see her son become so reckless. Yet there is still affection between the two men, with Jamie helping Colum into the carriage and putting his hand over his uncle’s in a brief gesture of farewell.

Before they depart themselves, Claire asks Jamie to go and thank Laoghaire.
 He is shocked, asking what he is meant to thank her for, sarcastically suggesting that perhaps he should be grateful for Laoghaire not attempting to have Claire arrested in the past few days. But Claire is insistent and so Jamie agrees. Approaching Laoghaire, he makes a formal bow of apology, stating that he doesn’t know why he is thanking her, but is doing it all the same. Laoghaire replies that she hopes that one day she will be able to earn his forgiveness. He turns away without speaking further and does not hear her final words...
 “and your love.” This is a signal to the viewer: Laoghaire hasn’t changed that much after all.

As they ride towards Kingussie, Jamie, Claire and Young Simon are suddenly met by a group of Lord Lovat’s men, led by the old fox himself.

 Simon is dispatched to see to the men and Lovat jokes that making a soldier out of his son will be a greater feat than defeating the British. He asks Claire what vision she has for him now and it becomes obvious that he had not been taken in by Claire’s performance at the castle. Jamie explains: it now seems that Lord Lovat has sent his men to support King James and he will receive the credit if they win. However,
if the British are victorious, Lovat can claim that Simon acted of his own free will, using the neutrality pact with Colum to protect him. Lovat thanks Claire, saying that he couldn’t have gotten it all without her. Jamie says that he hasn’t got Lallybroch, to which the old fox merely says,
 “Not yet” before riding away. The episode ends on a humorous point though, with Jamie asking Claire to reassure him that he is nothing like his grandfather. Claire replies that she has seen evidence of a similarly devious turn of mind in Jamie, who in turns says that they may have to rethink their agreement not to lie to one another. As they ride towards Prince Charles,
 Claire’s voiceover summarises what they have achieved: they have Lovat’s men, Jamie will be in Charles’ good graces and they will have the opportunity to steer the rebellion to victory. Lastly Claire speaks again of Maisri and how the old woman had said they could change the future. Perhaps, says Claire, they already have.


This was an extremely controversial episode, due to the large alterations that were made to Diana Gabaldon’s original story. In the book, Laoghaire and Colum never come to Beaufort Castle and Young Simon, far from being meek and timid, is an arrogant man who insults Claire in Gaelic. Most importantly, Jamie is never made aware of Laoghaire’s role in having Claire arrested for witchcraft. The producers have stated that they decided to bring Laoghaire back into the story in order to lay the groundwork for future storylines, but book fans know that one of these storylines is far less plausible if Jamie is aware of Laoghaire’s earlier deception. That said, tv and book are two very different media and to this point any changes made to the original have only enhanced the story overall. It is perhaps best then, to trust Ron Moore’s overall “vision” and believe that everything will indeed be all right in the future!
This recap was written by Susie Brown, a teacher librarian and children’s writer who lives in Australia. She didn’t like the Laoghaire storyline at all, but is trying to remain positive!
***************************************************************************
“Holding On To Faith” - a recap of Season 2 episode 7 by your Aussie blogging lass!
OutlanderHomepage Originals, By Susie Brown.
There is a change to the music this week, with the Skye Boat melody taking on almost a carousel feel. This is accompanied by a faint spinning effect of the camera, as the viewers’ eyes adjust to the fact that the images being shown are not from the 18th century, but decidedly more modern. Indeed, the title soon flashes up: Boston 1954. A red headed girl is looking at a library book on birds and calls her mother over to show her one of them.
 The mother is Claire and we realise that we are back in the 20th century, a few years after Claire’s return. Book readers already know exactly who the little girl is, while tv only viewers can safely assume that this is the child that Claire agreed to raise with Frank. Mother and daughter look at the book, with the child asking what bird it is. Claire tells her daughter that it is a heron, adding that she had seen one in Scotland. A wistful look crosses her face, as the young girl asks when her mother was in Scotland. Having promised TV Frank in episode 1 to leave the past behind, Claire says only that it was a long time ago. As the scene ends, the book image morphs into a close-up of an actual heron, leading us back to the 1700s and the continuation of the drama from the previous episode.
There is a change to the music this week, with the Skye Boat melody taking on almost a carousel feel. This is accompanied by a faint spinning effect of the camera, as the viewers’ eyes adjust to the fact that the images being shown are not from the 18th century, but decidedly more modern. Indeed, the title soon flashes up: Boston 1954. A red headed girl is looking at a library book on birds and calls her mother over to show her one of them.

(As a side note: it seemed unlikely that a specific bird would be chosen at random, so I googled the symbolism of the heron. Interestingly,

the heron represents the ability to stand on one’s own, to determinedly follow one’s own path. It could certainly be argued that the heron is a very apt bird totem for Claire.)

the heron represents the ability to stand on one’s own, to determinedly follow one’s own path. It could certainly be argued that the heron is a very apt bird totem for Claire.)
Claire is lying on a bed in the hospital, fractured images all around her. Her view is blurred and out of focus, images and noises surrounding her.
 Mother Hildegarde is trying to calm her; one of the sisters is praying and Monsieur Forez, in an ironic reversal of his previous conversation with Claire, is trying to save lives - both hers and her child’s. Claire’s distressed voice breaks above the noise, alternating cries of “my baby” with “Jamie.” She is white and vulnerable, as Mother Hildegarde tells her to stay calm. A single tear rolls down her cheek as she seems to focus on the flying heron and the camera pans out to reveal the dire nature of the situation to the viewers. There is little doubt that Claire’s baby has not survived.

This reality is confirmed in the next scene, when Claire awakens, her eyes seeing a statue of the virgin Mary above her. She runs her hands over her stomach and realises that something is wrong. She becomes distressed, calling in a broken, panic-stricken voice for her baby. Mother Hildegarde comes to her side immediately and overcome with emotion herself, breaks the news that Claire’s daughter has been “born dead.”
 Claire’s eyes are wide and pleading and she is unable to comprehend what she is being told. She becomes increasingly distressed, saying that it is not possible and demanding over and over that her baby be brought to her. As she struggles to rise from the bed, the statue of the virgin Mary, which one of the sisters had suggested could comfort her in her grief, due to the fact she too had lost a child, shatters onto the tiled floor.

(Another side note: Caitriona Balfe is astonishing in this scene. Truly astonishing. You feel every second of Claire’s pain and disbelief. It is searingly raw and utterly devastating.)

The despair heightens in the scene that follows. Several days have passed and a calmer Claire is feverish, her breathing ragged. She asks Mother Hildegarde where her baby is now and the older woman tells her that she had baptised the girl, naming her Faith. It is an illegal thing to have done, as babies must be living in order to be baptised, but Mother Hildegarde explains that she wanted Claire’s daughter to be buried in hallowed ground. It is an action that she says will stay between the two women and God. A priest arrives to perform an unction of the sick, in order to “prepare the soul” as Mother Hildegarde says. It is now that we realise that the older woman expects Claire to die as well, and is doing everything she can to care for Claire’s soul, if she cannot heal her body.
 Claire says that she needs her husband, but Mother Hildegarde replies that there has been no word of Jamie. When the father asks if Claire would like to make a last confession and unburden herself of any sins, Claire says that her sins are “all she has left.” It is a comment that highlights how utterly alone and defeated Claire feels. The priest begins his prayers, as Claire begins to shiver - the fever is taking hold. Mother Hildegarde orders Bouton to stay with Claire and the dog curls up obediently at the foot of the bed.


Later that night, Claire is sleeping restlessly. Her breathing is worse and she tosses and turns as the fever takes over. Bouton starts to growl as a hooded figure creeps towards the bed. The figure takes Claire by the shoulders to wake her, which she does, calling out to Jamie briefly before a hand covers her mouth and asks her to hush. The hood falls back and we see Master Raymond,
who warns her that he will be finished if anyone finds him there. He asks Claire what she sees and the vision of the heron returns, as Claire answers that she can see blue wings.
 Commenting that blue is the colour of healing and that the wings will carry away the pain if Claire will let them, Raymond begins his work. A voiceover explains the direness of Claire’s situation. Part of the placenta remains inside her body, causing a deadly infection. Yet as Raymond’s hands begin to move over her body, Claire feels the bacteria itself start to die instead, the fever draining from her bones, as her body starts to relax. Raymond instructs Claire to call for Jamie and as she does so, the placenta comes away into Raymond’s hands. Unsure of what he has done and how he has done it, Claire knows only one thing: Master Raymond has healed her and saved her life. As her friend hides, the sister appears, having heard Claire cry out. She is astonished to see that the fever has broken and runs at once for Mother Hildegarde. Raymond takes this opportunity to say farewell to Claire, with the words “Be well, Madonna.”


Mother Hildegarde continues to explain that Randall’s injuries were great, but he has survived and has been given leave to recover in England. In one respect, this is good news. Randall has gone from their lives again and if Black Jack lives, then so does Frank. But anger has now overtaken Claire’s thoughts. She tells Mother Hildegarde that her husband had betrayed her, with his need for revenge more important than her or their child, breaking the promise he had made to her to grant “one year of grace”. When Mother Hildegarde responds with a verse from bible, in which it is desirable to “throw iniquities into the sea”, Claire replies that she doubts that there is a sea big enough. Tears fill her eyes once more, but they are tears of anger now, not despair.
Weeks pass and the viewers next see a carriage driving through the streets bringing Claire home. Her body has healed,
 but not her soul. Fergus had come to the hospital, her voiceover explains, bringing flowers and asking when she will return. Having lost both husband and child and faced with nowhere else to go, Claire agrees and Fergus, in Jamie’s place, takes his frail mistress’ hands and helps her out of the carriage.

This is perhaps the most beautiful and heartbreaking scene to date. The servants all rush to line up outside the house, standing in silent respect and sorrow as she appears.
 With a beautiful melody composed by Bear McCreary, a melody which his blog identifies as the Faith theme, Claire walks slowly down the line, while the servants bow and curtsey in unison. When she reaches Suzette, the housemaid tearfully kisses Claire’s hand and Claire begins to lose her composure. When she reaches Magnus, he whispers “Welcome home, milady” and begins to bow. But Claire stops him, putting a hand on his chest and then taking his hand. Tears falling now, she whispers back, “Thank you, Magnus” and curtseys to him instead, as the butler closes his eyes, overcome with emotion. It is a stunningly simple and totally heartfelt piece of acting from both Caitriona Balfe and Robbie McIntosh - and it is well nigh impossible to watch it without crying.

Later that night, Fergus is brushing Claire’s hair for her. When she has had enough, she dismisses him, but not without noticing the young boy freeze at the sight of the perfume bottles on her dresser.
 He in turn dismisses her questioning “What is it?” by saying that it is nothing and leaves the room. Alone again, an emotional Claire is pacing the room. Her eyes catch the box of apostle spoons and she lifts the lid, picking up one briefly, before her emotions start to get the better of her. Closing the lid, she picks up the box and kicks it under the bed, before grabbing her wrap and leaving the room.

In the hallway, her own grief is interrupted by the sound of Fergus’ cries. She goes into his room and finds him calling out in his sleep. She wakes him, telling the young boy that he is just having a bad dream and that he should tell her about it, as it might make him feel better. But Fergus soon explains that it isn’t just a dream.

This is yet another stunning piece of acting, this time from Romann Berrux, as Fergus. Haltingly, Fergus begins to tell Claire what happened to him when he accompanied Jamie to Maison Elise. After disobeying Jamie’s order to stay put, Fergus had gone into an open bedroom after spying a bottle of perfume that he had decided to steal for Claire as a gift. He breaks off his story to hand Claire the bottle in question, remarking that it is lavender. Claire looks at the perfume as it it were poison. Lavender is the scent favoured by none other than Black Jack Randall. He had used it during the attack on Jamie and Claire herself had used it when trying to ransom Jamie’s soul.
In a chilling flashback, we see Black Jack discover Fergus in the room. Remarking that Fergus is not what he ordered, but will do, Randall grabs Fergus and begins a sickening assault.
 Claire listens in horror as an increasingly distraught Fergus finishes his tale, blaming himself for what has happened. On discovering Fergus being assaulted, Jamie had attacked Randall, breaking his promise to Claire on the spot and demanding a duel.
 Claire draws Fergus to her, saying over and over that it is not his fault. In this moment, she is a mother, comforting a distressed child and the moment is all the more poignant for this realisation.


A more composed Claire goes to see Mother Hildegarde in the next scene, asking for the older woman’s assistance in obtaining an audience with the King. As Mother Hildegarde was goddaughter to the old sun King, Claire reasons that she will have the connections to make an approach. When Mother Hildegarde remarks that Claire must have found a deep enough sea, Claire replies that she now knows the reason why Jamie broke his promise to her and that while she is still angry at him, she wants to petition the King for Jamie’s release. Mother Hildegarde remarks that there will be a price to pay - as a “mercurial man”, Louis will undoubtedly expect Claire to lie with him. Undeterred, and with a bitter edge to her voice, Claire remarks that if it comes to sacrificing her virtue, she will add it to list of things she has already lost in Paris.
Arrangements are made and Claire takes another carriage ride, this time to the palace. Walking down the ornate hallway, Claire is pale, but determined. She wears Master Raymond’s pendant, her hair is styled and her dress immaculate. She is shown into the King’s quarters and comes face to face with Louis, who resembles a rather immaculately dressed spider, attempting to charm the latest addition to his web, remarking that he does not bite.
 Louis offers Claire hot chocolate from New Spain and an orange from one of his own trees. Under Louis’ intent gaze, Claire begins to make her plea, explaining that Jamie is in the Bastille and that while she agrees that he has broken a royal decree, it was only because he had been provoked and that as a Scot he is most fierce when questions of honour are concerned. She breaks off Louis’ response with a meaningful glance saying that she would be most grateful. Louis notices both wedding bands, remarking of Claire’s noteworthy loyalty to two husbands and slowly kisses both rings. Louis states that he is inclined towards mercy.
 Claire waits to see what the King’s pleasure will be, her voiceover remarking that as an absolute ruler he may do whatever he likes with both Jamie and herself. Louis says that if he grants Jamie’s release, he would like Claire to do a small favour in return, to which Claire repeats that she is at his complete disposal, a reply which pleases the King greatly. Claire looks towards the bed chamber, expecting to be led there, an assumption emphasised when Louis holds out his hand, saying “Come.” He caresses her face, commenting on her fine, pale skin and remarks that he can see why she is called La Dame Blanche.


Claire barely has time to register her surprise that Louis has used this term, when she is swept away from the bed chamber and led into another room, guarded by masked men.
An elaborate canopy of stars is above her head, fires burn in vessels around the room and Monsieur Forez emerges from the shadows. Louis asks for Claire’s assistance and two men are brought into the room. They are two men that Claire knows well: Master Raymond and Comte St Germain. Both have been charged with sorcery and the perversion of knowledge into an exploration of arcane arts, in order to use the dark arts for their own agendas.
 Monsieur Forez presents evidence which has been gathered from Master Raymond’s apothecary and the Comte’s residence. Introducing Claire as La Dame Blanche, with a heart so pure that she cannot lie, Louis says that Claire is able to look into men’s souls and see if evil dwells there. Muttering her trademark “JHRC” under her breath, Claire realises what she must do: tell Louis whether or not darkness exists in the men’s souls. If so, Louis says, they will be handed over to Monsieur Forez and executed. Claire has no option but to agree.

Walking to Master Raymond first, Claire smiles briefly at him. She moves to the Comte and begins a performance, stating that she sees a shadow behind the Comte’s eyes and begins to describe a gang of masked men called Les Disciples and asks him what he knows. But instead of confessing to being behind Claire’s attack, an increasingly angry and fearful Comte says he knows nothing of Les Disciples. He calls Claire a witch, stating that she has been known to drink poison and survive. When asked by Louis how he knows this, the Comte admits that he gave it to her, in retribution for her destroying his business.
With a cool stare and smile, Claire agrees that yes, she is a witch, but a white one, practising white magic. Louis reminds the Comte that Claire is not the one on trial. Despite knowing that St Germain had indeed intended to poison her and would have succeeded if it had not been for Master Raymond’s penchant for substituting bitter cascara for poison when customers asked for it, Claire is still reluctant to condemn him to death outright.
 She paces the room, saying that she sees darkness in Raymond’s soul too, but only the normal darkness that exists in every man, indicating that both Monsieur Forez and the king himself fall into this definition, adding that without darkness, there can be no light. It is the Claire of old returning briefly for a minute - confident and in command of a situation. Like the heron, she is standing on her own once again.

Louis remarks that he must make an example, if he is going to cleanse the city and suggests a way to aid Claire’s decision. A serpent is dramatically produced, startling Raymond, the Comte and Claire alike. Louis says that the bible states that a snake will not harm a true believer of God, clearly expecting the men to handle the deadly creature. Looking around, Claire suggests another option: that she give the men the same poison that the Comte had given her, asking that if they drink it and survive, Louis will free them. Louis allows her to give the poison to the men, but makes no promises as to their ultimate freedom.
Claire approaches Master Raymond first. He drinks and, as expected, doubles over in pain, gasping and gagging,
 but ultimately stands upright and handing the cup back to Claire. But as she moves towards the Comte, expecting the same result, the pendant around her neck suddenly darkens: an indicator of poison. It is then that Master Raymond’s sleight of hand is remembered: noone has seen him add poison to the mixture, but he has done so all the same. The Comte sees this too and his eyes widen in horror. He knows that the cup contains certain death. He begins to sweat and spits insults at Raymond and Claire as fearful tears begin to fall. But he has no choice. Louis orders him to drink and he does so,
 telling Claire that he will see her in hell. Within moments, his face darkens and he collapses. Stepping over the Comte’s body, Louis turns to Raymond, saying that the man should count himself fortunate and commanding the older man to leave Paris immediately. As Raymond is led away, his eyes on Claire in a silent goodbye, Claire’s voiceover recalls a line from the Wizard of Oz when Dorothy farewells the Scarecrow, remarking that she will miss him most of all.


Claire asks Louis if he will honour her original request. All charm gone, Louis now remarks that first there is the matter of the payment. He pulls her roughly from the room back into the bed chamber, where Claire is pushed back onto the rich bed cover. Louis takes his payment with a handful of short thrusts, while Claire lies back and thinks of England.
 It only takes seconds and Claire opens her eyes, realising in some surprise that it is already over. She sits up and straightens her skirts, to see Louis already rebuttoning his trousers. He tells her that he will issue a pardon for Jamie and also arrange one with the English crown, so that they may return to Scotland. With an impatient wave of his hand towards the door, she is dismissed. In a piece of beautiful comic precision, Claire picks up the orange she was offered earlier and curtseys. She is escorted back down the hallway, stopping briefly to gaze back in disbelief at what has occurred. The camera pans back as she walks slowly from the palace. The slow walk is mirrored as the next scene begins, but this time it is Jamie, walking slowly up the staircase of the Fraser house. He pauses midway, uncertain, before continuing, head bowed. Claire waits at the top of the stairs, but does not look at him.

This scene is perhaps one of the most anticipated for book fans. The stakes were high, as it was expected that Caitriona Balfe and Sam Heughan would do a stellar job of the emotional conversation that Claire and Jamie were about to have. As they have done time and time again throughout this season and the last, the two actors did not disappoint. This was heart wrenching stuff and not watched by many without a box of tissues - and perhaps a whisky- close to hand.
Jamie is in shadow as the scene begins, our focus on Claire’s face. She is emotional, tears welling up, but her lips are pressed tight and her eyes are angry. Jamie is pleading, his voice husky with equal emotion, saying that he doesn’t know if the baby was a boy or a girl.
 She refuses to answer and he whispers her name, asking if she will make him beg. She turns and walks away from him, as he comes into full view. We realise that significant time has passed. Jamie’s hair is scraggly, his face covered in a full beard. He is wearing the same clothes from the duel - he has obviously come straight from the Bastille.

Claire sits before she answers, telling Jamie that the baby was a girl and that Mother Hildegarde, with an odd sense of humour had named her Faith and buried her in the cemetery next to the convent.
Jamie comes closer to her, telling her urgently that he did try to keep his promise.
 Claire confirms that Fergus has told her. She is distant, cool, and chillingly calm. It is a Claire he has not seen before and it obviously unnerves him. Jamie says that she must see why he did it, how he couldn’t let Randall go unpunished. Claire refuses to answer, staring past him, still refusing to meet his eye. Stealing himself for her response, Jamie asks the question: does she hate him for it? This makes Claire look at him. She swallows before answering, “I did hate you.”

We are now taken in flashback to the point where the statue of the virgin Mary shattered in the hospital. Mother Hildegarde brings Faith to Claire, so that she can see and hold her.
 In an exquisite display of a mother’s ultimate grief and ultimate love combined, Claire marvels at the beauty of her dead daughter. Back in the present, Claire is holding her emotions tightly in check, speaking in a voice thick with pain. She describes Claire to Jamie, who watches mesmerised, pain crossing his own face as he hears of the transparency of Faith’s skin, like a pearl still wet from the sea. He bows his head when Claire tells him that Faith’s eyes were a bit like his own and that she had wisps of copper hair.


We then see Claire singing to her daughter, a song popular in 20th century vaudeville, about liking to be beside the seaside. It is usually sung joyfully, but here it is full of longing, a longing that we see on three faces - first Claire’s in the hospital and then Jamie and Claire back in the present. Still they have not touched, or really looked at each other. The desolation is palpable.
Louise de Rohan appears in the final flashback scene of the episode and observes Claire still enamoured of her daughter. Louise asks how long Claire has been like this and Mother Hildegarde answers that it has been since the morning.
 With a brief touch of her own pregnant belly, Louise tentatively approaches Claire. It is a beautiful tender scene and kudos goes to Claire Sermonne, for showing this side of Louise. No longer the pouty socialite giggling at trivial matters, Louise is tearful and full of concern. She answers Claire’s question, “She’s beautiful, isn’t she”, with an honest “She’s an angel” and asks if she may hold the baby, adding that it is time. Grief stricken all over again, Claire nods, kissing her daughter in farewell and finally handing her over to her friend. At this point, Claire’s resolve crumbles totally and she falls sobbing onto the bed.

“So yes,” says an emotional Claire back in the present, “I hated you.”
Jamie whispers “Aye” and turns away, sitting down across the room. He is as desolate as she.
But Claire hasn’t finished. She has come full circle now, blaming herself for what has happened. She was the one who asked the impossible of Jamie, she was the one who put Frank before their family, she was the one who followed Jamie to the woods. Jamie is quick to contradict her, saying that Frank is her family too.


“But he’s not here,” replies Claire. “And now neither is our daughter.” She continues to self blame, adding that it’s not Jamie’s fault, or even Randall’s. It’s hers.
Now it is Jamie’s turn to offer comfort. As the Jamie and Claire theme begins slowly in the background, he moves towards her. He says that he had asked her forgiveness once, to be told that there was nothing to forgive. Similarly, he says, he has long forgiven her for anything she could ever do. Claire takes this as her cue for her final admission: she slept with the King to buy his freedom. Unnerved, but determined, Jamie replied that she did it to save his life, in the same way that he had given himself to Randall to save hers.

Jamie kneels before Claire saying that the only way they can live with it is to carry it together. His voice catches on this word, and Claire asks through her tears if he is sure that he wants to do that.
“We lost our child,” Jamie replies, “but by the grace of God we may be given another.”
“Then bring me home,” says Claire. “To Scotland.”
This brings Jamie undone. He is crying too now and his voice is full of yearning as he says, “Aye. Scotland. But there is something I would like to do first.”
Still, despite their grief and renewed commitment to each other, they have not touched.


The final scene opens on a gravestone saying “Faith Fraser.” Jamie kneels before it, holding the apostle spoon of St Andrew, the patron saint of Scotland. Faith’s music begins again as Jamie speaks directly to his daughter. He kisses the spoon and lays it on the grave, telling Faith that if they have to bury her in France, they will leave a piece of Scotland with her.
 Claire kneels beside him and they each cross themselves. Finally, Claire’s hand reaches for Jamie’s and he grasps it tightly, as they bid farewell to their daughter.

This was a tour-de-force episode. Clearly the highlight of the season so far, it is hard to imagine that it will go unnoticed at awards time. Caitriona Balfe is breathtaking, but each actor brings their utmost to this important part of the story. While many relationships fail after such a tragedy as losing a child, it is precisely because Jamie and Claire choose to carry the burden together that they can survive. The essence of Jamie and Claire’s love is highlighted in this episode and we hope against hope that some healing and happiness will come to them in Scotland. As viewers, we feel privileged to be part of this journey, undertaken as it has been with such obvious love and respect.

This recap was written by Susie Brown, a teacher-librarian and children’s writer who lives in Australia. She hated Jamie’s beard when she first saw it, but is now able to concentrate on the acting and marvel at the talents of the actors.
**************************************************************
“The best laid schemes of Mice and Men oft go awry” A recap of season 2 episode 6 by your Aussie blogging lass!

 The exchange that follows is a truly touching one. Murtagh quizzes her further, asking that if she knows the results of Culloden, she must also know when people die.
Claire replies that she doesn’t know his fate, or Jamie’s or even her own. Murtagh remarks that even if she only knows what Jamie has told him she knows, it is a burden he wouldn’t want to have to carry. He places his hand over hers and she gives him a tearfully grateful look in return.
 After what we assume is a lengthy day of companionable riding, Jamie and Fergus have located the wine shipment. Putting his pickpocket talents to good use, Fergus slips through the darkened warehouse, soon emerging with two bottles of wine.
Jamie removes the seals, tips out some of the wine and tips in the concoction, instructing Fergus to place the bottles where the men are sure to find them. He also hands Fergus the bottle of nettle mixture that will produce the rash and tells the boy to brush the liquid onto the inside of the men’s coats. Fergus does as instructed and, mission completed, the two gallop away into the darkness.

******************************************************************************************************************************************
“The best laid schemes of Mice and Men oft go awry” A recap of season 2 episode 6 by your Aussie blogging lass!
OutlanderHomepage Originals By Susie Brown
Ominous imagery abounds as the episode begins and the strains of the theme song merge into a dramatically charged melody. It is still the Skye Boat song, but slower, and in a slightly different key.
 The music is accompanied by images of people preparing for something: rope is being wound, a fire torch is lit in the darkness. The title of the episode reveals itself as “Best Laid Schemes”, and already the indication is, as Robert Burns’ quote suggests, that whatever the schemes are, they are going to go awry.

In the opening scene, Jamie sits alone at his desk, deep in thought. He nods almost imperceptibly. He has made a decision. The music playing behind is the Jamie and Claire theme, so the decision must concern her. Murtagh enters and announces that Randall has been released from the Bastille. Murtagh begins to talk of dueling arrangements - contacting Randall’s second and choosing a venue and time,where they will be safe from the gendarmes. Jamie is silent, not looking his godfather in the eye.
 Talk then turns to Jamie’s training regime, with Murtagh offering to fetch the broadswords so that Jamie can hone his skills, but Jamie tells him that he can’t. Initially misinterpreting this as a combination of Jamie’s busy schedule and his self doubt, Murtagh is incredulous when Jamie elaborates: he won’t be dueling and has withdrawn the challenge. Murtagh’s frustration only increases when Jamie refuses to explain why, saying only that it’s complicated. Murtagh is angry, accusing Jamie of changing his mind “like a woman in flux”. This stings, but rather than rise to the bait and explain, Jamie says only that Murtagh must trust that it’s for a sound reason. Disgusted, Murtagh stalks out of the room, almost colliding with Magnus, who is bringing Jamie’s breakfast. It is from Claire, who has left instructions that he must have a proper meal to start his day. On asking where Claire is, Jamie is told she is at the hospital.

Jamie’s reply, “Of course she has” has been interpreted in different ways by different reviewers. It can be argued that this is indicative of the distance between them. Without saying a word, Claire has left the house, leaving Jamie to dine alone. Others say that this is merely an acknowledgement of Claire’s determination to lead a purposeful life - even though they are in the midst of personal turmoil, she will not let Mother Hildegarde down.
Over at the hospital, a heavily pregnant Claire is going about her duties when she is called over to assist Monsieur Forez. While preparing a body for burial, Monsieur Forez informs Claire that he has been called away to perform his official duties - in this case the execution of people who have been involved in the Dark Arts, as well as those who have associated with them. He gives Claire a meaningful glance, the first of many throughout the conversation. Monsieur Forez proceeds to describe, in chilling detail, the processes involved in drawing and quartering.
 The enthusiasm he displays in the description is reminiscent of Randall’s description of flogging in season 1 and the exchange becomes all the more sinister for this similarity. Yet unlike Black Jack, Monsieur Forez is actually delivering a warning, remarking that he has made Claire pale and that perhaps their friend Master Raymond would be better company for her. We are left in little doubt that behind his ghoulish words, Forez is giving Claire an opportunity to act to protect both her friend and herself - Master Raymond’s activities are known and continued association with him could lead Claire to meet Monsieur Forez under entirely different circumstances.

Claire takes this warning and heads straight to the apothecary. Ushered into the secret room, Claire wastes no time in telling Raymond that he must leave at once, to avoid being swept up in the King’s plan to rid the city of practitioners of the Dark Arts. Raymond is unconcerned at first, telling Claire that this has happened before and that heretics in the past have always been quickly freed.
 But Claire explains that this time is different. She relays Monsieur Forez’s latest mission and tells Raymond that he is in danger. Faced with this news, Master Raymond agrees to flee, remarking to Claire that she is risking her own safety by coming to warn him. She says that she is merely doing what friends do. Gratefully kissing her hand, Raymond promises that they will meet again, whether in this life or another.

Back at the house that evening, Jamie is giving Claire a foot massage. Some reviewers have expressed surprise at the easy conversation and closeness between the two, given the emotional turmoil at the end of the previous episode. The ultimatum that Claire had given to Jamie had seemed at the time to cause an irrevocable rift between them, yet now Jamie is rubbing her feet?! As the scene continues, we discover the reason.
Jamie explains that his change of heart was not because he agreed that he owed Claire a life. In fact, Jamie points out that he has saved her life on at least as many occasions and that they are even. In a speech straight from Diana Gabaldon’s book, Jamie explains his own rationale for letting Black Jack Randall live.
Viewers are used to seeing poignant scenes between Jamie and Claire being beautifully executed by Sam Heughan and Caitriona Balfe and this one is no exception. Jamie tells Claire that while they are doing everything to prevent Charles Stuart’s rebellion from succeeding, the day may still come when they must face the horrors of Culloden Moor.
 If something should happen to him, he says, he wants her to be able to go to safety to a man who loves her. In urgent and emotional tones, and with unshed tears making his eyes bright, Jamie makes Claire promise that if she has no other choice, she will go back through the stones and back to Frank. When she agrees, he kisses her and lays his head on her belly. It is a perfect mixture of fear and love - neither want to think of the possibility of being parted, but promises are made all the same - not just for Claire’s safety, but for the life of their child. The agreement is all the more poignant for the fact that viewers are watching this scene with the knowledge of episode 1. Armed with that knowledge, the viewer can feel just as despairing as Claire, the look on her face clearly showing that she does not want to think about that course of action for a second.

A change of pace is definitely called for and it is provided in the following scene, where Claire, Jamie, Murtagh and Fergus experiment with various herbs and potions in order to create the appearance of smallpox. Murtagh, no doubt still angry from the cancelled duel, wishes to know why this is necessary.
Jamie and Claire explain that if they can thwart Charles’ wine business by having the warehouse and wine destroyed, then donations to the Jacobite cause will dry up and the Bonnie Prince will be forced back to Rome with his tail between his legs. Murtagh again suggests that it would be easier to slit the Stuart’s throat, but Claire comments that this would only make him a matyr throughout Scotland.
Meantime Jamie begins to swallow the potions to create the effects of the pox, seemingly undeterred by Claire’s descriptions of the vomiting, cramps and rashes that will soon occur. Fergus is more interested in playing with bandages and getting underfoot, for which he is admonished by Claire. It is an endearing maternal moment, amidst discussion of how to get the potion inside St Germain’s wine, in order to be drunk by his men.

The potions begin to take hold and Jamie starts to look and feel ill. Claire is pleased at her handiwork, while Murtagh is furious. As Claire starts to try and counter the rash with a soothing ointment and Jamie lives up to the title of King of Men by not actually vomiting, they realise the time has come: they must tell Murtagh everything.
Shortly afterwards, an anxious Claire watches from the window as a queasy Jamie paces the courtyard with his godfather. When Jamie reaches the end of the tale, Murtagh states that he has no place to contradict what he says.
 Striding towards Jamie, he punches him in the jaw in admonishment. It is news, he says, that Jamie should have trusted him with from the outset. Ruefully, Jamie nods and the two move off together, a relieved Claire still watching from above.

The following morning in the courtyard,
 Claire farewells Jamie and Fergus, who are off on their mission to spike St Germain’s wine shipment with the herbal smallpox formula. After telling them both to be careful, Claire returns inside, to find Murtagh writing dates from 1918 to 1945 on a piece of paper. He asks her directly if she has really lived through the years in question and she confirms that she has, pointing out the year that she was born and the year that she became a nurse - or a healer, to use the 18th century term.

 The exchange that follows is a truly touching one. Murtagh quizzes her further, asking that if she knows the results of Culloden, she must also know when people die.
In the books, Murtagh is never explicitly told of Claire’s history, although it is certainly feasible that given his closeness to Jamie he would have known. The decision to provide TV Murtagh with the knowledge is a welcome one, as it also creates a touching bond with Claire, further cementing the relationship that began in season 1.
 After what we assume is a lengthy day of companionable riding, Jamie and Fergus have located the wine shipment. Putting his pickpocket talents to good use, Fergus slips through the darkened warehouse, soon emerging with two bottles of wine.
Arriving home late, Jamie enters the bedroom and an anxious Claire asks if they had been successful. Jamie remarks that he hadn’t stayed around to find out. Claire says that it must work: Charles Stuart must be prevented from getting the money he needs.
 Jamie responds by telling her not to worry - if anyone can deliver pestilence and disease, it’s them! With a sigh, he falls into bed beside her - and it’s lovely to see that their affection is back.

Jamie’s next visit to Maison Elise sees him beckoned into a room by none other than Charles Stuart, who is accompanied by the Comte St Germain. The Prince is nervous; the Comte disgusted. We soon discover that Jamie and Fergus have indeed been successful.
 There has been an incident at the Comte’s warehouse, Charles tells Jamie. St Germain adds that some of his men have been stricken by an illness that is possibly contagious and that while the affected men have been hidden away, they will soon be missed. Charles informs Jamie that as a result they will need to move the wine immediately, to which Jamie remarks that this may prove damaging to his uncle Jared’s wine business. It is a comment that causes the Comte to explode, shouting his mistrust of Jamie and the fact that Jamie has tried to ruin him before. The Prince attempts to placate the Comte, at the same time reminding Jamie that the profits from the endeavour will be the seed to expel the Hanoverian usurpers to throne, to regain the soil and restore the blessed King. Jamie acquiesces, saying that while he has yet to secure buyers, he will arrange transport of the wine to his warehouse at once. Charles proclaims Jamie to be a loyal and true patriot, a comment that draws a disgusted response from the Comte, who announces his intention to accompany Jamie in order to watch over his investment. This is an unwelcome development, but Jamie gives no hint of concern, sarcastically remarking that the Comte’s conversation will be a pleasant diversion on the lonely road to Le Havre.

The next scene once again provides some comic moments, as the Frasers adjust to the new developments.
 Suzette is dressing Murtagh into some fine French clothing, much to the gruff Scotsman’s disgust, complaining that playing a Jessie is bad enough, but now he has to do it in clothes which hinder his movements. Claire too is concerned. Jamie has hired some men to act as highwaymen, but can they play the part? It is a dangerous endeavour and Jamie acknowledges the fact, saying that the plan revolves largely around not being caught. Claire remarks that occasionally Jamie could lie to her in order to put her mind at ease, information that Jamie promises to bear in mind for next time. Claire is not convinced, remarking that it is needlessly risky, particularly considering that the Comte St Germain will be there too. Murtagh says that they have devised a plan for the Comte and Jamie assures her that he has thought through everything and that it will do. Besides, he reasons, Jamie will merely be a merchant transporting goods and that it will be Murtagh in the line of fire. Murtagh adds that if he is caught, he would like Jamie to kill him, as he has no intention of being hanged in his current outfit. Suzette steps forward at this point, promising to take him away and get him undressed at once. It is a lighthearted ending to a potentially serious turn of events.

In bed that night, Claire apologises, stating that bad things tend to happen when they are apart. Jamie smiles at her, saying that they always find a way back to each other. Rubbing her belly, Jamie is startled by a sudden movement - a kick from the baby.
 After an amusing by-play where Jamie refers to the baby as a he and Claire as a she, Jamie leans over Claire’s belly and speaks directly to his child, tenderly calling it “Wee one”, announcing himself as its father and saying “I canna wait to meet ye.” It is simultaneously beautiful and heartbreaking, as, armed with episode 1 knowledge, the viewer has to doubt that this will ever happen. Claire kisses him and the two begin to make love, Jamie’s reticence at whether they can safely do so silenced by Claire’s statement “you won’t hurt us.”

The romantic moments of the previous scene are starkly contrasted by the one that follows.
 An increasingly preoccupied Claire is enduring the simpering and giggling of Louise and her ladies, who are making off-colour observations about mutual acquaintances. At the same time, Jamie and the Comte are making their way through the darkness with the shipment of wine. The viewer soon realises the reason for Claire’s irritation with Louise and the others - she is worried about Jamie. At the arranged time and place, Murtagh and the other “highwaymen” surround the wagons, ordering Jamie and the Comte to drop their weapons and give up the cargo. The Comte is adamant that they keep going, aiming his pistol at a masked Murtagh, refusing to get down off the carriage and promising that Murtagh and the others will be hunted down and hanged.
 Obviously carrying out their prepared plan, Jamie knocks the Comte out of the way, just as Murtagh fires a shot wide of the two men. The other men capture the Comte while Jamie appears to leap onto Murtagh and fight him, indicating with a nod of the head when it is time for Murtagh to “overpower” him. Murtagh obliges by knocking Jamie unconscious.


We are then returned to the simpering ladies, with whom Claire quickly loses all patience. She asks if they are distressed by the way that the city treats the poorest of its citizens. The ladies completely miss the point, with Louise saying that the gendarmes should remove the poor to the less desirable parts of the city. Unable to bear the women a moment longer, Claire leaves the room and the others resume their gossip session.
With Fergus as chaperone, Claire goes to the hospital. She tends to the patients,while Fergus plays with Bouton.
 But something is wrong. Mother Hildegarde notices Claire’s exhaustion and insists that Claire goes and rests. Claire tries to tend to more patients, but the older woman tells her that unless she wishes to become one herself, she must stop and lie down. Claire agrees. While helping her onto the bed, Mother Hildegarde notices spots of blood on Claire’s stockings. She is bleeding. Mother Hildegarde reassures Claire that it is nothing to be overly concerned about, as bleeding can happen at this stage. Nevertheless she insists that Claire should stay the night at the hospital, agreeing to send Fergus home with a message for Jamie.

Jamie, meanwhile, is nursing a sore head, courtesy of Murtagh’s knockout punch. A distressed Charles Stuart is fearing ruination, saying that he will be persona non gratis with the bankers. The Comte meanwhile is suspicious at the timing of the attack. His intimation is clear - and Jamie tells him that false accusations can have dire consequences.
 The two leap simultaneously to their feet, ready to fight. The Prince stops them, reminding the Comte that by his own account Jamie had saved him from attack and that the discord will not recover his wine. As Charles launches into a speech of self pity, we see Jamie struggling to contain his pleasure - it looks like the mission has succeeded and that Charles will indeed be unable to mount a Jacobite rebellion. But still playing the part, he reaches out a hand to comfort the prince, who immediately starts to cry, promising to take his own life if he is forced to live in “Godforsaken Poland”.

It is morning by the time Jamie arrives home and Fergus greets him with the news that Claire is at the hospital. Jamie is concerned, but Fergus, who undoubtedly does not know that Claire has been bleeding, tells Jamie that Mother Hildegarde had suggested that Claire stay there to save her walking the streets at night and that he, Fergus, had allowed it. With a grin, Jamie says that he was wise to leave his wife in such capable hands and the two share a companionable breakfast.
 Fergus asks when Murtagh will return and Jamie answers that he may be gone for a month or two, as he has gone to Portugal to sell the wine. Suzette interrupts their discussion to inform Jamie that Charles has gotten himself into trouble at Maison Elise, running up a substantial bill. Madam Elise has threatened to call the gendarmes if he does not pay. Fergus offers to go as Jamie’s proxy, but Jamie refuses saying he should go himself, not wanting the gendarme to make enquiries as to his business affairs. Fergus states that he will accompany him, to guard his right and Jamie remarks that he will be honoured.

On arrival at Maison Elise, Jamie tells Fergus to wait while he settles the bill. But, in scenes reminiscent on Claire’s refusal to “stay put” in season 1, Fergus too goes wandering, spying a bottle of perfume on a table inside an unlocked bedroom.
 As Fergus moves to the bottle, the camera pans around the room and we see a red military jacket hanging up. Suddenly the door closes and the ominous music builds. A sickening parallel is drawn with season 1 - when Claire disobeyed Jamie’s orders to stay put, she ended up at the mercy of Black Jack Randall. Although we have only seen Fergus’ look of alarm, tv viewers can’t help but worry that the young boy is about to find himself in a similarly perilous situation.

After her night at the hospital, Claire is greeted by the servants back at home, but none will meet her eye. She asks Suzette where Jamie is, but the maid refuses to answer at first. Spying Jamie’s brace on the bed and realising that he must have returned from Le Havre, Claire asks again. Reluctantly, Suzette tells her that Jamie has gone to the wood, after getting into a fight with an English officer. Shocked, Claire asks the name of the officer and what had happened. As Suzette haltingly begins to explain the story that she has been told, Claire spies a note on the dresser. “I am sorry. I must. J” it reads and Claire’s worst fears are realised. Jamie has broken his promise and has gone to fight Black Jack at the woods.
Accompanied by Magnus, who refuses to allow her to go alone, Claire gets back into the carriage and heads for the woods. She is distraught, admonishing Jamie aloud for breaking his promise to her, while her fingers touch Frank’s gold wedding band.
 She is also obviously unwell, breathless and repeatedly grimacing in pain as the carriage thunders towards the woods. Magnus helps her towards the spot, Claire moving clumsily and hanging onto the butler for support.

The duel is underway and Claire’s plan to call out to Jamie is abandoned. Instead, she says, she can do nothing but wait to see which of her men will die.
By now, Magnus is just as concerned for Claire as he is for Jamie. She is groaning in pain, hanging onto the tree for support. The fight is vicious, the two men evenly matched. Black Jack goads Jamie further, asking how Claire forgave him and more frenzied sword play sees the two men both lose their balance before advancing on each other once again.
By now, Magnus is just as concerned for Claire as he is for Jamie. She is groaning in pain, hanging onto the tree for support. The fight is vicious, the two men evenly matched. Black Jack goads Jamie further, asking how Claire forgave him and more frenzied sword play sees the two men both lose their balance before advancing on each other once again.

Suddenly, there is nothing but blood. Claire doubles over, blood coursing down her legs, to the horror of Magnus standing beside her. Jamie lunges for Black Jack, his sword piercing Randall’s groin.
 Randall falls, his hands covered with blood and his eyes glazed with pain. With a cry to Jamie, Claire does the same. Jamie hears her and looks over in horror, as the gendarmes thunder into the clearing. Desperate to get to his wife, Jamie drops his sword, but is surrounded by the officers. His cries become all the more anguished, screaming out “Claire!” as she rapidly begins to lose consciousness.
 She manages to tell Magnus to take her to Mother Hildegarde and with one last “Jamie”, she passes out. While book readers knew that this was coming, seeing it played out is every bit as emotional as reading Diana Gabaldon’s original words.


The title of this episode is taken from the Scottish poet Robbie Burns’ poem, “To a Mouse.” The seventh stanza of the poem reads, in part: “The best laid schemes o' Mice an' Men, Gang aft agley, An' lea'e us nought but grief an' pain, For promis'd joy!” This translates as: “The best laid schemes of Mice and Men oft go awry, And leave us nothing but grief and pain, For promised joy!” The final scenes of this episode personify Burns’ words completely.
Jamie had promised to allow Randall to live for one year, in order to ensure that Frank’s ancestor would be conceived. It was a decision made specifically to secure safety for Claire and their child, regardless of what happened with the Jacobites. But for reasons yet to be explained, Jamie has broken his promise and it is an action that has resulted in nothing but grief and pain, as emphasised by his impassioned cries. With one sword blow, he has undoubtedly rendered Randall incapable of fathering a child, thereby potentially ending Frank’s life before it begins. The shock of seeing the duel has caused Claire’s collapse and, it appears, the miscarriage of their child. As Jamie is led away by the gendarmes, he knows no-one’s fate - Randall and Claire may both be dying and he may see himself hanged. The promised joy of meeting his child has gone and all that is left is grief and pain. And you can’t get more awry than that.
This episode recap was written by Susie Brown, a teacher-librarian and children’s writer who lives in Australia. She is already stocking up on tissues for the next episode.
“Time Heals All Wounds - or does it?” A recap of Season 2 episode 5 by your Aussie blogging lass
OutlanderHomepage Originals By Susie Brown
Uh-oh. The elaborate strings are back. As Raya Yarbrough’s vocals fade out at the start of the episode, the Skye Boat melody is taken up by the strings. The last time they appeared, the episode that followed dealt with deception and unease. Already it seems, the hints are here - it will only be a matter of time before something goes wrong. Indeed,
the concept of time immediately makes its presence felt, in the form of a loudly ticking clock that is heard throughout the opening scene.
As the servants clear up the carnage from the dinner party - straightening furniture, picking up strewn flowers and righting overturned vases, Claire stands alone.

Soon enough, Jamie’s footsteps are heard echoing through the corridor. He finds Claire on the chaise lounge, next to a sleeping Fergus, who has been keeping watch with her throughout the night.
 Jamie compliments Fergus on guarding his mistress and gathers the boy up into his arms. Claire and Jamie share a tender kiss and we get a glimpse of what parenthood for them could look like - with tired smiles and affectionate touches as they carry a sleeping child to bed. It is a comforting image. Yet all the while, the clock is ticking in the background...

Shortly afterwards, Jamie relates what has happened to him, telling Claire that Duverney had arrived at the Bastille and demanded his release. He asks if Claire is all right and she replies, “Yes, we’re fine, now that you’re home.” It is another nod to their impending parenthood, accompanied by Claire’s protective gesture of rubbing her belly. Murtagh has also been released, Jamie says, but Alex Randall has not been so lucky. Mary’s uncle has accused him of attacking his niece, a charge that can only been refuted by Mary herself. Claire says that they must help Alex, adding that he is not like his brother, Black Jack, but the look on Jamie’s face indicates that he is not as convinced of this as she. Claire asks if the Duke of Sandringham will vouch for his secretary, but is told that the Duke has already dismissed Alex from his service, due to the public scandal. The only positive that has come from the dinner is the fact that Sandringham seems to have recognised Charles Stuart for “the poor investment that he is.” On learning that Charles actually left the dinner with St Germain, Jamie remarks that no good can come of the pairing. He decides to have Murtagh follow St Germain, to see if there is any evidence to suggest that the Comte planned the attack on Claire and Mary.

The conversation then turns to the events in the alley, with Jamie asking if Claire can remember anything else about the attack itself. Claire describes the attackers as being both well dressed and well spoken, remarking that rather than her having to escape, the attackers had fled when they had seen her face, calling her La Dame Blanche, which she understands from Fergus is a type of sorceress.
This leads Jamie to rather shamefacedly admit that he may have been responsible for giving her this title, as a tactic for avoiding the unwanted attentions of the ladies at Maison Elise. Claire is irritated, remembering all too clearly the witch accusations at Crainesmuir. The fact remains though, that this narrows the pool of suspects to customers at Maison Elise and that if the identity of the men can be discovered, then a link with St Germain may result. The scene ends with the two in a comfortable embrace,
 Jamie saying that all he wishes for after the long night is for Claire to lay in his arms.

Next, we see the wine business’ quarters for the first time, as a kilted Jamie takes charge of the latest shipment. Murtagh reports the results of his tracking of St Germain, which are disappointing. Nothing suspicious has been noted, although while at Maison Elise, he has heard of a gang called “Les Disciples”. The gang is made up of aristocrats who prowl the streets in search of young women, with membership to the gang granted by way of “a maidenhead”. This would explain the glee of the attacker who had proclaimed Mary to be a virgin.

Meanwhile, Claire calls on Mary Hawkins, finding the young girl locked away from prying eyes by her overly protective family. Admitted to her room on the pretext of giving Mary a full medical examination, Claire learns that Mary is confined to the house and that once she has recovered, she must leave Paris. Mary has written a letter to the authorities at the Bastille, providing details of the attack and exonerating Alex. She begs Claire to deliver it for her, saying that Alex is a good man with a kind heart. Claire promises to see it delivered and talk turns to Mary’s recovery.
 With a haunted look that displays all too clearly the loss of the innocent young girl that she was - and perhaps in a parallel to the conversation that Jamie had with Claire at the end of season 1 - Mary tells Claire that she feels ashamed, like a different person who will never be the same again. The older woman hurries to tell her that the attack was not her fault, but Mary’s demeanour doesn’t change. Physically though, she is recovering: the bleeding has stopped and Claire has brought herbs to help with discomfort. Mary asks if she is going to have a baby and we see a look cross Claire’s face. She knows from Frank’s family tree that Mary will indeed have a baby in the future, one fathered by none other than Black Jack Randall and this knowledge seems to unnerve her momentarily. She soon regains her composure though, reassuring Mary that she wouldn’t be pregnant, given her attacker’s inability to “finish”. Mary states how grateful she is for all that Claire has done for her, remarking that at least now she can’t be forced to marry the dreadful Viscomte, who would never take “a soiled bride.” In an attempt to cheer the stricken young women, Claire deems her too pretty and sweet to marry a warty old man. It is a comment that indeed results in a small smile from Mary, who then tells Claire that once Alex is released the two plan to marry. It is news that disturbs Claire greatly,as she actively begins to worry about the future of Frank. If Mary and Alex marry, instead of Mary and Jack, how could Frank be born?
 At the house, we see Claire wrestling with her conscience, sorely tempted to throw Mary’s letter into the fire. Knowing that this would be an act that would condemn Alex Randall to prison, Claire is unable to do so, not without being completely certain that such an action would ensure Frank’s existence.

Back at the wine business, Charles Stuart appears to talk to Jamie. He has rid himself of the “female haze that clouded his mind” and is fully committed to the Jacobite cause once again. While the English supporters have withdrawn their support, Charles has joined forces with the Comte St Germain, securing a bank loan that will enable the financially reduced Comte to purchase a case of Portuguese Madeira. Once sold, says Charles, the resulting profit will be used to start securing ships and weapons, which will in turn lead King Louis to provide the remaining funds.
 In Charles’ mind, it is only a matter of time before he can deliver the throne of Britain to his father. Jamie tries to dissuade Charles from associating with the Comte, citing rumours of heretical circles and demonic rituals. The prince dismisses this though, saying that he pays those rumours no more heed than the ones circulating about Claire. In a final twist, Charles informs Jamie that he has arranged for Jamie himself to be the one to sell the wine to the Comte, so that he can complete the transaction and keep an eye of St Germain at the same time. Reluctantly, Jamie joins Charles in a toast to the future, when the rightful King will sit on the throne once more. The Prince is once again in control - and the ominous music builds!

The scene that follows is one solely written for the tv series and is one of the more disturbing scenes of the season to date. Alex Randall and Claire are walking in the garden, Alex expressing his gratitude to Claire for assisting in his release from the Bastille. They discuss his plan to wed Mary and Claire expresses her concern at Alex’s ability to find employment now that he has been dismissed from the Duke’s service. This leads to a debilitating coughing fit which takes Alex a few moments to recover from. Claire seizes on this too, suggesting that Mary would be robbed of her youth playing nurse to him and that Alex should consider the type of life he can offer her and set aside his feelings.
 Obviously distressed, Alex agrees: he loves Mary enough to want her to have the future she deserves. Claire tells him that while Mary loves Alex very much she will move on. Alex thanks her for her candour, remarking that Mary is fortunate to have Claire as a friend. He bows and takes his leave, whereupon Claire’s voiceover states that it broke her heart to break his in this way. She admits to robbing the young couple of happiness, but sees herself as having no other choice. The evidence from the 1940s links Mary to Black Jack, not to Alex and as Frank’s music begins to play softly in the background, Claire states that Alex and Mary simply cannot be, for Frank’s sake. Despite this, it is a disturbing betrayal. Claire knows Alex to be a good man and she is well aware of his brother’s sadistic cruelty. Earlier, she had declared Mary to be too pretty and sweet for the warty old Viscomte, to say nothing of her wish to see Mary’s attackers brought to justice, yet she is now prepared to see Mary at the mercy of Black Jack, whose penchant for torture she knows intimately. This scene further highlights the fact that actions can have very serious consequences. It is indeed “untimely” - Frank’s future may well depend on these actions in the past, but it will come at the cost of two innocent souls.

At Maison Elise, Jamie and the Comte conduct an icy conversation in two separate languages- Jamie refusing to speak French and the Comte refusing to speak English. Yet both men understand each other perfectly well. Neither wish to be doing business with the other and issue their own warnings: the Comte will not forget Claire’s attempt to “ruin” him, while Jamie promises vengeance on those who poisoned and attacked Claire.
 After telling Jamie that he is not interested in his personal affairs, the Comte states his intention to procure the shipment of wine himself, telling Jamie to contact him when the buyers are in place. With a disdainful sneer he tosses coins on the table and leaves.

Jamie updates Claire that evening, remarking that if the wine venture is successful, Charles is likely to gain the needed funds and set sail for Scotland. Claire replies that this means they must ensure that Charles never gets his hands on the money and that the shipment must be destroyed. Jamie’s joke that perhaps the Comte could bring in another ship with smallpox leads Claire to think of a plan whereby herbs could be used to produce the appearance of smallpox amongst the crew, leading ultimately to the destruction of the cargo. She plans to investigate this the following day, but Jamie reminds her that they are due at the Royal Stables, as he had agreed to assist the Duke of Sandringham in the purchase of some horses. Claire is unimpressed, saying that Jamie doesn’t owe the Duke any favours, but he responds that he also doesn’t want to court any disfavour. Rising, he goes to collect a box from the desk that he presents to Claire, saying that he had been waiting for a good time to surprise her.

The splendour of the Royal Stables is breathtaking - kudos to the designers of this scene. Elegantly dressed people are wandering around the grounds, but disturbingly, the elaborate music has begun in earnest. It heralds unpleasantness - and indeed, it appears quickly, in the form of Sandringham.
 With Claire feigning illness after his greeting, Jamie and the Duke get down to the business of the day, choosing horses while the Duke gossips about recent events, branding Charles Stuart an “utter ass”. Jamie continues to remark on the horses, but maintains his supposed Jacobite allegiance, commenting that while he also sees the prince for what he is, the Prince’s father is the true King. Meantime, Claire listens to gossip of a different sort, while on a walk through the garden with Jamie’s ex-girlfriend, Annalise.
 With exquisite politeness, Annalise annoys Claire by talking of her own time with Jamie, when he was direct, honest and simple. She remarks that Claire has turned him into a man of business and politics. Claire replies that he is still Jamie, who will never lose sight of who he is at heart. Annalise argues the point, saying that her Jamie was impulsive and headstrong and that while he still may possess this quality, Claire has turned the boy into a man. At this point, Annalise notices a different man striding towards them, one who she says is showing a particular interest in Claire.


Claire turns, just as Jack Randall comes into view. He walks over and utters one word of greeting: “Claire.” It is chilling, as it is delivered in Frank’s tone of voice. It is also the first time that Black Jack has used her first name, almost as if, in his twisted mind, the events of Wentworth have put them on intimate first name terms.

By contrast, he makes an elaborate introduction to Annalise, speaking in French and bowing low, an action that is obviously difficult for him. Annalise replies in English, asking if he is in some discomfort, to which he replies, with a long look at Claire, that he met with an accident some time ago. Abruptly turning away from him, Claire tells Annalise that she is unwell, prompting the other woman to offer to get her husband for her. Claire says that this is unnecessary, but it is too late. Randall has heard. “Jamie,” he says. “He’s here?” Instantly, Black Jack is back in control: circling Claire, all the while speaking of how the universe had set them on seemingly divergent paths, yet leading them to meet at the French court.
 He refuses to let Claire pass him, but breaks off his conversation with a sudden, “The King.” Claire responds with a profanity, realising all too late, courtesy of Black Jack’s elaborate bow and mocking glance, that she has just sworn in the presence of King Louis.

By contrast, he makes an elaborate introduction to Annalise, speaking in French and bowing low, an action that is obviously difficult for him. Annalise replies in English, asking if he is in some discomfort, to which he replies, with a long look at Claire, that he met with an accident some time ago. Abruptly turning away from him, Claire tells Annalise that she is unwell, prompting the other woman to offer to get her husband for her. Claire says that this is unnecessary, but it is too late. Randall has heard. “Jamie,” he says. “He’s here?” Instantly, Black Jack is back in control: circling Claire, all the while speaking of how the universe had set them on seemingly divergent paths, yet leading them to meet at the French court.

It is where Randall’s control ends, however. In a delicious scene, expertly delivered by Lionel Lingelser as Louis, Randall is mocked by the King and his courtiers. Whilst complimenting Claire and stating his pleasure at seeing her again, the King switches to English when speaking to Black Jack, intimating that the latter’s French is not good enough to continue the conversation in the King’s tongue. He follows this with a veiled insult of Jack’s uniform and comments on the English army’s penchant for “slaughtering each other.”

Louis asks Claire if she and Black Jack are friends, musing aloud how their acquaintance would be viewed by her Scottish warrior husband.
At this, Jamie appears, causing Black Jack to briefly touch his hand to the sword on his hip. But Jamie manages to keep himself in check, greeting the King and conducting a stilted but charged conversation with Black Jack, where he asks after the latter’s health. Fearing Jamie’s ability to keep this up for long, Claire pulls Jamie close to her and asks Black Jack what he is doing in France.
This is the one time we see a glimmer of humanity in Jack Randall. He states that he has come on a mission of mercy: to convince the Duke to reinstate his brother into his service.

King Louis responds that perhaps Black Jack should beg the Duke, on his knees. Unsure as to whether the King is asking him to beg immediately, Randall does just that, kneeling before the King. This earns him an immediate mocking reaction from the King and his entourage, Louis branding the English as being “so literal.”
 Jamie also, can barely contain his delight at seeing Randall so obviously humiliated. Claire asks for permission to retire, as she is feeling unwell, leading Louis to dismiss both her and Jamie. After they have walked away, Louis then tells Black Jack to rise also, so that he doesn’t stain his “pretty britches”.
As they walk, Jamie asks Claire if she is really unwell. Once she admits that she had merely wanted them to get away, Jamie strides straight back towards where Black Jack is standing.
 Claire watches tensely, seeing Randall lay a hand on Jamie’s chest, before the men bow formally to one another. When Jamie returns to Claire, he is holding his excitement in check, telling Claire that he has challenged Randall to a duel which Black Jack has accepted, telling Jamie that he “owes me a death.”

As soon as they arrive home, Jamie sends Fergus in search of Murtagh, proclaiming the day to be a grand one. But instead of getting out of the carriage, Claire demands that the coachmen drive her to the Bastille, with all due haste. The reason for this soon becomes clear.
That evening, Jamie and Murtagh are discussing the particulars of the duel. Murtagh reminds Jamie to be careful, as Randall is able to choose the weapon and even though this is likely to be swords rather than pistols, the captain is an expert swordsman and cannot be underestimated. Jamie is ready for action, flexing his injured fingers as he speaks. Suddenly Claire appears in the doorway and announces that there will be no duel, as Randall is in the Bastille. Claire says that she has made accusations that Black Jack was the one who attacked herself and Mary.
 While she knows that he won’t be held for long, Claire had wanted time to make Jamie see sense. She tells Jamie that dueling is outlawed in France and that if he’s caught he will find himself in the Bastille, compelling him to think of her and the baby. Murtagh tries to assure her that they won’t be caught, but Claire asks him to leave, saying that it is a matter between Jamie and her.

The final few minutes of the episode are some of the most powerful ever seen on television and are exquisitely acted by both Caitriona Balfe and Sam Heughan. Jamie begins by reminding Claire that she had given him a gift by telling him that Randall was alive and that he intends to claim the gift. Claire responds, saying that he can’t kill Randall now, because if he does, then Frank will not be born. She explains the link between Mary Hawkins and Black Jack and the child that they are meant to have, a baby that will be Frank’s direct ancestor. If Jamie kills Randall before the child is conceived, he will in effect, kill Frank too.

Claire implores Jamie, telling him through her tears that Frank must exist, as he is part of the future. Jamie’s reply is grim, telling her that he thought they were there to change the future.

Claire’s pleas become more desperate. Frank is an innocent man, she tells him, who has harmed neither of them. Jamie’s reactions become more angry. He tells Claire that he can bear a lot, but why should he bear everyone’s weakness, without being allowed his own? Jamie can’t believe that Claire will ask him to spare Randall’s life, when she alone saw precisely what Black Jack had done to him. Claire begs for a delay, just long enough for the child to be conceived, but Jamie refuses, saying that she must choose, as he will not live while Randall does.
 He places his dagger into Claire’s hand, aiming the point at his heart. If she won’t allow Jamie to kill Black Jack, then she must kill Jamie herself. Again, Claire begs for a delay: a year, so that the child may be conceived. Throwing away the knife, she says that Jamie owes her that much. Desperate now, she plays her final card: saying that she has saved Jamie’s life not once, but twice and he owes her a life.

The look that Jamie gives Claire is so full of anger, betrayal and hurt that it actually takes your breath away. This is the first time that there is no hint of affection evident anywhere on Jamie’s face. It is a masterclass of acting by Sam Heughan, that only intensifies and it is hard to imagine that the actor will not be rewarded with some award nominations for this scene alone. Jamie’s voice is choked, his eyes bright with unshed tears and he turns away. He cannot believe, he says, that Claire will deny him vengeance of the man that made him play his whore; the man who lived in his nightmares and in their bed, the man who almost drove him to suicide. But as a man of honour who pays his debts, he asks her to confirm what she is asking of him: will she claim the debt in the form of Jack Randall’s life?

Through her tears and quickened breaths, Claire does so. Bitterly, Jamie nods. With a look of barely contained fury, he picks up his sword, kisses it and returns it to its scabbard near the fire, saying “A year. Not one day more.” Relieved, Claire reaches for him but he jerks backwards, hissing, “Do not touch me.” The episode ends with the couple at opposite ends of the room, but the distance between them is now unmeasurable.
This recap was written by Susie Brown, a teacher librarian and writer who lives in Australia. Her heart was pounding for the last half of the episode and, even though she knew what was coming, the brilliance of the acting took her breath away.
****************************************************************************
Emotions Run High - a recap of Season 2 episode 4 by your Aussie Blogging Lass!
OutlanderHomepage Originals By Susie Brown
As the strains of the Skye Boat song transform into the opening music for this episode, we immediately notice a change in mood. Gone are the jarring harpsichord notes from episode 2, or the elaborate strings of episode 3. This time, we have flutes, which immediately set a more lighthearted tone.
 It is a tone that continues into the first scene, where Jamie and Duverney are playing yet another game of chess in the Grand Library at Versailles. This time though, Claire is hovering over Jamie’s shoulder, watching the proceedings. Politely, Durverney asks if they have thought of baby names. The looks on both Jamie and Claire’s faces are priceless, as they hear the potential choices of their spouse. “Lambert” is quickly rejected by Jamie for sounding too English, whilst Claire declares “Dalhousie” as being reminiscent of a sneeze.
As the strains of the Skye Boat song transform into the opening music for this episode, we immediately notice a change in mood. Gone are the jarring harpsichord notes from episode 2, or the elaborate strings of episode 3. This time, we have flutes, which immediately set a more lighthearted tone.

But just as we are lulled into believing that this may at last be a happier episode, who should enter the picture but the Comte St Germain, who quickly dismisses both the game and Claire with a bored speech and an icy stare respectively.
 Jamie cannot disagree with the Comte’s prediction of his inevitable loss however, and concedes the game. Duverney responds by deeming it to be a draw, commenting that Jamie was obviously distracted and stating he would prefer a clean victory. Claire takes the hint and goes in search of “something else to do”, accepting a glass of wine from a passing servant as she leaves.

Jamie and Durverney’s talk turns to politics, with Duverney revealing that King Louis is intrigued by the pledges of the English nobility towards the Jacobite cause. Casually browsing the library shelves nearby, Claire sips her wine and at the back of the frame, we see the Comte appear. He is out of focus, but it is obvious that he is intently watching Claire. Within seconds, she begins to cough and then doubles over in pain.
 Alarmed, Jamie runs to her side. The other patrons in the library look on, as Duverney calls for assistance and Jamie sweeps Claire up in his arms. The Comte then comes into focus, still watching intently. While the other patrons are still, the Comte paces, with just the faintest hint of a smile crossing his face. It is an action that makes him look predatory and we are left to assume that his earlier threat to make Claire pay was not an empty one.

Back at Jared’s house, Jamie is making a white-faced Claire a cup of tea. She tells him that she doesn’t think it was poison, but rather bitter cascara, due to the aftertaste she had detected in the wine. Jamie asks about the child and Claire reassures him that the baby should be fine, but adds that she had been terrified to think that she might lose it. They discuss whether the Comte was behind her sudden illness, with Jamie swearing to make St Germain suffer. While Claire says that she would give good money to watch, they have no proof and they cannot risk a scandal that would result in Prince Charles distancing himself from them. Still feeling nauseous, Claire asks Jamie to distract her and to update her on what is happening with Duverney. Jamie tells her that Duverney has spoken to Louis, who is intrigued by Charles’ offer of alliance. If the promised money from Sandringham is forthcoming, then Louis is likely to support the campaign as well. Jamie suggests a new plan: that they host a dinner for Sandringham and invite Charles as well, with the intention of making the Prince seem foolish, therefore dissuading the Duke from supporting him. While the plan is a good one, Claire realises that the time has come. She must tell Jamie of Sandringham’s secretary, Alexander Randall and give him the news that Black Jack is still alive.
Jamie’s response is unexpected, to say the least. He declares this to be wonderful news, because it means he will have the chance to see Randall die.
 He is now freed from something that has been plaguing him for months: the fact that he had missed Black Jack’s death. He reassures Claire that he is not about to return to Scotland to exact revenge, thereby risking the hangman’s noose and abandoning their plans in France. Suddenly Jamie is lighter and happier, kissing Claire and her pregnant belly and smiling with genuine thanks. The sense of relief in them both - and indeed in the viewers! - is palpable. Claire even jokes with a relieved Murtagh the following morning, saying she didn’t know why he’d been so worried about telling Jamie the news.

Although different from the book, the way back for Jamie is still the opportunity to fight back against Black Jack Randall. In the book, this fight occurs in his drug induced haze at the Abbey, when Claire mimics the voice of Randall and gives Jamie the opportunity to take control, thereby redeeming his soul. In this version, the redemption has come by giving the news that Randall lives. The promise of the fight back is still in the future, but the very fact that it exists restores control and hope to Jamie. At last, the same conclusion has been reached, albeit it by an alternative method. It is certainly more believable to watch on screen and is beautifully acted by both Caitriona Balfe and Sam Heughan.
The positive mood shifts once again in the following scene however, when Claire returns to Master Raymond’s and tells him of the attempted poisoning the previous evening, which had endangered both her and her child. Remembering their previous conversations about poison, she asks whether he had sold bitter cascara to the Comte St Germain. Master Raymond tells her that he had only had one buyer for bitter cascara in the past month and he had no way of knowing who that person was.
 Worried that they are being watched, he takes her into his private room, which is lavishly and beautifully decorated with symbols and skulls. With a piercing look, Raymond speaks of having long been fascinated by things “not of this time”.

This is a very clever line. While we are left to wonder if Raymond can tell of Claire’s time travelling abilities, book readers will also recognise it as an illusion to his own mysterious situation. Raymond perceives that Claire is worried about something and she admits that she is. She speaks of her friend Frank, sharing her fear that his future is in doubt. Master Raymond then performs a form of fortune telling, by getting Claire to throw the bones in order to get the answer to her question. When Claire looks in the cup, it appears to be empty, but a second glance shows it full of sheep knuckles after all. Raymond remarks that this is merely a sleight of hand that he often cannot resist with his customers and they share a laugh. This is also brilliant foreshadowing for book readers “in the know", as this very skill becomes a vital plot point later on.
The result of the casting is troubling for Claire, as the knuckles suggest that she will indeed see Frank again. With Bear McCreary’s Frank melody playing softly in the background, we see the shock on Claire’s face.
It is another reminder to the viewers that Claire and Jamie’s plan will ultimately fail. While we already know this from the first episode, it is nonetheless a jarring moment. Seemingly unaware of the turmoil his comment has created, Master Raymond says that it is Claire who is his main concern, giving her a stone pendant which he says will change colour in the presence of poison.
 While he can charge much to his customers for such a stone, Raymond declares it to be free of charge and winks at Claire. We are left wondering: is this merely a gesture of camaraderie, or is it an apology for the bitter cascara? Had he known after all and his conversation about bitter cascara in the previous episode had been a warning? Regardless of the answer, this scene has links to many events both past and future. It is a stroke of genius by the production team.
It is another reminder to the viewers that Claire and Jamie’s plan will ultimately fail. While we already know this from the first episode, it is nonetheless a jarring moment. Seemingly unaware of the turmoil his comment has created, Master Raymond says that it is Claire who is his main concern, giving her a stone pendant which he says will change colour in the presence of poison.

The next scene finds Claire with Louise and Mary, both admiring Louise’s new cuckoo clock. Mary is charmed, but Claire is confused as to how this qualifies as an urgent visit. Louise quickly dispatches Mary to get food for the devilish pet monkey, so that she can share her delicate news: she is pregnant. At this point, we see a new Louise. It is a beautiful contrast to the Louise we have seen up to this point.
 She no longer appears worldly, but younger and unsure. This Louise has reached the conclusion that she must terminate the pregnancy, as the baby is not her husband’s and she asks Claire’s help. Claire says that she can attempt to brew a herbal potion that would do the job, but that it is a dangerous thing to do, as it could kill her as well. Once she has ascertained that Louise really wants to keep the child, Claire tries to offer other suggestions, such as leaving her husband, or convincing her husband that the child is his. Louise asks, “How will I raise a child with a man who is not the father” and we are instantly transported to Claire’s 1940s dilemma, as it is a situation which we know she will face with Frank. Claire’s answer is telling, saying all that matters is that the child is brought up with love. Once again, we wonder if she will remember this herself when the time comes.

Later that evening, Jamie returns, still in a happy mood, with romance very much on his mind. Foreplay is brought to an abrupt halt however, when Claire notices bite marks on Jamie’s thighs. This is a complex scene, brilliantly written and performed, that deals with the struggles their relationship has suffered over the past months.
 Jamie takes some time to realise the seriousness of Claire’s reaction. He has viewed the incident as a positive one, because now that the possibility of being the one to end Black Jack’s life exists, he has begun to be filled with lust again and has finally felt like a man. He speaks of the whore who had been intent on a “69” - with more emphasis on the ‘6” - with a sort of humorous affection, not seeming to notice the effect that his comments are having on Claire. She finally explodes, wondering why she should feel happy that he wanted to stir up his feeling with a whore before he would touch her.

In an increasingly emotional speech, Claire lets out her feelings of helplessness over the past months: how she has tried to be patient, how she has longed to be touched, how she has felt alone carrying their child, mentioning that they have barely spoken of the baby, even discussing baby names at the prompting of Duverney. Jamie responds by saying that she also doesn’t realise what he has been dealing with since Wentworth, leading Claire to utter an impassioned, “Tell me! Talk to me! Make me understand!” There is a moment of silence, the mutual pain evident on their faces. And finally he speaks.
What follows may well be one of the most longed for speeches for book fans, exquisitely performed by Sam Heughan. Using words resurrected from the Outlander novel, Jamie speaks of how the private part of himself, the fortress deep inside him - his soul - was blown apart by the events of Wentworth and left without shelter. He was left naked, alone, trying to hide under a blade of grass. He tells an obviously emotional Claire that this is where he has been ever since and leaves the room to “sleep elsewhere” for the night, as Claire’s hands close protectively over her belly.
But this time, Claire does not let the distance between them stand. She follows him, takes off her gown and whispers to Jamie to come and find her, to find them.

At last, they make love without the spectre of Black Jack, but with the very different unseen presence of their child. The Jamie and Claire theme music swells as they do indeed find each other. Afterwards, we hear the remainder of the fortress speech, where Jamie tenderly tells Claire that she has built him a lean-to and a roof to keep out the rain.

Noises above them interrupt their reconciliation, as Jamie hears someone on their own roof.
 Grabbing his shirt and his knife, he goes to investigate. Into the bedroom tumbles a very wet and very drunken Charles Stuart, whom Jamie introduces to Claire. It is an amusing meeting, Claire curtseying in her nightdress, while the Prince demands a whisky and his bandaged hand seen to. While Jamie takes care of his first demand and Claire the second, Charles speaks of his evening’s events. He has been spurned by his lover and forced to flee over the rooftops when her husband arrived home early. Charles speaks of God putting obstacles in his path, but he remains determined to overcome them and win his lover back. Claire remarks that his hand looks like it has been bitten by an animal and soon realises the truth. The Prince’s lover is none other than her friend, Louise de Rohan.

Armed with this news, and remarking that the two star crossed lovers are both dreamers who live in a fantasy world and are probably perfect for each other, Jamie and Claire discuss a new plan that could turn events to their advantage.
They decide to invite Louise, her husband and Charles to the dinner they are hosting for Sandringham, musing that if Charles hears about the pregnancy at the dinner table, he will come unhinged, making the Duke’s support for the Jacobites all the more unlikely.
When Claire asks if this makes them bad people, Jamie responds that they are doing a bad thing for a good reason. They embrace again and we see that their easy intimacy has returned.

The next scene sees Murtagh and Fergus waiting outside the hospital. Mary Hawkins (who book viewers know has been volunteering with Claire, but whose appearance may seem strange to tv only viewers) comes to tell them it will be another hour. She disappears back inside and Fergus shares his knowledge of women with an increasingly confused and impatient Murtagh.
 In an amusing by-play, the two become the closest duo to Rupert and Angus that season 2 has seen to date!

Inside the hospital, Claire is impressed by the acupuncture skills of Monsieur Forez, who is in the middle of resetting a badly broken leg. When the man suggests Mary smear the wound with hanged man’s grease, Mother Hildegarde explains that Monsieur Forez also works as an executioner.

Emerging at last, Claire and Mary are greeting by a gruff Murtagh, who announces that the wheel on the carriage is broken and that he has sent Fergus on ahead to tell Jamie that they will be late.

Saying that she has promised to be home to greet the guests, Claire insists that they walk. As they begin the journey, Jamie is already greeting the first guests to arrive at the house - none other than the Duke of Sandringham and Alexander Randall.
The Duke takes great pleasure in making the introductions, but Jamie maintains his composure.

Dark has fallen, as Claire and Mary continue to walk. With no sign of her stutter and her face aglow, Mary speaks of her new love, a man by the name of Randall. With visions of Frank’s family tree no doubt stirring in her brain, Claire asks where they met and Mary’s answer makes the identity of her love quite clear: not Black Jack, but Alexander.
Suddenly, they are set upon. Murtagh is knocked unconscious and Mary and Claire are attacked. As one of the assailants shouts his glee at finding a virgin, the Comte St Germain and his wife are seen arriving at the dinner party, invited by the Duke. This is a departure from the book, as Claire wonders for some time whether one of the assailants was St Germain. Here it becomes quite clear that he is not - although the fact that he could have indeed orchestrated the attack remains a factor. Jamie greets his latest adversary, still unaware of what is occurring on the street.

As the rape of Mary is completed, an assailant with a port wine stain on his thumb begins his assault on Claire. It is the same stain seen on the man replacing the carriage wheel in the establishing shot at the start of the episode - further evidence that this attack has been planned. Claire’s hood is thrown back and upon seeing her face, the attackers flee, dubbing her “La Dame Blanche” and running in fear of their souls.
This is not explained - although book readers are aware - but it is a turn of events that allows Claire and Mary to escape, assisted by a groggy, but now conscious Murtagh.
Back at the house, Charles is in conversation with the Duke when the deRohans arrive. He is visibly unnerved, dismissing Jules with a wave of his hand and lingering overlong in kissing the hand of Louise. Jamie watches amused, until a servant arrives with news that changes his demeanour. Hurrying outside, he finds Claire and the others.
The scene reinforces the connections between a number of the characters. Jamie immediately goes to Claire and Suzette to Murtagh,
 while Alex Randall, who was dining with the butler, has run straight to Mary. While Jamie and Murtagh are intent on setting out immediately to catch the brigands, Claire takes charge. She insists the evening is too important to cancel and issues instructions: they will take Mary upstairs without being seen; Suzette will help her dress and the dinner party will go on. Reluctantly, Jamie agrees.

Upstairs, Claire has dosed a now sleeping Mary with poppy syrup and leaves her in the care of the devoted Alex, who vows not to leave her side. As Claire dresses, she and Jamie share a hurried conversation about Jamie’s plight. Jamie explains that regardless of the unfairness of the situation, to notify the authorities and call a doctor would publicly shame Mary and ruin her for life. He suspects the Comte as being responsible for the attack and states his wish to go downstairs and cut his head off. This announcement unnerves Claire, who did not realise St Germain was in attendance.
 As Jamie goes down to announce her, Claire takes some deep breaths, to prepare herself for her role as perfect hostess.

By the time she enters the parlour, Claire is a model of composure. Unfazed by the Comte and Duke’s snubs in their refusal to bow, Claire apologises for her lateness and invites the guests in to dinner. Linking her arm through Louise’s, she is quickly updated as to the situation with the baby: Louise has convinced her husband that the baby is his.
After a brief glimpse of Alex declaring his love for a gently stirring Mary, the scene moves to the elegant dinner table. Claire sits at one end of the table, next to the Comte, while Jamie is at the opposite end.
 The Duke is holding court, Prince Charles is getting quickly drunk and Claire stares at the Comte, wondering whether he was indeed the orchestrator of her attack. Jamie moves proceedings along by asking Charles to enlighten everyone as to his plans. The Prince obliges, by stating that it is God’s plan for Charles to reunite the clans and restore a Catholic king to the throne. Louise interrupts at this point, declaring politics to be boring and changes the subject to opera.
 This begins the unravelling of Charles, declaring women to be fickle creatures. After a signal from Claire, Jamie publicly congratulates Louise and her husband on their baby. Slightly taken aback, Louise confirms the news. An increasingly drunken and emotional Charles, in a coded message to his lover, speaks of how one can be happy one day and a picture of misery the next, finally describing Jules as being a “man in the dark”. Jamie and Claire’s plan seems to be going without a hitch. Unbeknownst to them however, Mary has awoken upstairs and on finding Alex there, has run from the room.


The Comte’s wife draws attention to Claire’s necklace, at which point the Comte disdainfully explains its significance as a supposedly magic stone, able to detect poison. In barely disguised looks of contempt, the two discuss the need for the wearing of such a stone at the evening’s event.
 The Comte suggests that if Claire is so worried about the cooking in her own home, perhaps all the guests should be wearing a stone. Claire agrees that perhaps he should.

At this point, the entire evening descends into chaos. A screaming Mary has made it downstairs, with Alex in pursuit, trying to calm her. Rushing into the room, the dinner guests - Mary’s uncle and fiance amongst them - see Alex bodily restraining the terrified woman and perceive it as rape.


The episode ends with Claire protecting Mary, Alex cowering on the couch, Jamie and Murtagh swinging punches and young Fergus gleefully helping himself to the remains of a now empty dinner table.

This episode packed a lot into its hour! By far the highlight was the restoration of Jamie and Claire’s relationship - and what a lovely touch that this occurred on either Sam Heughan’s 36th birthday, or Jamie Fraser’s 295th, depending on which country the viewer happened to live in! There are many hidden nods to book viewers scattered throughout and some reviewers have commented that this may have been confusing to the tv only fans. The fact remains though that life is never dull for the Frasers. Danger has reared its head yet again, with the Comte firmly established as a new villain. But most importantly, Jamie and Claire are once again drawing strength from its each other and this is evident throughout the episode. Time will tell how Ron Moore and his team will choose to lead the couple through the upcoming events - but it is only reasonable to suspect that both the fortress and the lean-to will soon be in danger again.
This recap was written by Susie Brown, a teacher-librarian and author who lives in Australia. She may have clapped when the fortress speech was spoken at last!
****************************************************************************
What price a secret? Deception on a grand scale. Season 2 episode 3 recapped by your Aussie blogging lass!
OutlanderHomepage Originals
By Susie Brown
Like its predecessor, this episode opens with the transitioning of the theme song from the credits into a French arrangement of the Syke Boat melody. This week the transition is achieved through the rich sound of strings, complete with confident, elaborate embellishments to the usual tune.
 This also gives us an insight into what is to come. This music sounds more assured, but still ultimately false. In short, it’s a deception.
By Susie Brown
Like its predecessor, this episode opens with the transitioning of the theme song from the credits into a French arrangement of the Syke Boat melody. This week the transition is achieved through the rich sound of strings, complete with confident, elaborate embellishments to the usual tune.

Claire wakes alone in bed, to the sound of horses in the courtyard, followed by Jamie’s raised voice. She comes to the top of the stairs in time to see him striding towards her, barking orders to the servants as he does so. We can very quickly see that Jamie’s mood is quite different from last week, at least when it comes to his commitment to the plan that they have undertaken. This Jamie has a lot to do - it is the epitome of the “useful occupation” that the episode’s title suggests. He holds his arms out to servants as drinks are put into his hand and his old vest is taken off his back and replaced with a new one. He is confident, decisive Jamie, very much the “laird”, yet we are left with the feeling that this is another deception.

The exchange that follows is confusing, as it can be interpreted in a couple of different ways. In searching through the coin purse attached to his belt (French fashion’s equivalent of a sporran) Jamie discovers that something is missing. As he hurries back down the stairs and off to his next appointment, Jamie instructs Claire to begin the search for a small wooden snake carved with the word “Sawny”. He indicates the size of the snake with his fingers, stating that he has had the snake since childhood.
There is certainly an argument to be made that this is a continuity error from season 1. Claire has definitely seen the snake before, as Jamie’s sister Jenny had pressed it into her hands during labour, explaining how their elder brother had carved it for him, complete with the pet name “Sawny”, a Gaelic play on words for one of Jamie’s middle names.
 Later in the same episode, Claire had passed it on to Jamie and he remarked that he hadn’t seen it since he was about 5. The same snake ultimately ended up in the box of Jamie’s possessions that was handed to Claire at Wentworth prison. Given these significant appearances, it is highly unlikely that she would forget about the snake, to the point that it would need to be described to her. Is this an error on the part of the writer and director?

An alternative argument though, is that the exchange serves to heighten the distance that now exists between the couple. Has Jamie actually forgotten their tender exchange at Lallybroch? Is his need to block anything associated with Wentworth so strong that he would forget the inclusion of the snake amongst his possessions? Similarly, is Claire so desperate to put the past behind them that she chooses not to correct him and remind him that she doesn’t need a description in order to search for the carving? This is an equally valid theory. Regardless of which one is true, Jamie is soon halfway down the stairs, shrugging into the coat that his servant is holding out for him, asking Claire to give his regards to “her ladies.” And then he is gone, missing Claire’s exasperated response: they are not “her” ladies.
Another point open to interpretation concerns Jamie and Claire’s penchant for discussing their plans in front of the servants. While we were told in the previous episode that Jared had chosen his servants with care, ensuring their discretion, the fact remains that anti-Jacobite sentiments are being discussed in a Jacobite household. The main servants are certainly capable of understanding English and so could, given the right circumstances, inform on the couple. Given the care shown towards maintaining the deception at all other times, this seems like an odd exception to the rule. It could though, be argued that this is merely indicative of how well the Frasers have taken to their deceptive new life. They are now acting as the lord and lady of the house in every respect, including the way they treat the servants as being virtually invisible.
Regardless of these theories, the next scene opens with Claire and her aforementioned “ladies”, in the form of Louise deRohan and Mary Hawkins. The three women are playing cards and it becomes all too clear that Claire is right - she is unlikely to learn any meaningful secrets from this social circle.
 The inexperienced Mary is expressing her horror about what French men do to their wives in bed, much to the obvious amusement of Louise. As Claire is about to embark on a kindly “birds and the bees” talk, Mary’s identity suddenly dawns on her.
 In a brief flashback scene, we see TV Frank telling Claire that her beloved husband “got his start” with the marriage of Jonathan Randall and Mary Hawkins. This is a clever turn of phrase, as it specifically highlights Claire’s fears. If Black Jack is killed before 1746, then Frank will never “get his start” and will therefore, never exist. This adds another dimension to her dilemma as to whether to tell Jamie that Black Jack survived the stampede at Wentworth.


A series of departures from the book occur at this point. Claire arrives back at the house, and her servant provides her with a list of things that have happened since her departure, including the progress of the search for the “little snake wooden creature.” On being handed a piece of mending intended for her maid Suzette, Claire, now every inch the lady of the house, stalks into Suzette’s quarters, only to find Suzette “entertaining” Murtagh in her bed.

The resulting conversation with an indignant Murtagh begins badly, leading Claire to immediately apologise for her unforgivably rude behaviour, stating that she is not herself. She then shares the reason why: confiding in Murtagh the news that Black Jack is alive. Murtagh immediately counsels her against telling Jamie, insisting that rather than living a lie as she fears, she is keeping a secret in order to stop Jamie from returning to Scotland to exact his revenge, an act that would almost certainly result in him being hanged.
Meantime, Jamie is playing chess with Monsieur Duverney - and winning. Their conversation revolves around politics, which Jamie suggests is just chess on a grand scale.
 Duverney jokes that if Jamie wants his help, perhaps he should lose a game or two, this easy conversation demonstrating that the two men have formed a friendship. Duverney is surprised to hear that Jamie wishes the rebellion to be actively discouraged, but is convinced by the reason: that Scotland and her people cannot stand another failed rebellion at this point and must wait until a victory can be assured. Jamie asks Duverney to inform Charles that King Louis has no intention of funding a rebellion and quickly suggests that such a meeting could take place at the brothel of Maison Elise.
Seeing his friend’s eagerness to visit the establishment, he sweetens the deal by offering Duverney a ready made excuse for his wife: that he has merely being out with Jamie playing chess.
Seeing his friend’s eagerness to visit the establishment, he sweetens the deal by offering Duverney a ready made excuse for his wife: that he has merely being out with Jamie playing chess.
Claire arrives back at Master Raymond’s, only to be reacquainted with the Comte St Germain, who is just leaving the apothecary and fixes her with a piercing stare as he passes. Claire is initially suspicious of the Comte’s presence there, but Raymond comments that sometimes it is necessary to deal with people he neither likes nor trusts. This is a situation that Claire knows well and she soon follows him inside.

When talk turns to Claire’s dissatisfaction at her current conventional lot in life,
 Master Raymond suggests that she put her medical skills to use at L’Hopital des Anges, the charity hospital run by nuns that relies on medical volunteers of varying skills and motivations. Claire leaves Master Raymond’s armed not only with contraception for Suzette, but also with a new purpose.


Over at Maison Elise, Jamie and Duverney are talking with Charles Stuart (although Duverney is frequently distracted by the ladies of the establishment) and Duverney is, as he had promised Jamie he would, speaking of the current difficult financial situation. Here though, we see a different side of the Bonnie Prince. Gone is the petulant school boy, replaced by a man who is determined and excited by the support he has managed to gain from members of the British aritsocracy, almost enough, he says, to finance the entire campaign.
 Far from begging King Louis to fund a struggling rebellion, Charles makes an enticing offer: if Louis will support the Jacobite cause and provide the remaining funds, Charles will offer France an alliance with Britain after their victory. It is a master stroke and one that will, as Duverney says, “change the world.” He agrees to speak to the King on Charles’ behalf, as long as he can have evidence of the supporters Charles has mentioned. Jamie masks his obvious concern at these developments with skill - he is becoming more practised at deception as time goes on.

Jamie arrives home to an empty house, his calls for Claire going unanswered. As time passes, we see his frustration growing. When Claire arrives home, bursting with excitement and full of tales regarding the hospital, Jamie admonishes her. He accuses her of endangering the baby, ignoring her plea that she needs to feel useful and remarking that her duties at the hospital will hardly help them stop the rebellion. Claire asks what he wants her to do, given that she can’t very well visit Maison Elise with him. Jamie responds angrily that he wants to be able to come home when he has a problem and turn to her, despite the fact that he delivers this entire speech and the next turned deliberately away from her. Jamie outlines Charles’ plans, remarking that the man is “more canny than he seems.”
 Claire attempts to placate him, massaging his shoulders and assuring him that she will help in any way she can, even though she knows that all of the tasks currently fall to him. But rather than relaxing into her touch, Jamie deliberately removes her hand from his shoulders, with a biting comment that that was why he had come home, only to find an empty house while she indulged herself with potions and poultices. Still, he hasn’t looked at her. Not to be deterred, Claire moves in front of him to defend herself, saying that she has finally found some meaning to her day. But Jamie is furious, asking when he can find meaning in his day, instead of spending his time flattering a man in order to gain his secrets. He stands abruptly and stalks from the room. Never has the distance between the two of them been more stark and it is heartbreaking to watch. Murtagh and Suzette witness the end of this exchange, the latter remarking that it is impossible for there to be love in a marriage when love leaves the bed. This comment, as well as informing Murtagh of the seriousness of the situation, leaves us in no doubt that the relationship is struggling on all levels. Kudos to all the actors for their work in this scene. Even the book readers amongst the fandom must be starting to despair - when will Jamie and Claire ever be happy again?

Jamie has returned to Maison Elise, where he is a picture of misery, drinking alone at a table and fending off advances from the ladies. A young boy catches his eye and we see the child’s pickpocketing expertise through Jamie’s eyes. Interested, he follows the boy outside, leading to a subsequent chase through the streets.
 Once caught, the boy threatens to go to the police and tell Jamie’s wife that he ruts with whores. Jamie counters by informing the boy that while Claire would not believe such a story, Madam Elise would be very interested in the exploits of one of her servants. This changes the boy’s demeanour instantly, begging with Jamie not to turn him in. Jamie explains that he is not interested in doing that, or in the young boy’s body, but that he wishes to offer him a job. Confused, the boy asks what he will be doing and Jamie replies that it will be similar to what he is doing now - stealing, but for him. Swiftly, he picks the boy up and shakes him, upending the spoils from his night’s work onto the cobblestones. Amongst the contents is a small wooden snake - the same one that Jamie has been missing. Undeterred by this discovery, the boy asks what he will be paid.

Alone in bed once again, Claire is disturbed by the sound of smashing china. She wanders through the halls, coming upon the young boy sitting at the dining table eating a chicken leg. After bowing low and complimenting Claire on her physique, the boy is finally introduced by Jamie as Fergus and taken off to the servants’ quarters by an equally unimpressed Murtagh.
 On questioning Jamie further, Claire is informed of the next part of the plan: Fergus will use his pickpocketing skills to acquire letters which Jamie will copy and then return, in the hope of gaining vital information. Claire compliments Jamie on the plan and it is the first time that he actually looks at her and half smiles. It is a glimmer towards reconciliation, but is quickly extinguished when he bids her good night and leaves the room.

Over the following days, the plan is put into place and life takes on a new normality. Fergus steals the letters to be copied; Jamie continues to keep the company of Prince Charles and Claire spends her days at the hospital, where she continues to impress Mother Hildegarde and her companion,
 the dog, Bouton, who is himself blessed with the medical abilities to locate infections by smell.
When Jamie comes across a letter with a code hidden in a piece of music, it is to Mother Hildegarde that he reluctantly turns, at Murtagh’s suggestion. He arrives at the hospital just as Claire has completed, with Bouton’s help, a minor operation and asks Mother Hildegarde’s help in decoding the music. She in initially reluctant, in case she is getting involved in something dangerous or illegal, and for the first time, we see Jamie and Claire begin to work together. Claire assures Mother Hildegarde that her husband would not ask for help unless it was for a good reason. Satisfied with this assurance, Mother Hildegarde begins to play the piece.
 What follows is a scene interspersed with humour to a modern audience, as the older woman comments on the piece’s similarity to one called “Goldberg Variations” written by her friend, Herr Bach, whose music she fears will not stand the test of time...

Once given the clue of continuous changing keys, Jamie and Claire manage to solve the puzzle and Jamie translates the message, while a puzzled Murtagh looks on. The message proves the existence of English supporters and offers a sum of £40000 to the Jacobite cause. This also reveals Charles’ earlier claims to have almost enough to fund the rebellion to be an exaggeration, but one that still shows that it is indeed a possibility if the support is given.

The letter concludes with the single letter “S”, a supposed signature, which Jamie and Claire decode almost simultaneously as Sandringham, reaching the conclusion that the Duke is hedging his bets both for and against a rebellion. Jamie immediately plans to talk to the Duke, to try and convince him that he is making a bad investment.

The letter concludes with the single letter “S”, a supposed signature, which Jamie and Claire decode almost simultaneously as Sandringham, reaching the conclusion that the Duke is hedging his bets both for and against a rebellion. Jamie immediately plans to talk to the Duke, to try and convince him that he is making a bad investment.
In the final moments of the episode, the final deception is revealed. Buoyed by their first real progress, Jamie goes in search of drinks for the three of them to celebrate. Murtagh and Claire discuss in hurried whispers the new problem: if Jamie does indeed go to the Duke and happens upon the Duke’s secretary, in the form of Alexander Randall, then he will undoubtedly be told that Black Jack lives. They resolve that Claire must tell Jamie the truth immediately.
But when Jamie returns, alcohol in hand, he makes two toasts: to Mother Hildegarde and to Claire, for always being there when he needs her.
 Claire opens her mouth to tell him the news, but her courage fails her, telling Jamie instead that she loves seeing him so happy. He responds by kissing and embracing her.
The final shot of the episode is Claire’s glance at Murtagh, before briefly closing her eyes in despair. At last, Jamie is happier and in her arms, thanking her for being there for him - and every fan, both book reader and tv only viewer, both understands and despairs with her. It is a brilliant ending, hinting at many more twists and turns ahead.

The final shot of the episode is Claire’s glance at Murtagh, before briefly closing her eyes in despair. At last, Jamie is happier and in her arms, thanking her for being there for him - and every fan, both book reader and tv only viewer, both understands and despairs with her. It is a brilliant ending, hinting at many more twists and turns ahead.
Many reviews have commented on the cohesiveness of this episode and the high enjoyment and engagement factors that it brings. As mentioned earlier, there are also many deviations from the book in this hour of the series, but all of them are superbly crafted so that even though the method of the execution may be different, the things that need to happen to further the plot have either occurred or have been set up.
 Murtagh has been clearly established as a confidante to Claire as well as a protector of Jamie, and this is a wonderful expansion of his character. “The old Jamie” has begun to return at last - but will he forgive Claire and Murtagh’s ultimate deception? No matter how the producers choose to play this out, one thing is for sure: it’s going to be a compelling journey, worthy of Diana Gabaldon’s original.

NB. This recap was written by Susie Brown, a teacher-librarian and writer who lives in Australia. She couldn’t have told Jamie either!
****************************************************************************
“Unease Amongst the Opulence”
A recap of episode 202 Dragonfly in Amber, Season Two Outlander!
OutlanderHomepage Originals,
From the opening moments of this episode, its title comes into play. We are certainly “Not in Scotland Anymore.” The soaring music of the credits quickly merges into a harpsichord version of the main tune and we are treated to views of opulent dresses and shoes, instead of Scottish wools and tartans. Immediately, we have inklings of the visual feast that lies ahead. It should be wonderful, but something doesn’t seem right.


(A nod to the acting of Tobias Menzies is needed here. He is barely in this episode, but Black Jack’s brief appearances, albeit in flashback, are so menacing that they immediately destroy any affection felt last week for TV Frank!)


But action soon comes in another form, with news from Jared bringing with it an invitation for Jamie to meet with Charles Stuart. After a wry translation of the letter where he informs Claire that the meeting will take place in a brothel, Jamie and Murtagh (because who would leave home without a Murtagh) arrive at the suggested venue. Amidst the suggestiveness, the floor show and the sex toys on offer, the two men sit at a table with the “Bonnie Prince” and attempt to discuss politics.

Andrew Gower’s portrayal of Charles is spectacular, as it clearly illustrates how dire the Jacobite situation actually is. Charles Stuart is little more than a petulant school boy, sulking when he is told something he doesn’t like and who has never been to the Scotland he wishes to unite.

Back at Jared’s house, Claire, Murtagh and Jamie discuss the situation. Murtagh describes Charles as a dangerous blockhead, while Jamie adds that he wouldn’t trust the prince with Lallybroch’s vegetable patch, let alone the fate of Scotland. Rather than court the minister of finance for support, the trio are determined to ensure that Monsieur Duverney recognises a bad investment when he sees it. Finally Claire muses that if a rebellion can be planned in a French brothel, perhaps it can be stopped at a French court.
The next step then, is for the Frasers to be invited to Versailles.


Claire would have more fun without him.
Meanwhile, Rosie Day’s Mary is a masterclass in timidity. Mary is horrified by the boldness of Louise, and her stammering speech and defensive body language bring out the maternal instinct in Claire immediately. The announcement of the young girl’s impending marriage to a wart-covered old man further elicits Claire’s sympathy, but there is something about Mary’s name that Claire can’t place. (This represents a departure from the book, where the significance dawns on Claire almost immediately.)


Despite their continued tension in private, the Frasers need to maintain their social appearances. Two weeks later, Louise’s dressmakers have worked their magic and Claire descends the stairs wearing her infamous red dress.

As it does in the book, the dress has the desired reaction. Jamie is incredulous at the amount of cleavage on show and remarks that Claire will need a bigger fan than the one she currently holds. We are also treated to a beautifully comic reaction from Murtagh, who gawks at Claire with his mouth open, until Jamie slaps him. It is another splendid piece of acting from Duncan Lacroix, who makes Murtagh more endearing with each scene.
Following their arrival at what is obviously the utmost of social occasions, Louise sweeps through the room, boasting of her connections to all the noble families and promising to introduce Claire to anyone she wishes. Seizing the opportunity, Claire mentions the finance minister’s name and while Louise warns of Duverney’s “rather gross sensibilities”, she promises to find the man, should he be in attendance.

The Dressing of the King is a male only affair and Jamie and Murtagh soon discover that nothing is private in the royal rooms. King Louis, beautifully portrayed by Lionel Lingelser, is found on a commode in the midst of some digestive distress. His Majesty’s demeanor is reminiscent of the petulance of Charles Stuart and Murtagh and Jamie find themselves disbelieving of the personalities around them, Murtagh wondering aloud whether Jamie will be lucky enough to wipe the royal behind. Instead, Jamie convinces one of Louis’ entourage to introduce him to the king, whereupon he suggests that a regular diet of porridge might cure the King’s current malady.

Meanwhile, Claire is enduring the conversation of the women of the court, who are discussing the amorous nature of one of the male guests, as well the various names for the “male member”. The women reject the English terms that Claire suggests and deem the English language in general to be “unmusical”. Unable to bear their chatter any longer, Claire leaves to get some air, but not before she and Louise witness Mary Hawkins in conversation with a man other than her intended. Louise also spies the French finance minister and true to her word, proceeds to engage Monsieur Duverney in flirtatious conversation. Interpreting Louise’s comments to mean that Claire is anxious for an amorous encounter with him, Duverney sets out to find her.

Fortunately, no harm has been done in this regard. Duverney is full of apologies, which Jamie and Claire are all too pleased to accept. With their mutual declaration of friendship and the promise of future games of chess, the
conversation is halted by the arrival of the King, now off his commode and

Jamie follows Murtagh to see the object of his wrath, managing just in time to stop Murtagh from drawing his sword on the Duke of Sandringham.
They are soon joined by Claire, who like Murtagh, is not at all pleased to be reunited with the Duke.


Both Simon Callow and Laurence Dobiesz play their parts beautifully in this scene. Simon Callow is by turns deliciously insincere and downright vengeful, to the point where we thoroughly understand Murtagh’s earlier labelling of the Duke as Judas. Meanwhile, Laurence Dobiesz has Tobias Menzies’ vocal patterns and facial expressions down to a tee. He is entirely believable as the younger Randall brother who seems to have no knowledge of his elder sibling’s sadistic personality.

Indeed, there are a number of “off book” moments in this episode. In interviews, Diana Gabaldon has expressed the opinion that it would have been virtually impossible to do a literal transcription of the book, and that Ron Moore has done an expert job in creating an adaptation that leads the characters towards the major events which need to happen in order to faithfully retell the story. This episode seems to be the beginning of this process.
Definitions of the word “unease” include the terms ‘not easy in body or mind; uncomfortable; restless; disturbed and perturbed’. All of the main players are showing considerable unease throughout this episode and it is an overall mood that is transferred to the viewers as well. In a nutshell, we are definitely not in Scotland anymore.
NB. This recap was written by Susie Brown, a teacher-librarian and writer who lives in Australia. She felt considerably uneasy throughout this episode!
****************************************************************************
“LET’S BE FRANK”
A recap of Season Two Outlander, episode 201 Dragonfly in Amber,
from your Aussie blogging lass!
OUTLANDER HOMEPAGE ORIGINALS, Written by Admin, Susie Brown


There are a number of parallels with season 1 all throughout the first episode, all cleverly woven into the narrative. We open to a distressed Claire laying at the base of the stones at Craigh na Dun, with a voiceover declaring that she’d wished she were dead. In the first episode of season 1, Claire had no idea what had happened to her and once she’d worked it out, was desperate to return to the future. This time, Claire knows exactly what has gone on, but is desperate to be back in the past.


Indeed, book fans may wonder this too, as the first half of the episode represents a fairly big diversion from Diana Gabaldon’s version of events. In a recent interview, Ronald D Moore spoke of the process of creating new scenes for tv and how he took bits from other books in the series, as well as reworking conversations and descriptions into new dialogue between the main players. This is a spectacular piece of production magic, because what emerges from the whole process is the fleshed out character of Frank Randall. It is easy to forget Book Frank, because we experience the story through Claire’s eyes and her heart belongs to Jamie from early on. But the TV series forces us to consider the man she left behind. How would it have felt to have your wife disappear? How would you cope, having to constantly deal with people telling you that she’d run off? And how would you feel when she returned, years later, pregnant and obviously mourning another man? It’s a lot to deal with and we get to watch some of it play out on the screen. TV Frank is joyful at his wife’s return; uncertain in her company and confused by her largely distant behaviour. He is a man desperate for them to return to the life that had been theirs, but intelligent enough to know that this is unlikely to happen easily.

Back at the Wakefield house, the Reverend and Frank discuss the authenticity of Claire’s clothes and how she could possibly have acquired them. As Ronald D Moore has explained, Book Frank had not been told the story of the stones, but TV Frank has been, which gives him the option of being more likely to believe what has happened to Claire. Throughout the conversation, both men look out into the garden, watching Claire turning pages of books and mentioning her obsessive research into Scottish history and the Jacobite cause. Reverend Wakefield presses the need for Frank to be given some answers, but Frank says that Claire will speak when she is ready. He is a man lost and unsure, still in love with a woman who, despite his best efforts, no longer seems to be in love with him.


But as Claire prepares to leave, packing Jamie’s charred ring into her suitcase and looking at her reflection in the mirror with a protective hand on her pregnant belly, we know that she will never be free of her “ghost”. In another clever parallel, she is wearing the same coat and carrying the same suitcase as in season 1. Presumably, Frank had kept her possessions all this time, in the hope that she would return to him. Meanwhile Frank burns her 18th century gown in a bin below her window as the music of Bear McCreary’s Frank theme grows in intensity, and Claire watches the smoke from the fire rise into the distance. The close up of her face looking skyward is reminiscent of the shot from Season 1 when Jamie and Claire rode towards Lallybroch, speaking of planes. Almost on cue, we realise that Claire is indeed sitting in a plane, having just arrived in Boston. With a look at the skyline, she hesitates before stepping onto the tarmac. Frank reaches out his hand, which she takes. Finally, she seems a little less haunted.

From here, the story is back “on book”, with events panning out as Diana Gabaldon’s chapters dictated. But before continuing with the France section of the episode, some kudos must be given to Tobias Menzies. Early reviews have used the phrase “a masterclass in acting” and it is certainly that. We ended season 1 loathing the evil Black Jack Randall - a sadist, a man without honour, a man devoid of feeling. Yet within moments of the start of season 2, we are feeling real sympathy for Frank Randall - a realist, a man with honour, a man displaying joy, sorrow, despair and love. The fact that these characters are so diametrically opposed would not be unusual, except for the fact that they are portrayed by the same actor. Tobias Menzies deserves every accolade for his performance in this episode. It is truly beautiful.

As we become reacquainted with the Frasers, it is obvious that all is not quite right. In a parallel from the first half of the episode this time, it is Jamie who is a shadow of his former self. He looks younger, thinner and in pain, both physically and emotionally. By contrast, Claire has regained all of her strength. She is in the one in charge, reassuring Jamie, counselling him on the need to go through with their plan, for the sake of the future. Jamie agrees, despite his considerable doubts, because of his love and trust in her, but what to tell Murtagh is another matter.


“Through a Glass, Darkly” is an intense hour of television that covers a lot of ground - some familiar, some new. The episode succeeds in every way, showing the full gamut of emotions of all the major players, regardless of the time period from which they come and hinting at the drama that lies ahead. It remains to be seen how often we will return to the 1940s, but one thing is clear, emotions are going to run high this season. We’d better get ready!

NB. This episode recap was written by Susie Brown, an author, teacher-librarian and ardent Outlander fan who lives in Australia. She is firmly on Team Jamie, but does have enormous sympathy for TV Frank!
***************************************************************************
No comments:
Post a Comment